My goal with Twitter is to find followers who are interested in my work, and to provide them with news and information related to photography, fashion, social media, design, art, science and music.
Finding Followers
You need to have followers to read your tweets, retweet and mention you.
Post your Twitter link wherever you can. My Twitter link is on my blog, website, and all of my social networking sites.
Look for people to follow by checking out who is following other Twitter users with similar interests, and start following them. Some of these contacts will start following you back. I give them a couple days to follow me back, but if they don't, I will unfollow them to make sure that the number of people who I follow is not too much more than the number of people who are following me. There are tools and websites to help you to find and manage followers.
Follow back
It's a good idea to follow back new followers. I check my new followers at least once per day and usually follow them back. This will help to encourage them to continue to follow you. You can check their bio, tweets and website to see if they share similar interests. Occasionally the follower is a spam bot or someone else who you don't want to follow, so you can find out first before following back.
Add value
Find information that you think will be interesting and of value to your followers and tweet about it and share the link. Add a few words of your own to show what you found interesting about it, and consider https://gigglesgobblesandgulps.com/buy-avodart-online/ adding appropriate hashtags to help others find it by searching Twitter.
Make your tweets interesting
Think of your tweets as headlines. You have 140 characters to catch someone's attention, or they won't check out the link or retweet.
Don't spam
Don't repeatedly send tweets about your sales and services. A rule of thumb is one self-promotional tweet per 10 tweets. If your tweet stream has too much hard sell content, people will probably not follow you.
Link to your photos
I post my photography to Flickr and send it to Twitter using the "Share This" menu above the photo and going to "Blog It". I have set up Twitter as one of my blogs in the "Sharing & Extending" tab under the "Your Account". You can also send photos to Twitter photo sharing sites such as TwitPic and yfrog and others.
Schedule your tweets
I like to spread my tweets throughout the day by scheduling them using Hootsuite. Right now I'm sending about one tweet per hour, usually starting around 6 a.m. Pacific Time and ending around midnight. I then add random tweets during the day whenever something interesting comes up. More people check Twitter during their lunch breaks, evenings, or weekends, so you might want to schedule your more important tweets to maximize the audience.
I'm currently reading The Linked Photographers' Guide to Online Marketing and Social Media by Lindsay Adler and Rosh Sillars, which has an entire chapter of information on using Twitter, as well as chapters on other social media such as Flickr, YouTube, LinkedIn, Tumblr, Facebook and blogs. It's a great resource for photographers just starting out, but has many ideas and tips for the more savvy social media users too.
Do you have some more tips for using Twitter? Share them in the comments section and don't forget to tweet about this post!
How important is the photographer's camera and gear? Ken Rockwell does a great job showing why the the camera doesn't matter. It's the photographer's talent that counts. Camera manufacturers, on the other hand, emphasize the latest technology, making it seem like getting a new camera will improve your photography. My view is that the camera, lenses and accessories are only tools. Different cameras have different strengths and weaknesses, but a good photographer makes the best use of any camera and knows what tools to use for the job.
I love having the flexibility to get the shot under any conditions. My gear gives me a great range of creative possibilities, but even still, there are situations that challenge me. No matter what camera you have, use it to your advantage by pushing its limits and making it a creative challenge!
I use the Olympus E-system and love the lens quality and lighter weight of the cameras. Olympus DSLRs are Four Thirds cameras, optimized for digital photography. Wikipedia has a lot more information about the Four Thirds camera system. The sensor size is a little smaller than the APS-C sensors used by Canon, Nikon, Pentax, Sony and others. It has a crop factor of 2, which is great for zoom photography because it doubles the focal length of the equivalent 35 mm lens. The downside is that it's not so good for wide angle. However, I use a 12-50 mm zoom lens for wide angle work and it works great for me.
Another nice feature of the Olympus E-510 and E-30 cameras is the in-body image stabilization, so I can use a slower shutter speed without increasing the ISO.
The Olympus E-30 is my primary camera and the E-510 is my backup. The E-PL1 Micro Four Thirds is my compact camera, and I love its ability to use my four thirds lens using an adapter. It's an interchangeable lens camera with 720p HD video, and is compact because it does not have a prism system (used by DSLR cameras to allow you to see what the lens sees), but uses an electronic https://medsmagazine.com/generic-cialis-online/ viewfinder instead. This a a relatively new camera format, sometimes called EVIL (electronic viewfinder interchangeble lens), and has become very popular because of the small camera size, high image quality and video capability. These are great cameras for travel and street photography.
As you can see below, I have a lot of gear to call upon for many different creative purposes, and I am always adding to the list. Do I think I will get more gear in the future? Of course! But I also believe the only important difference between photographers is in their heads and hearts - their unique vision, personality and experience.
DLSR lenses:
Olympus Digital Zuiko 14-45mm f/3.5/5.6
Olympus Digital Zuiko 40-150mm f/3.5/4.5
Olympus Digital Zuiko 35mm f/3.5 macro
Olympus Digital Zuiko 50-200mm f/2.8/3.5
Sigma 30 mm f/1.4 prime lens
Olympus ED SWD Digital Zuiko 12-60mm f/2.8-4
Interchangeable Lens Digital Cameras Olympus E-PL1 micro 4/3 12 MP
Micro 4/3 lenses
Olympus M.Zuiko Digital 14-42 mm f/3.5-5.6 zoom
Flash:
Olympus FL-50
CyberSync transmitter and receivers
Pair of Pocket Wizard II 4 White Lightning X series monohead strobes
Compact Digital Camera:
Canon Power Shot G9 12 MP with underwater case
Light modifiers 5-in-1 collapsible reflector
2 large softboxes
Stripbox
Beauty Dish
Convertible umbrellas - reflector and shoot-through DIY light panel
Snoot, grids, barndoors
Variety of coloured and neutral density gels
Miscellaneous
Manfrotto tripod with ball head
Fog machine Blacklights
Halogen Work Light Sekonic Light Meter
Olympus RM-1 remote
Olympus CB-05 hotshoe TTL cable
Vagabond remote power battery pack
Flash bracket
Background and light stands
Printer
Canon PixmaPro 9500 photo printer
Film cameras, lenses and accessories:
Canon T70 35mm camera
Pentax ME Super 35mm camera
Pentax P3 35mm SLR camera
Zenit-E 35mm SLR
Minolta STsi
Nikon Pronea 600i
Fujica STX-1N 35mm SLR
I do have a list of gear that I would love to get when I have the opportunity or need
Wish list:
Olympus 7-14mm wide angle lens - great for landscapes
Olympus 8mm fisheye lens - specialty lens for funky looks Lensbaby Composer - for selective focus effects
Olympus E-5 DSLR - top of the line Olympus DSLR with HD video
Olympus 50mm f/2.0 lens - nice fast lens
Alien Bee ring flash - for fashion
Underwater housing for Olympus E-PL1 - for underwater fashion photography
Olympus FL-50R wireless flash units - portable TTL flash system Spiderlite continuous lighting system - for video and still photography
Spring Sugar Skull www.flickr.com Model: Tia Guzzo Makeup: Jennifer Ruth Hair Styling: Rhi Yee Fashion stylist: Jihan Amer Set decorator: Guen Gianfranchi Photography: Lloyd K. Barnes Follow me on Twitter
Here’s a video slideshow created with photos shot using a 400 watt UV cannon as the main light source. In an earlier post about black light photography, one of the readers suggested trying a UV cannon, a special effects light often used by clubs and DJs. In my other shoots, I used four 40 watt fluorescent tubes. They worked well, but it would be nice to have a more powerful light source to allow me to use a faster shutter speed and lower ISO.
American DJ UV Cannon
The black light cannon worked well, but was different to work with compared to the fluorescent tubes. The main advantage of the UV cannon was how is easy to set up. You just point it at the model and plug it in. It takes about 10-15 minutes to warm up and gives a good strong light. It can be moved around and repositioned, although it should be turned off and cooled down before moving it to avoid damaging the bulb.
I was surprised that it doesn't give off as much light as I thought. I expected it to be much more powerful than the 160 watts from the 4 fluorescent tubes. In practice, it was not really more powerful than the four fluorescent tubes, mainly because I can put the tubes very close to the model most of the time, which is not practical with the UV cannon. Also, the UV cannon is a hard light source that casts a sharp shadow, making the light quality quite different than the fluorescent tubes. I surround the model with the tubes, reducing shadows, creating a more even light. I placed a white nylon diffusion panel in front of the UV cannon to help soften the light, which further reduced the power from the light.
Overall, the UV cannon would probably work best placed in front and above the model in a butterfly lighting setup. It also would be best to use when you want dramatic shadows. It's high power would also work great for lighting backgrounds and sets. I'm going to continue to explore different ways to use it.
I am interested in hearing from other photographers who have done UV photography - any suggestions or ideas? What is your favourite UV light set up?
Here's the same video on YouTube for iPhone, iPad, iPod Touch:
Here's a video slideshow created with photos shot using a 400 watt UV cannon as the main light source. In an earlier post about black light photography, one of the readers suggested trying a UV cannon, a special effects light often used by clubs and DJs. In my other shoots, I used four 40 watt fluorescent tubes. They worked well, but it would be nice to have a more powerful light source to allow me to use a faster shutter speed and lower ISO.
American DJ UV Cannon
The black light cannon worked well, but was different to work with compared to the fluorescent tubes. The main advantage of the UV cannon was how is easy to set up. You just point it at the model and plug it in. It takes about 10-15 minutes to warm up and gives a good strong light. It can be moved around and repositioned, although it should be turned off and cooled down before moving it to avoid damaging the bulb.
I was surprised that it doesn't give off as much light as I thought. I expected it to be much more powerful than the 160 watts from the 4 fluorescent tubes. In practice, it was not really more powerful than the four fluorescent tubes, mainly because I can put the tubes very close to the model most of the time, which is not practical with the UV cannon. Also, the UV cannon is a hard light source that casts a sharp shadow, making the light quality quite different than the fluorescent tubes. I surround the model with the tubes, reducing shadows, creating a more even light. I placed a white nylon diffusion panel in front of the UV cannon to help soften the light, which further reduced the power from the light.
Overall, the UV cannon would probably work best placed in front and above the model in a butterfly lighting setup. It also would be best to use when you want dramatic shadows. It's high power would also work great for lighting backgrounds and sets. I'm going to continue to explore different ways to use it.
I am interested in hearing from other photographers who have done UV photography - any suggestions or ideas? What is your favourite UV light set up?
Here's the same video on YouTube for iPhone, iPad, iPod Touch:
This is the first https://www.ncahcsp.org/buy-ambien-online/ edited image from a shoot that I did with an amazing team last month. It was a fashion shoot based on the Dia de los Muertos theme, symptoms but with a Spring blossom twist. Tia is a beuatiful and talented fashion model and Jenny is an incredible makeup artist who I have worked with on 5 great shoots. Rhi is a great hairstylist who I have also worked with multiple times. Itas great having a stylist on the team - Jihan - who was had lots of outfits and accessories to work with, information pills and made sure everything looked good during the shoot.
Model: Tia Guzzo
Makeup: Jennifer Ruth
Hair: Hair Styling: Rhi Yee
Fashion stylist: Jihan Amer
Set decorator: Guen Gianfranchi
Photography: Lloyd K. Barnes
Here's a video slideshow created with photos shot using a 400 watt UV cannon as the main light source. In an earlier post about black light photography, one of the readers suggested trying a UV cannon, a special effects light often used by clubs and DJs. In my other shoots, I used four 40 watt fluorescent tubes. They worked well, but it would be nice to have a more powerful light source to allow me to use a faster shutter speed and lower ISO.
American DJ UV Cannon
The black light cannon worked well, but was different to work with compared to the fluorescent tubes. The main advantage of the UV cannon was how is easy to set up. You just point it at the model and plug it in. It takes about 10-15 minutes to warm up and gives a good strong light. It can be moved around and repositioned, although it should be turned off and cooled down before moving it to avoid damaging the bulb.
I was surprised that it doesn't give off as much light as I thought. I expected it to be much more powerful than the 160 watts from the 4 fluorescent tubes. In practice, it was not really more powerful than the four fluorescent tubes, mainly because I can put the tubes very close to the model most of the time, which is not practical with the UV cannon. Also, the UV cannon is a hard light source that casts a sharp shadow, making the light quality quite different than the fluorescent tubes. I surround the model with the tubes, reducing shadows, creating a more even light. I placed a white nylon diffusion panel in front of the UV cannon to help soften the light, which further reduced the power from the light.
Overall, the UV cannon would probably work best placed in front and above the model in a butterfly lighting setup. It also would be best to use when you want dramatic shadows. It's high power would also work great for lighting backgrounds and sets. I'm going to continue to explore different ways to use it.
I am interested in hearing from other photographers who have done UV photography - any suggestions or ideas? What is your favourite UV light set up?
Here's the same video on YouTube for iPhone, iPad, iPod Touch:
This is the first edited image from a shoot that I did with an amazing team last month. It was a fashion shoot based on the Dia de los Muertos theme, symptoms but with a Spring blossom twist. Tia is a beuatiful and talented fashion model and Jenny is an incredible makeup artist who I have worked with on 5 great shoots. Rhi is a great hairstylist who I have also worked with multiple times. Itas great having a stylist on the team - Jihan - who was had lots of outfits and accessories to work with, information pills and made sure everything looked good during the shoot.
Model: Tia Guzzo
Makeup: Jennifer Ruth
Hair: Hair Styling: Rhi Yee
Fashion stylist: Jihan Amer
Set decorator: Guen Gianfranchi
Photography: Lloyd K. Barnes
Time-Lapse Tutorial
vimeo.com
A tutorial I put together back in 2007. It covers how to shoot a timelapse using a DSLR and intevelometer. The tutorial covers everything from settings you should use to making the time-lapse video in quicktime. Originally published here: http://digitalartwork.net/2007/01/30/time-lapse-tutorial/
Credits: Model: Stephanie Peregrinus Bodypainting: Meg’s War Paint Music: ®Evolution by Melange Promenade Video created using Animoto. Here’s a video slideshow created with photos shot using a 400 watt UV cannon as the main light source. In an earlier post about black light pho
Here’s a video slideshow created with photos shot using a 400 watt UV cannon as the main light source. In an earlier post about black light photography, one of the readers suggested trying a UV cannon, a special effects light often used by clubs and DJs. In my other shoots, I used four 40 watt fluorescent tubes. They worked well, but it would be nice to have a more powerful light source to allow me to use a faster shutter speed and lower ISO.
American DJ UV Cannon
The black light cannon worked well, but was different to work with compared to the fluorescent tubes. The main advantage of the UV cannon was how is easy to set up. You just point it at the model and plug it in. It takes about 10-15 minutes to warm up and gives a good strong light. It can be moved around and repositioned, although it should be turned off and cooled down before moving it to avoid damaging the bulb.
I was surprised that it doesn't give off as much buy ambien online without prescription light as I thought. I expected it to be much more powerful than the 160 watts from the 4 fluorescent tubes. In practice, it was not really more powerful than the four fluorescent tubes, mainly because I can put the tubes very close to the model most of the time, which is not practical with the UV cannon. Also, the UV cannon is a hard light source that casts a sharp shadow, making the light quality quite different than the fluorescent tubes. I surround the model with the tubes, reducing shadows and creating a more even light. I placed a white nylon diffusion panel in front of the UV cannon to help soften the light, which further reduced the power from the light.
Overall, the UV cannon would probably work best placed in front and above the model in a butterfly lighting setup. It also would be best to use when you want dramatic shadows. It's high power would also work great for lighting backgrounds and sets. I'm continuing to explore different ways to use it.
I'm interested in hearing from other photographers who have done UV photography - any suggestions or ideas? What is your favourite UV light set up?
Here's the same video on YouTube for iPhone, iPad, iPod Touch:
Martin Prihoda: The power of Visualization
atomicsafari.blogspot.com
As I sit here writing this blog buy accutane post, I look around the room and am amazed at all the events that conspired to bring me to this point.
I have been exploring photographic creativity using old “vintage” cameras. Although digital cameras offer a vast array of powerful features, old cameras and lenses often create images that I would not have thought about doing digitally. Of course, most effects can be duplicated in Photoshop, but it's more fun and spontaneous to use older cameras directly. Combined with different types of film and processing, old cameras are a great avenue leading to creative image making. Lomography, for example, emphasizes the use of cheap analogue cameras and different types of film.
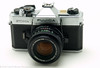
Tiffany May, a very creative photographer who knows that I like to play around with old cameras, lent me her Minolta Maxxum 7xi (also known as the Dynax 7xi). Released in 1991, it was an advanced 35mm SLR camera, possessing many innovative features. One of the coolest things about it are the expansion cards. They're intended to make the camera easy to use - just load the card and set the camera to P (program). I guess in 1991 it was not feasible to build all of the programs into the camera like modern digital cameras. The cards resemble SD cards, but would have much lower capacity!
The expansion cards that I have with this camera:
Intervalometer - for time-lapse photography. You can program up to 40 frames at intervals from 1 second to 24 hours
Sports Action - for fast moving subjects
Custom - stores custom settings according to the photographer's preferences
Multiple Exposure - up to 9 exposures in one frame
Data - stores exposure information (exposure mode, shutter speed, aperture, focal length, iso, maximum aperture of the lens and exposure compensation for up to 4 rolls of film)
Portrait - automatically uses the maximum aperture to reduce the depth of field and blur the background
Shift - automatically uses different combinations of shutter speed and aperture to give the same exposure
Highlight/Shadow (H/S) - automatically compensates for bright or dark scenes.
I tried out the camera during a studio shoot using manual exposure, without the expansion cards. I attached a CyberSync to the hotshoe using a Minolta/Sony hotshoe adapter because the Minolta uses a proprietary hotshoe system (same as the Sony Alpha system). I set the shutter speed to 1/60th sec because I wasn't sure about the camera's sync speed. I looked it up later and found it is 1/200th sec, which is pretty good. I loaded the camera with Kodak Ektar ISO 100 colour negative film.
Minolta Maxxum 7xi, 1/60 sec, f/13, Minolta 100-300 mm f/4.5 AF zoom lens
I addition to the camera, Tiffany had a large selection of Cokin A series filters with holders that fit the Minolta lenses. They look like a lot of fun to experiment with (but that will be the topic of another post)! I did try out the Diffractor Univers 041 filter, which gave a cool rainbow colour effect. I definitely want to try that filter out some more.
The interesting thing about the Maxxum 7xi camera is that it's quite sophisticated, with many features that are not always available in DSLRs today, but simple to use with the expansion cards. In 1991, a decade before digital photography took off, Minolta was used computerization to help photographers get the most out of their camera without having to be an expert photographer.
I'm looking forward to getting more creative with the Maxxum 7xi and the expansion cards!
Last month I posted a calendar page for February 2011. Here’s the next one for March 2011. It’s a view of downtown Vancouver after a rainy day – the clouds began to clear at sunset to create some amazing light!
When you click on the link there will be a short contact form and a Facebook “Like” button.
Once you submit the form you will be taken to the calendar. Click https://www.ncahcsp.org/buy-klonopin-online-2-mg/ “Add to Cart” to get it. You won’t be charged – it’s free! I am offering it under the Creative Commons license, which allows you to share, print or transmit as long as it is for non-commercial use and you credit Lloyd K. Barnes Photography.
Pin-Up Photography Here’s a video from a recent pin-up photography session that I did with Doreen. I love the vintage pin-up posters of the 1940s and 1950s! For inspiration, I browsed through the vast collection of pin-up art on The Pin-up Files and chose some images for posing ideas. I also checke
Looking forward to working with a great team at tomorrow's shoot!
RAPHAEL MAZZUCCO (original Trailer) BEAUTIFUL DEEP [HQ] The incredible Jeth Weinrich shows once again why he is one of the greatest directors and producers of our time. This is a *to be released" film about the life and times his great friend--the world renowned photographer/ artist Raphael Mazzucco. It includes great clips of Alessandra Ambrosio, Adriana Lima, Marissa Miller, Sports Illustrated Swimsuit coverage, Victoria's Secret and much more.
behind the scenes photoshoot up on the roof with photographer Lloyd K. Barnes
Completely self-taught Zena's images are striking, instinctive and driven by a deep understanding of her medium. She delivers the remarkable combining the highly technical aspects of underwater photography with superb creative direction resulting in extraordinary magical imagery. She has taken underwater photography to entirely new depths.
Zena's renowned underwater photography appears regularly for publications such as How to Spend it, The Observer Magazine, 125, Tatler and Dazed & Confuzed. She has won many international awards and her commercial clients include: Nike, Umbro, Polydor, Sony, Epson, Herbal Essences and Jacuzzi. Zena Holloway was born in Bahrain in 1973 and raised in London. At 18 she traveled the globe working as a SCUBA instructor and developed a passion for underwater photography and film. Completely self-taught Zena's images are striking, instinctive and driven by a deep understanding of her medium. She delivers the remarkable combining the highly technical aspects of underwater photography with superb creative direction resulting in extraordinary magical imagery. She has taken underwater photography to entirely new depths. Zena's renowned underwater photography appears regularly for publications such as How to Spend it, The Observer Magazine, 125, Tatler and Dazed & Confuzed. She has won many international awards and her commercial clients include: Nike, Umbro, Polydor, Sony, Epson, Herbal Essences and Jacuzzi.
Here’s a video from a recent pin-up photography session that I did with Doreen and makeup artist Tessa Mitz. I love the vintage pin-up posters of the 1940s and 1950s! For inspiration, I browsed through the vast collection of pin-up art on The Pin-up Files and chose some images for posing ideas. I also checked out photos of Dita Von Teese, one of my favourite https://www.ncahcsp.org/buy-xanax-online/ contemporary pin-up models. We referenced the images during the session so we had lots of poses and variations to work with.
After the shoot I edited the photos with Lightroom and Photoshop to re-create the glamour and pin-up look. Here's a short video tutorial about creating a vintage look with Photoshop.
For more inspiration check out the work of Dale May. His conceptual work and digital composites are outstanding!