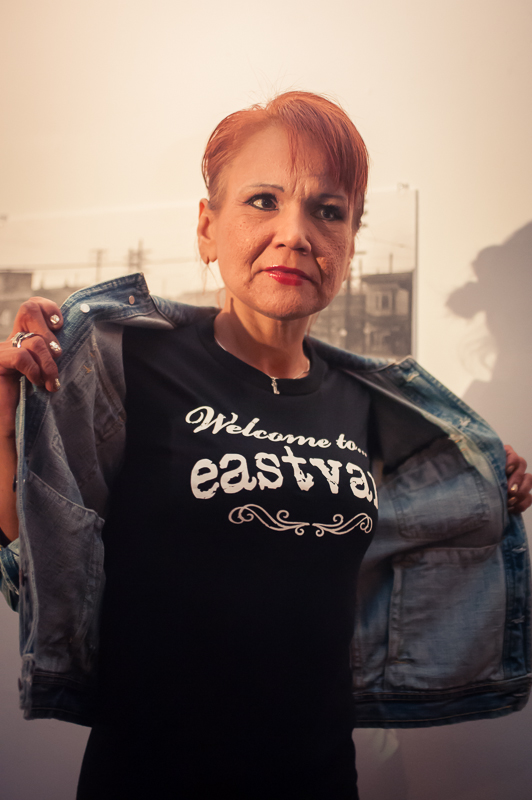
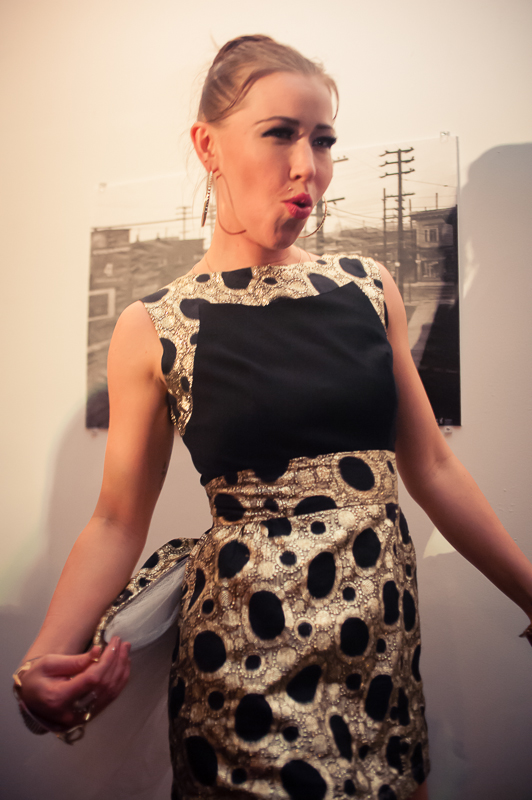
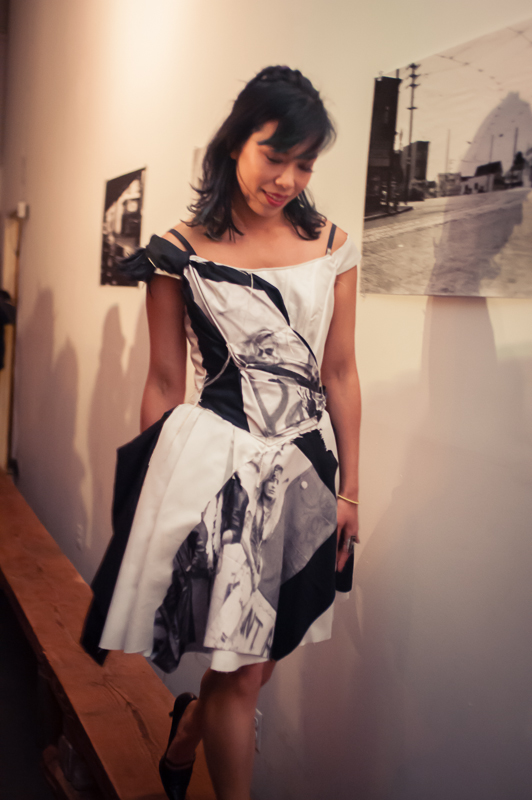
Fashion Show at Shop Wrong with Okalani Style
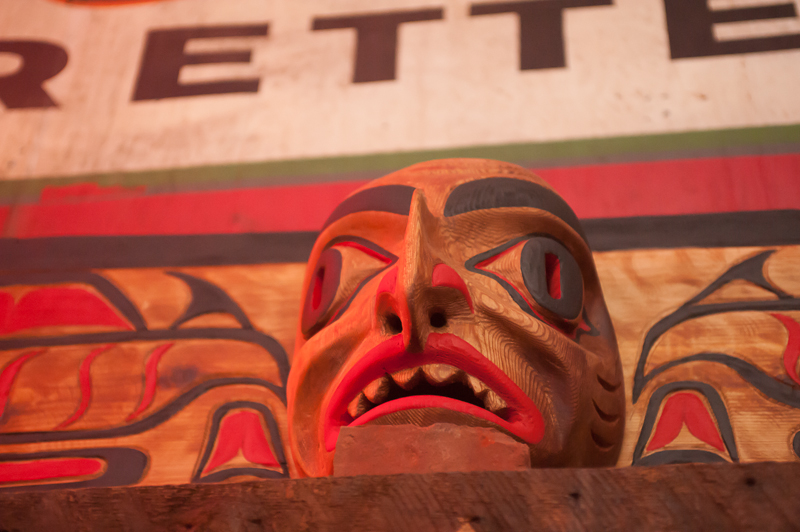
Shop Wrong features local and repurposed fashion, jewellery and accessories. Located in a vintage building in Strathacona, it's a very cool shop, decorated with antique signs and native art, with a definite East Van vibe. To celebrate their opening, Shop Wrong hosted a fashion show on Friday, March 22, 2013, featuring the designs of Okalani https://www.rossitchpediatricdentistry.com/buy-depakote-online/ Style. If you want to support local business in East Vancouver, check out Shop Wrong!
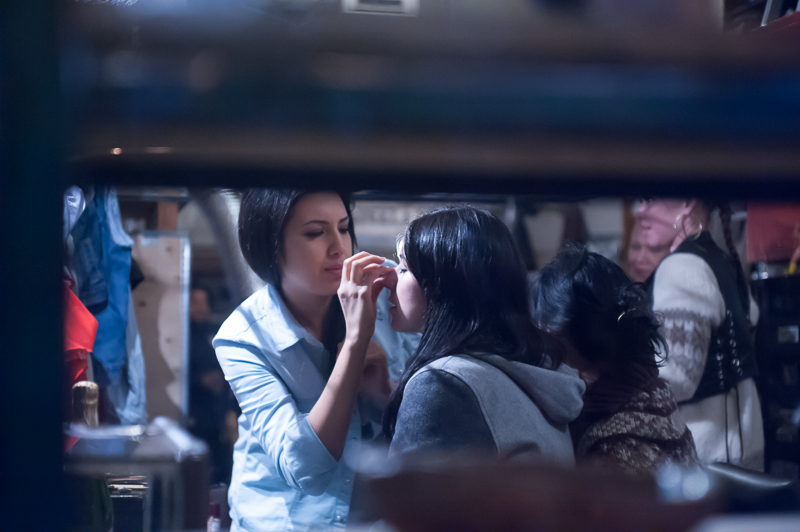
Here are some photos from the show (click thumbnails to see larger size).
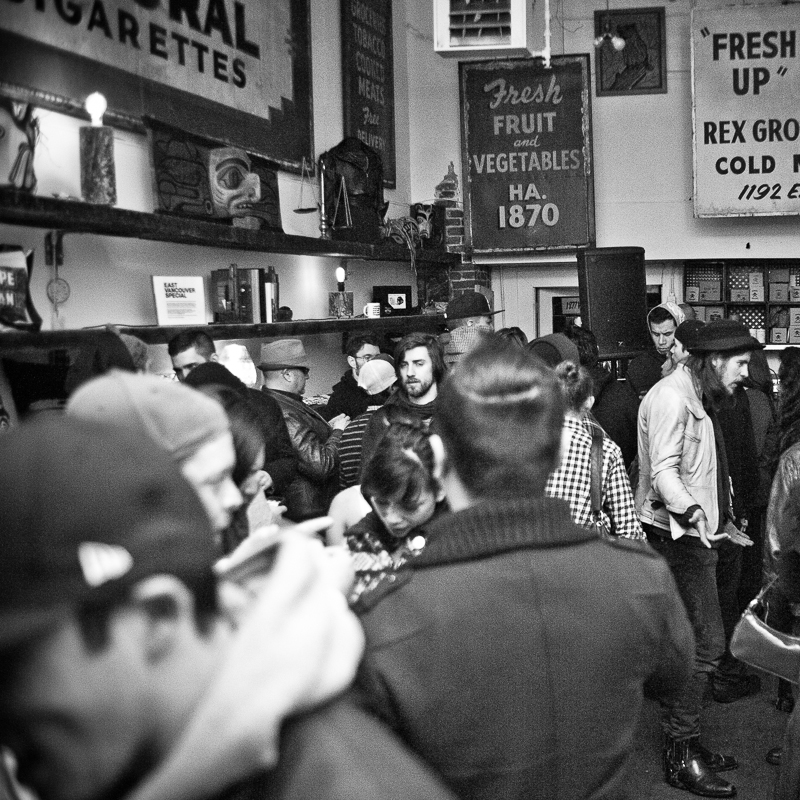
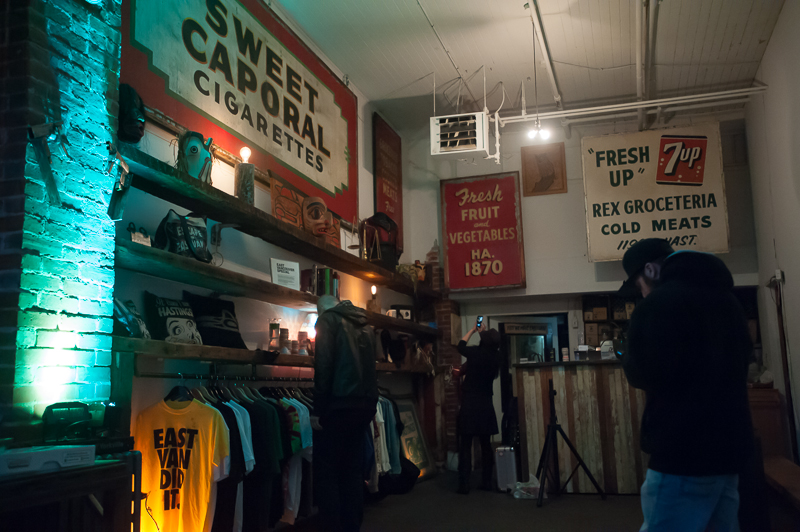


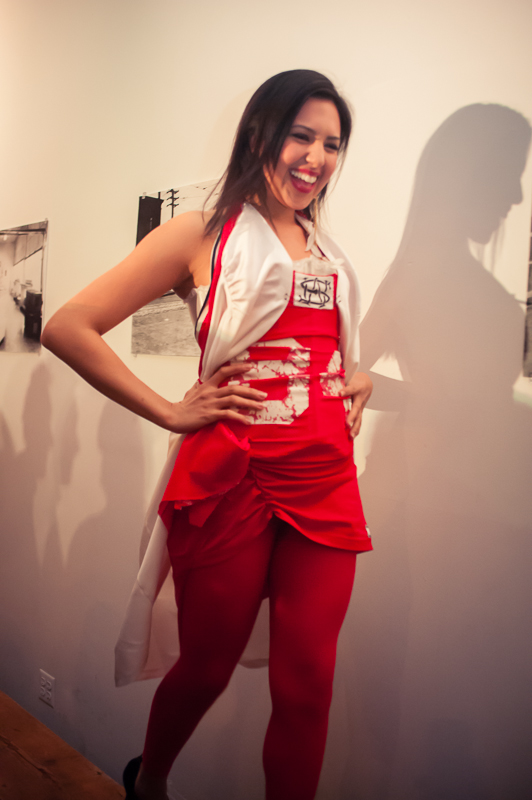
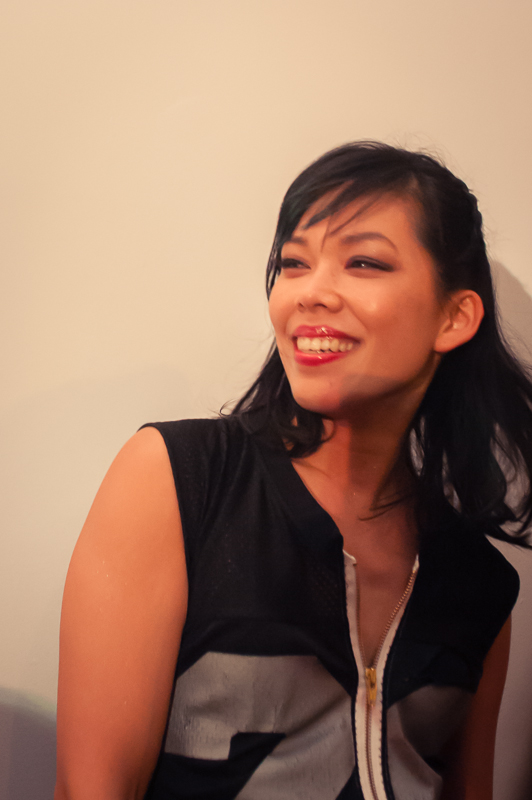
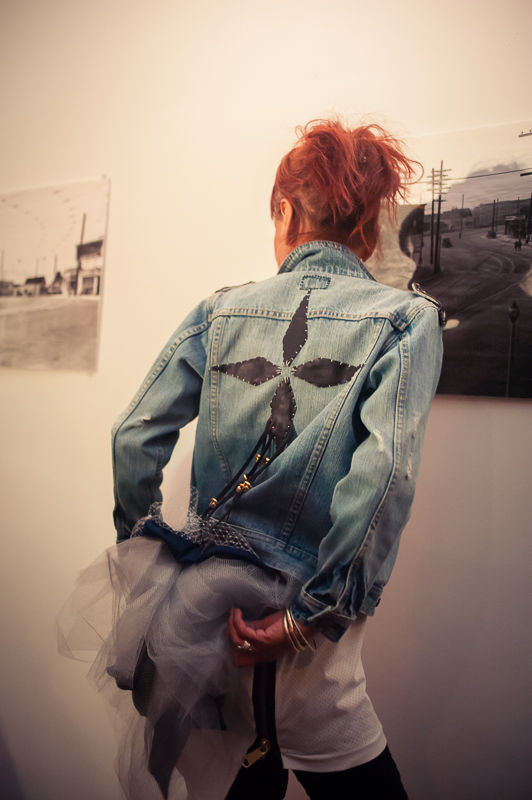


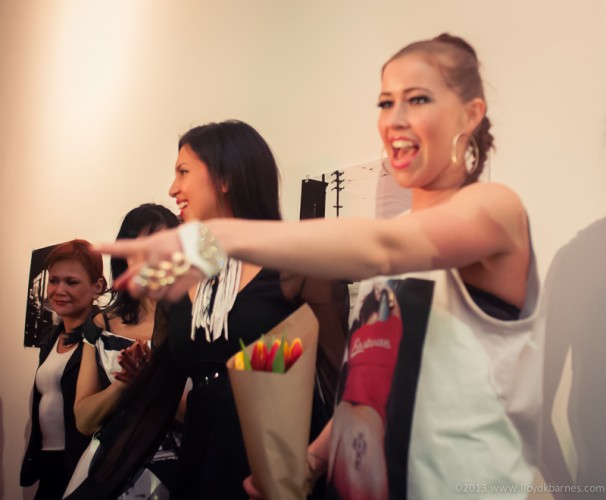
Click the photo to go to the Facebook gallery with many more shots!
Rainbow Butterfly Wallpaper
I recently discovered that an image I created and posted on Flickr is now on many free wallpaper sites without credit. The sites have disclaimers like as this one:
“DISCLAIMER: All wallpapers and backgrounds found here are believed to be in the “public domain”. All of the images displayed are of unknown origin. We do not intend to infringe any legitimate intellectual right, artistic rights or copyright. If you are the rightful owner of any of the pictures/wallpapers posted here, and you do not want it to be displayed or if you require a suitable credit, then please contact us and we will immediately do whatever is needed either for the image to be removed or provide credit where it is due. All the content of this site are free of charge and therefore we do not gain any financial benefit from the display or downloads of any images/wallpaper."
I don't have a problem with non-commercial use of photos that I have shared on social media as long as they are credited appropriately with a link back to the original source. There are many sites (248 hits https://ellisclinic.com/medical/buy-xanax-online/ using buy tramadol Google image search) that are using this photo. I contacted the most popular wallpaper site and they were happy to add the credit and link, or take it down if I preferred. However, since there are so many of these free wallpaper sites, it will be very time consuming to contact each one. So I have decided instead to post the image here for a free download. That way you know who created it and can choose to support the photographer (me) so that I can continue to provide cool images ![]()
I believe that people are happy to pay for art and media if it easy to do so. So, I have made available a larger version for 99 cents so that you can pay for if you wish and help support my work. If you prefer to just use the free version, that's cool too. Click on the button to purchase the 2350 x 3000 pixel version for 99 cents using PayPal:

For the free version, just click on the thumbnail, then right click to save it:
-

- Rainbow Butterfly 1024 x 803 Free Wallpaper

Thanks for your support!
I'll be adding more of my photos for free and premium downloads in the near future, so please subscribe to get updates!
Night Photography

North Star Brand Hot Dog Package c.1964-1974
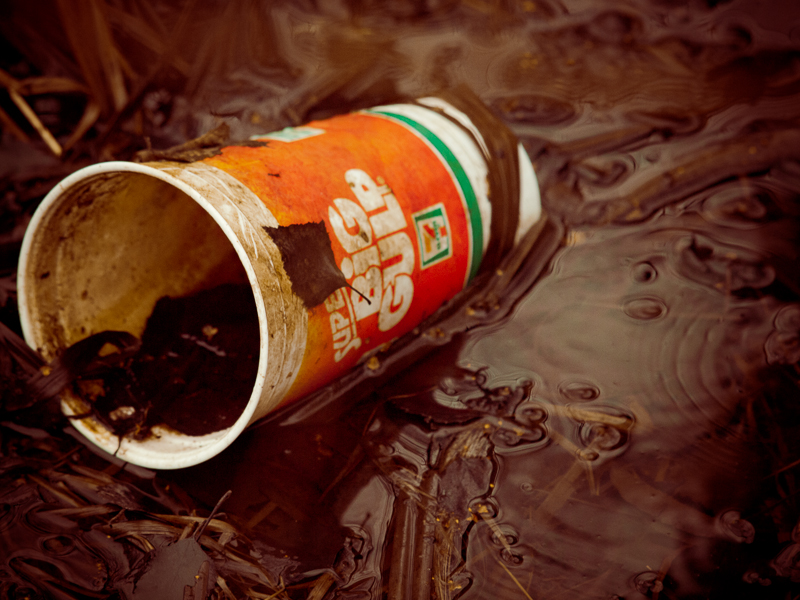
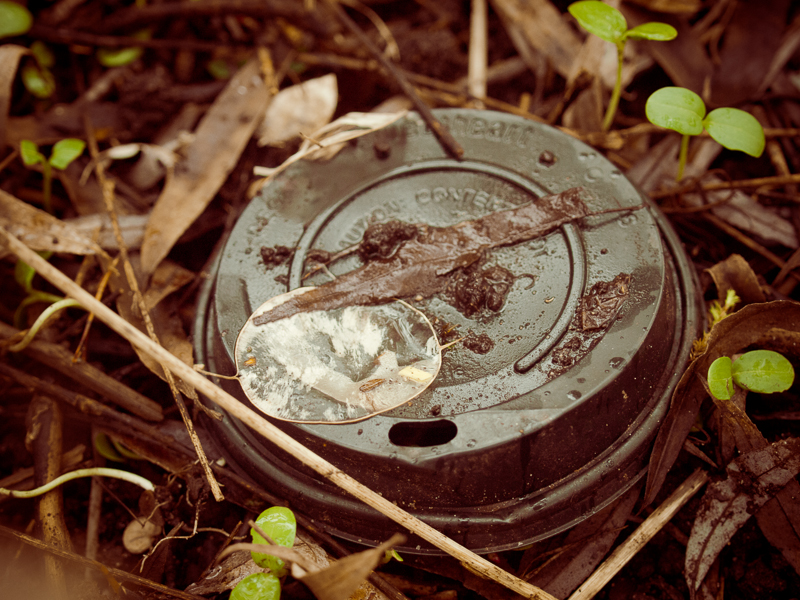
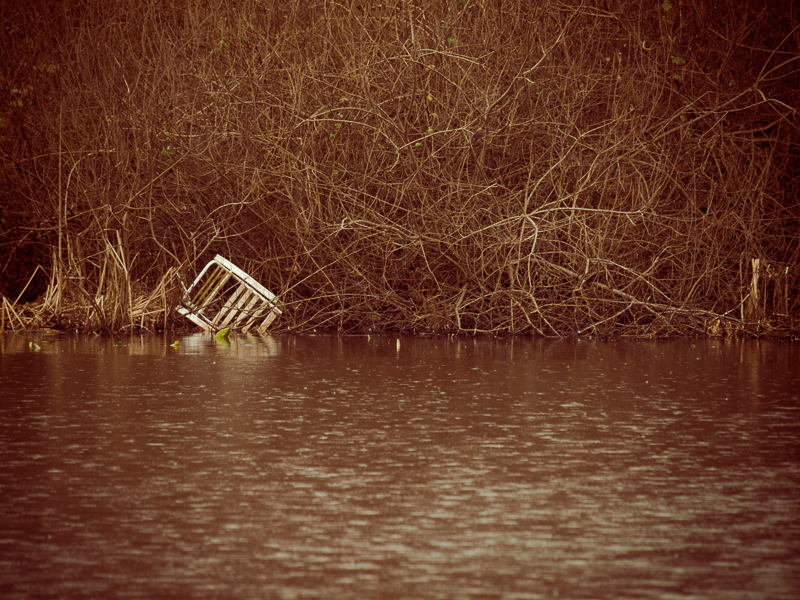
In the previous post, I showed some photographs of plastic waste from a local Vancouver park. This time I went to Spanish Banks, a beautiful natural beach on English Bay. Here's a photo that I took while I was there:
At first it was difficult to spot any plastic - the beach looked pristine. However, after a few minutes, I spotted many pieces of plastic waste. The tide was going out, and I found most of the plastic in the high tide line, mixed in with seaweed and driftwood. I found plastic bags, wrappers, bottles, a cap from a ballpoint pen, styrofoam, food containers and coffee lids. I even found some AstroTurf!
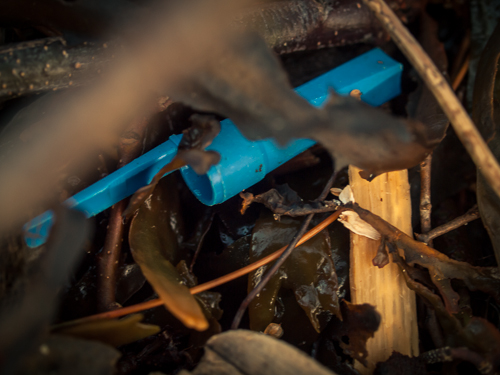
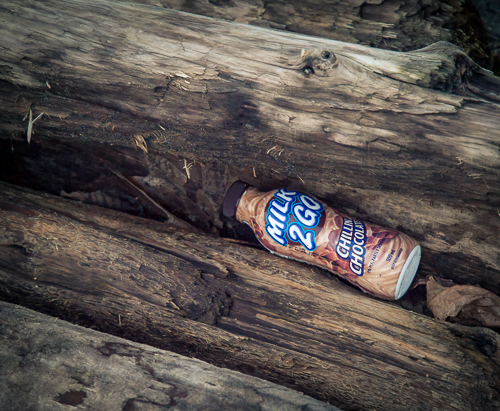
The most interesting waste plastic that I found was a package labeled North Star Brand Wieners by Intercontinental Packers, Vancouver. Although it was made in Canada, it had no French labeling and the weight was in Imperial Units (one pound). Canada introduced bilingual packaging in 1974 and metric weights in the mid-seventies. After a little research, I learned that the company existed in Vancouver from 1964-1994. Incredibly, this package dates from c.1964 - 1974, showing how long plastic persists in the environment. After 40 to 50 years it is still around! It will remain in the environment for another 50 years or much longer, along with all other plastic waste. Unfortunately, much of this waste gets into the ocean, where it is eaten by marine life, often injuring and killing fish, birds, turtles and dolphins. Check out the documentary "Addicted to Plastic" for more information about the problems caused by plastic waste in the environment, along with solutions that will need to be implemented to correct the problem. In the meantime, if you care about the environment, don't litter with plastic waste!
-
- Ballpoint Pen Cap
-
- AstroTurf
-
- Plastic Bottle
Here's another photo from beautiful Spanish Banks:
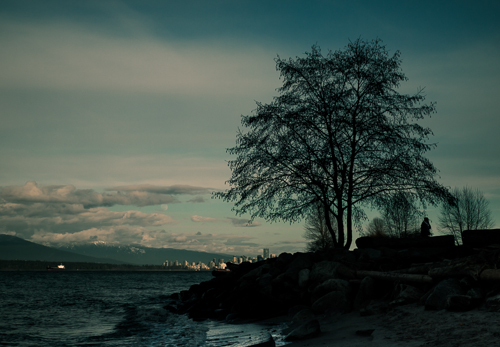
Spanish Banks, Vancouver
North Star Brand Hot Dog Package https://www.rossitchpediatricdentistry.com/buy-lasix-online/ c.1964-1974
In the previous post, I showed some photographs of plastic waste from a local Vancouver park. This time I went to Spanish Banks, a beautiful natural beach on English Bay. Here's a photo that I took while I was there:
At first it was difficult to spot any plastic - the beach looked pristine. However, after a few minutes, I spotted many pieces of plastic waste. The tide was going out, and I found most of the plastic in the high tide line, mixed in with seaweed and driftwood. I found plastic bags, wrappers, bottles, a cap from a ballpoint pen, styrofoam, food containers and coffee lids. I even found some AstroTurf!
The most interesting waste plastic that I found was a package labeled North Star Brand Wieners by Intercontinental Packers, Vancouver. Although it was made in Canada, it had no French labeling and the weight was in Imperial Units (one pound). Canada introduced bilingual packaging in 1974 and metric weights in the mid-seventies. After a little research, I learned that the company existed in Vancouver from 1964-1994. Incredibly, this package dates from c.1964 - 1974, showing how long plastic persists in the environment. After 40 to 50 years it is still around! It will remain in the environment for another 50 years or much longer, along with all other plastic waste. Unfortunately, much of this waste gets into the ocean, where it is eaten by marine life, often injuring and killing fish, birds, turtles and dolphins. Check out the documentary "Addicted to Plastic" for more information about the problems caused by plastic waste in the environment, along with solutions that will need to be implemented to correct the problem. In the meantime, if you care about the environment, don't litter with plastic waste!
-
- Ballpoint Pen Cap
-
- AstroTurf
-
- Plastic Bottle
Here's another photo from beautiful Spanish Banks:
Spanish Banks, Vancouver
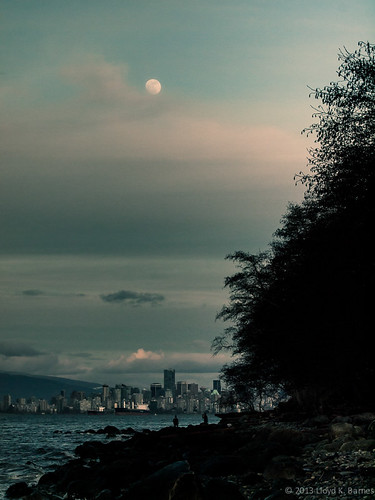
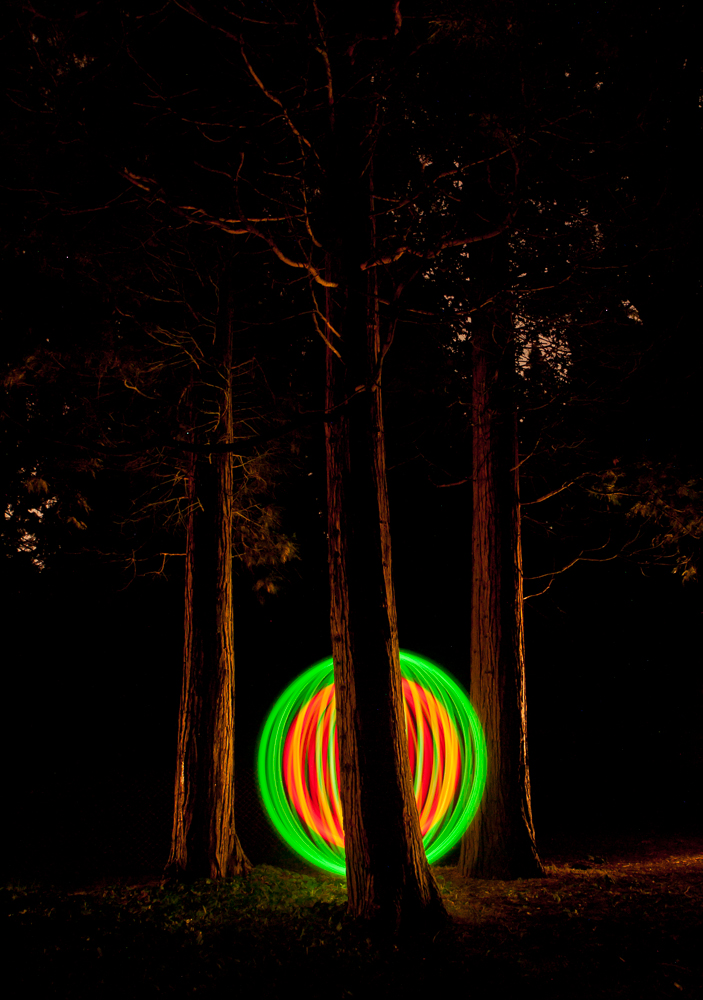
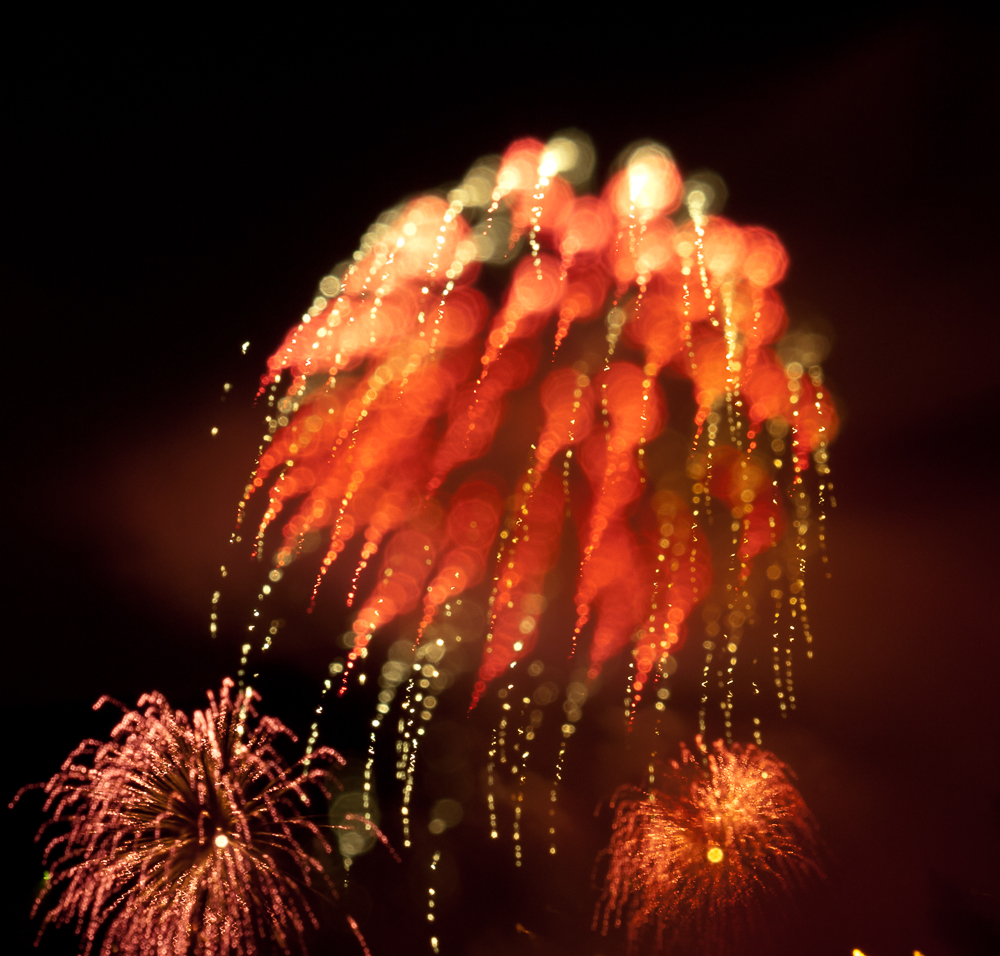
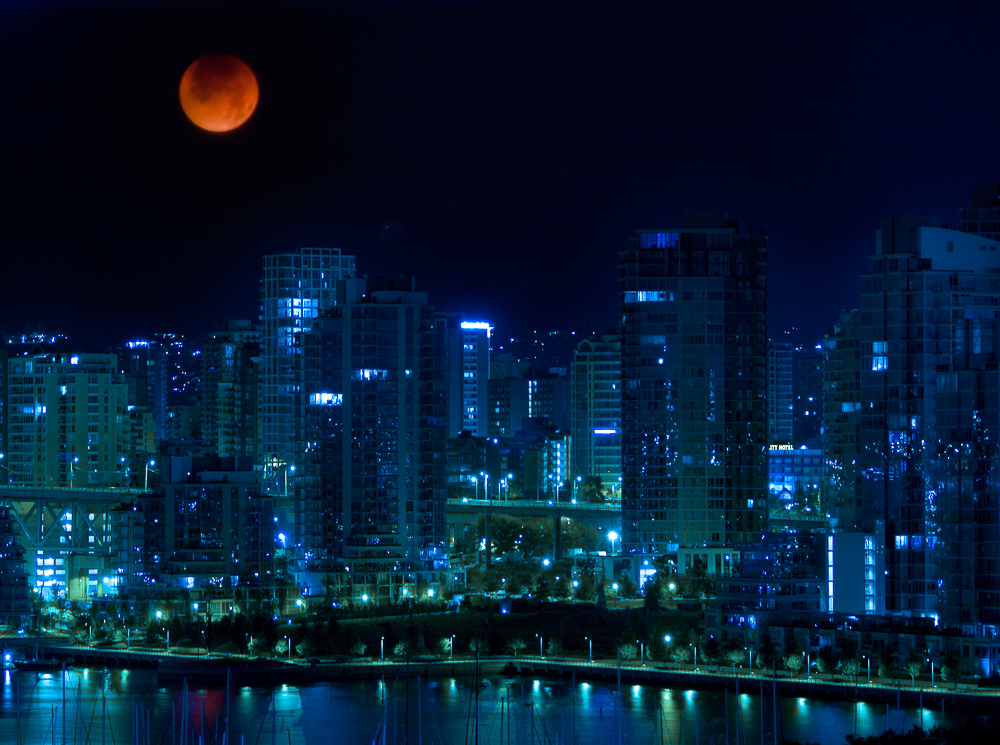
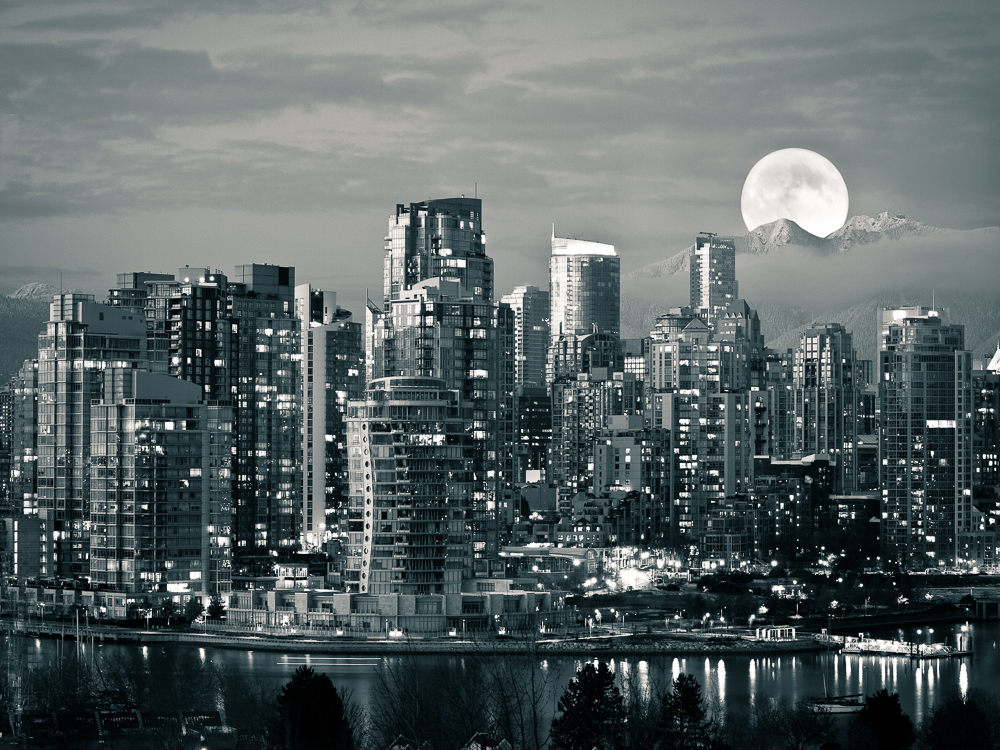
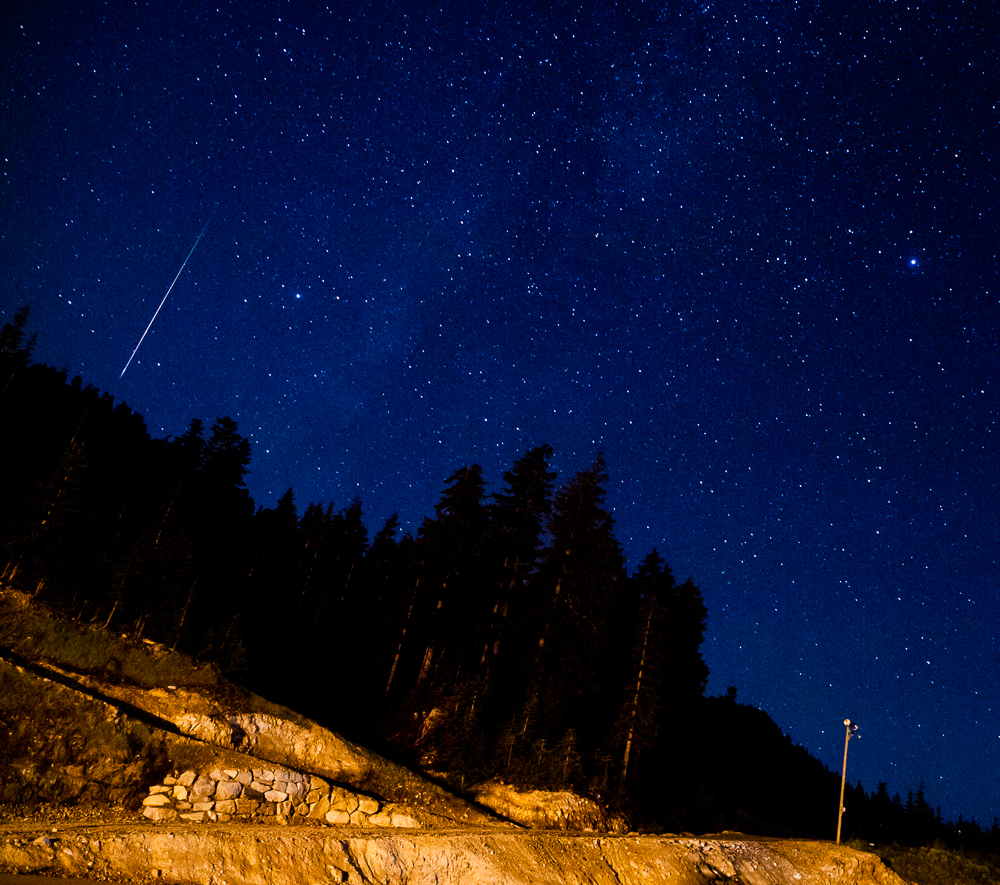
Here are some of my favourite night photographs that I have taken over the last few years. Click on the thumbnails to expand to large size and enjoy!
-
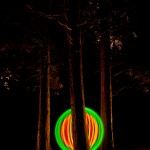
- Light Painted Orb
-
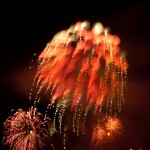
- Fireworks with Focus Blur
-
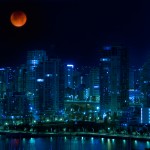
- Lunar Eclipse
-
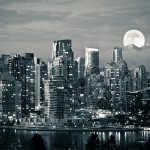
- Moonrise
-
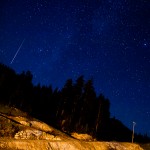
- Perseid Meteor, Cypress Mountain, Vancouver
40 Year Old Plastic at the Beach
North Star Brand Hot Dog Package c.1964-1974
In the previous post, I showed some photographs of plastic waste from a local Vancouver park. This time I went to Spanish Banks, a beautiful natural beach on English Bay. Here's a photo that I took while I was there:
At first it was difficult to spot any plastic - the beach looked pristine. However, after a few minutes, I spotted many pieces of plastic waste. The tide was going out, and I found most of the plastic in the high tide line, mixed in with seaweed and driftwood. I found plastic bags, wrappers, bottles, a cap from a ballpoint pen, styrofoam, food containers and coffee lids. I even found some AstroTurf!
The most interesting waste plastic that I found was a package labeled North Star Brand Wieners by Intercontinental Packers, Vancouver. Although it was made in Canada, it had no French buy xanax online labeling and the weight was in Imperial Units (one pound). Canada introduced bilingual packaging in 1974 and metric weights in the mid-seventies. After a little research, I learned that the company existed in Vancouver from 1964-1994. Incredibly, this package dates from c.1964 - 1974, showing how long plastic persists in the environment. After 40 to 50 years it is still around! It will remain in the environment for another 50 years or much longer, along with all other plastic waste. Unfortunately, much of this waste gets into the ocean, where it is eaten by marine life, often injuring and killing fish, birds, turtles and dolphins. Check out the documentary "Addicted to Plastic" for more information about the problems caused by plastic waste in the environment, along with solutions that will need to be implemented to correct the problem. In the meantime, if you care about the environment, don't litter with plastic waste!
-
- Ballpoint Pen Cap
-
- AstroTurf
-
- Plastic Bottle
Here's another photo from beautiful Spanish Banks:
Spanish Banks, Vancouver
Plastic in the Park
I recently watched the documentary Addicted to Plastic, which explores how plastic has contaminated the environment. Plastic is cheap and much of it gets thrown away. It doesn't biodegrade, so every piece of plastic ever thrown out still exits in the environment. It may take hundreds of years to break down. Although increasingly more plastic is being recycled, much goes to landfills, and some eventually makes its way to the oceans. Tons of plastic are now floating in the oceans. Seals, dolphins, sea turtles, fish and birds consume the plastic because it resembles food. The plastic is often lethal because it cannot be digested and just accumulates in the animals' digestive systems preventing them from getting their normal diets.
I took a walk in Vancouver's John Hendry Park (Trout Lake) to see what plastic garbage I could find lying around. It was not hard to find. At first glance the park looks clean and well cared for. But on closer inspection, there are many bits and pieces of plastic. Here is a small sampling of the typical plastic waste that was lying on the ground. There were buy tramadol on line plastic bags, 6 pack rings, fast food containers, disposable lighters, plastic cutlery, old toys, bottles, cups, coffee lids and cigarette package wrappers. This might be surprising since Vancouver is well known as a clean city, where most people are concerned for the environment, taking care to throw out waste in the numerous containers provided by the city. In the next few weeks, I'll be checking out some other public areas in Greater Vancouver to see how they compare.
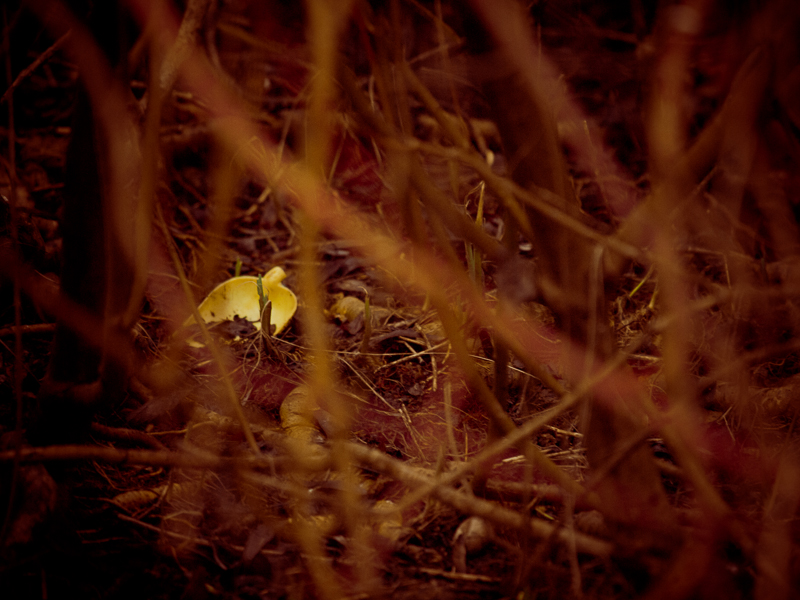


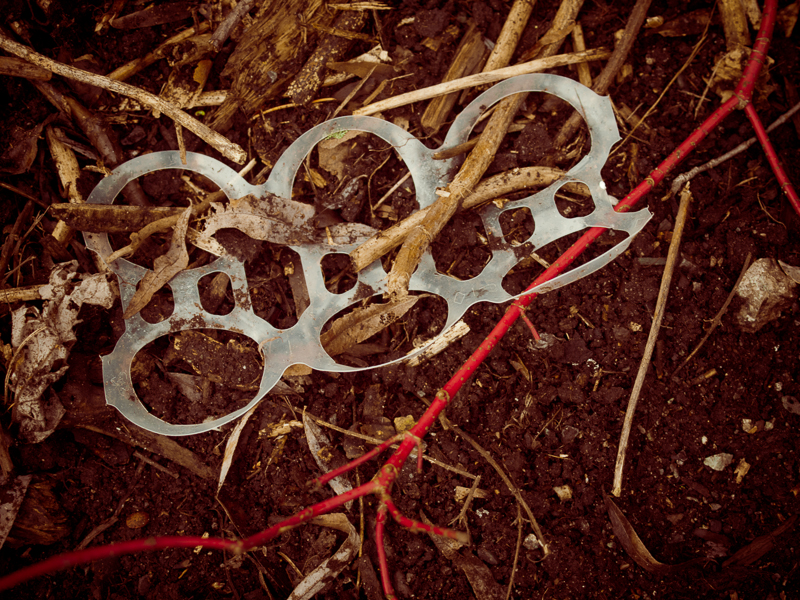
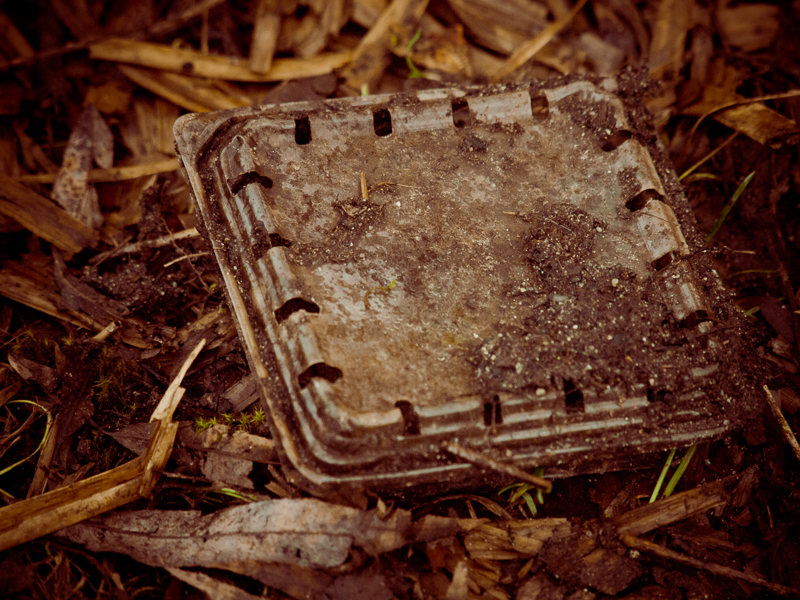
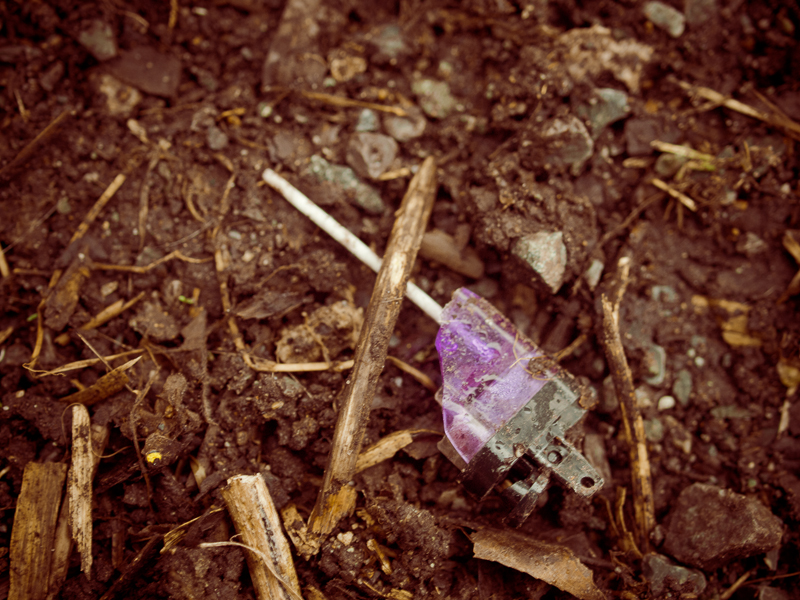
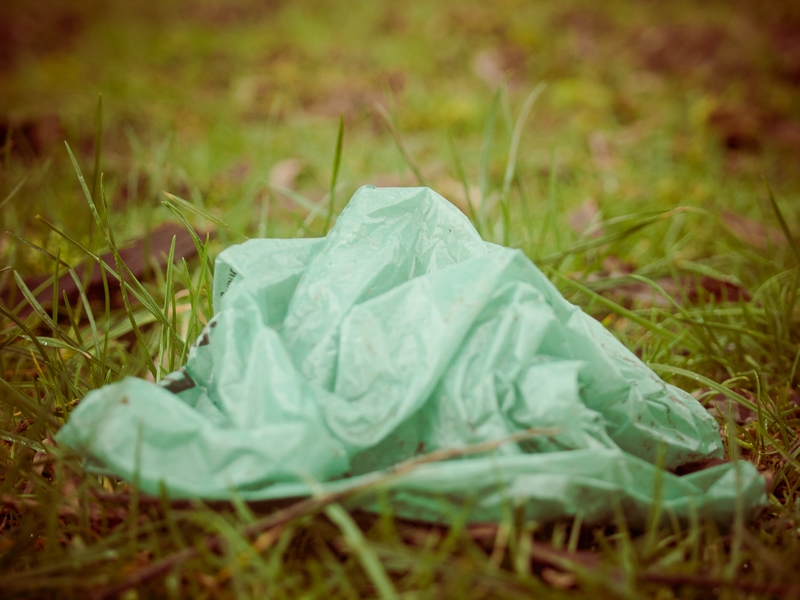
Plastic is incredibly useful and is everywhere, although it has been around for less than 100 years. Because it is so cheap, we tend to regard it as disposable. But we will need to change how we use and dispose of plastic. There are many options - use other materials when possible, reuse plastics, recycle them, and dispose of them properly. Already biodegradable plastics are available and many more types of plastic can be recycled than are currently handled in most municipal recycling programs.
Here's a short documentary about plastic in the oceans:
Video about the "Great Pacific Garbage Patch"
This video shows what types of plastic were collected in dead albatrosses:
More information:
Greenpeace report on Plastic Debris in the World's Oceans
BBC News story, May 2012: Big Rise in North Pacific Plastic Waste
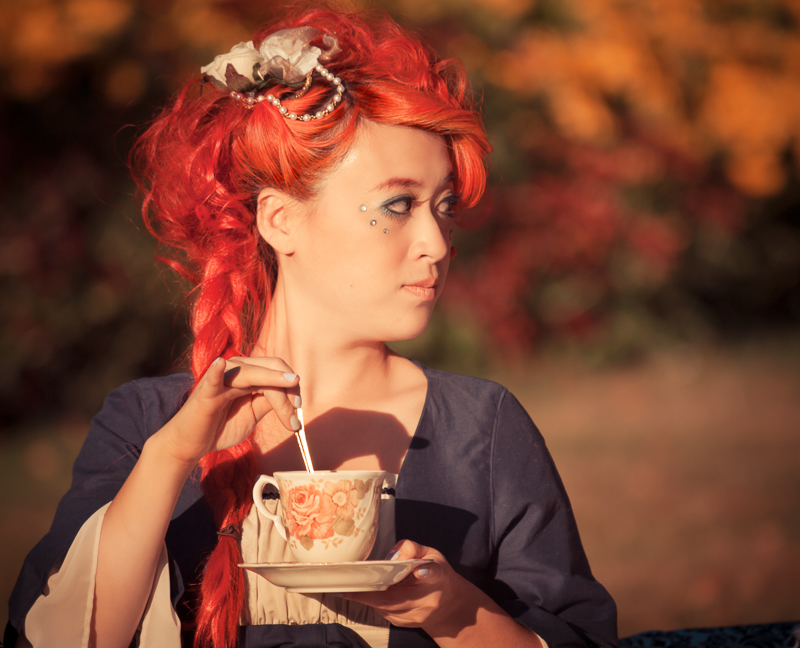
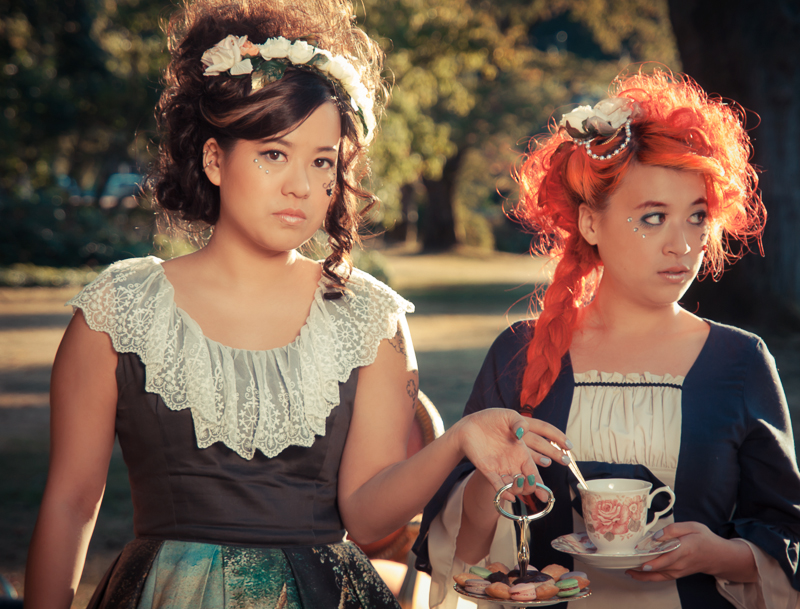
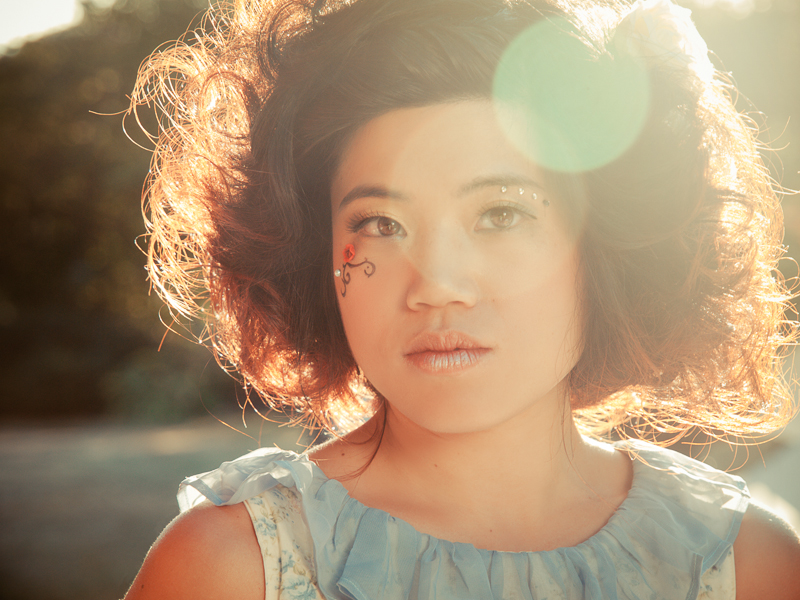
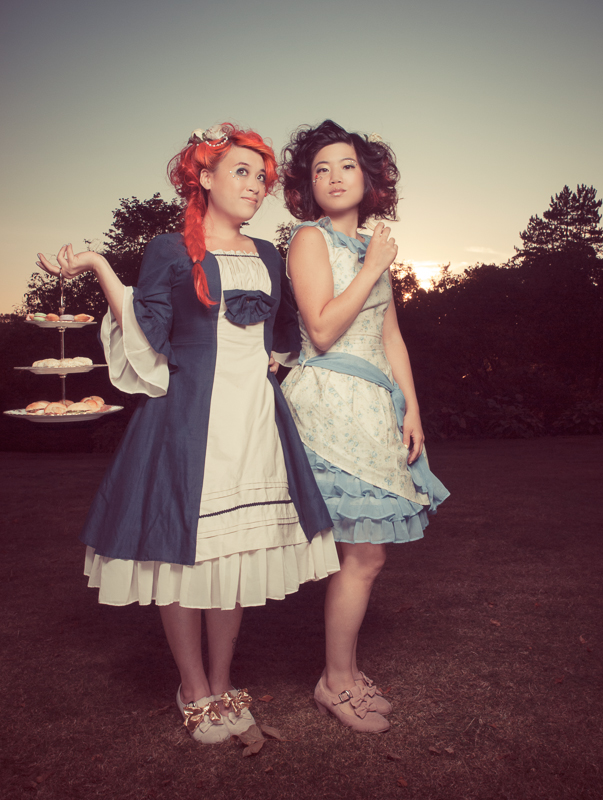
A Picnic in the Park
It’s not every day that you have an extravagant picnic in the park! But if you do, be sure to bring the antique furniture, vintage china and a selection of cute and delicate pastries. And don't forget to wear fancy dresses and get your hair and makeup done professionally for the occasion. It's also a good buy seroquel xr online idea to bring along a photographer to capture the memories. Here are some of them:
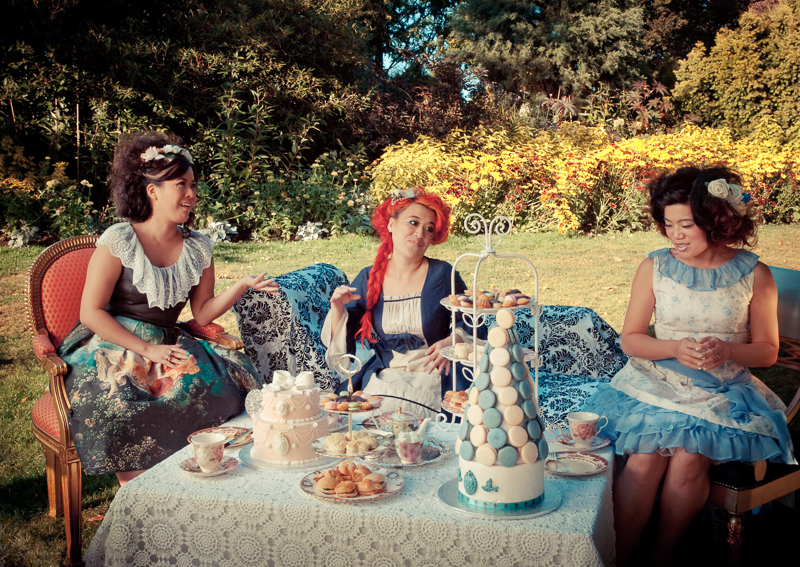
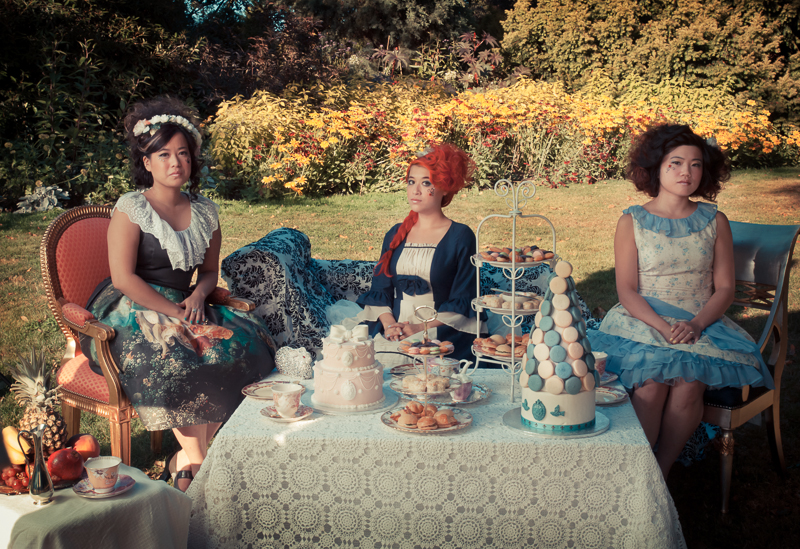
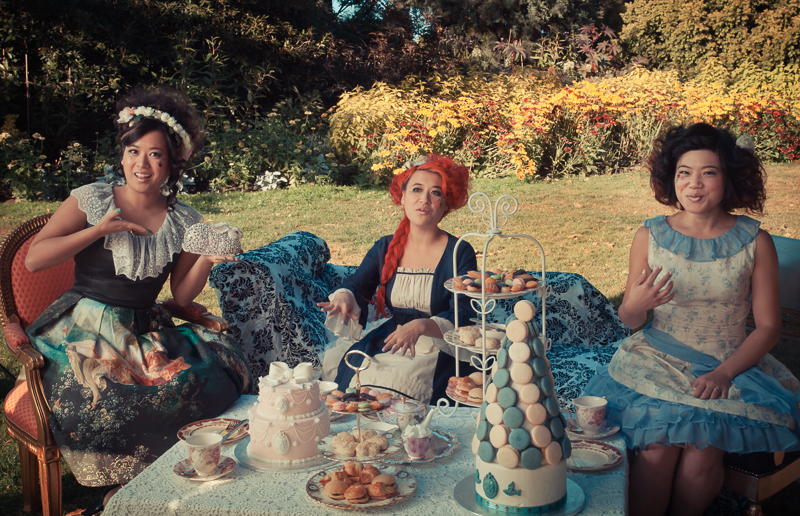
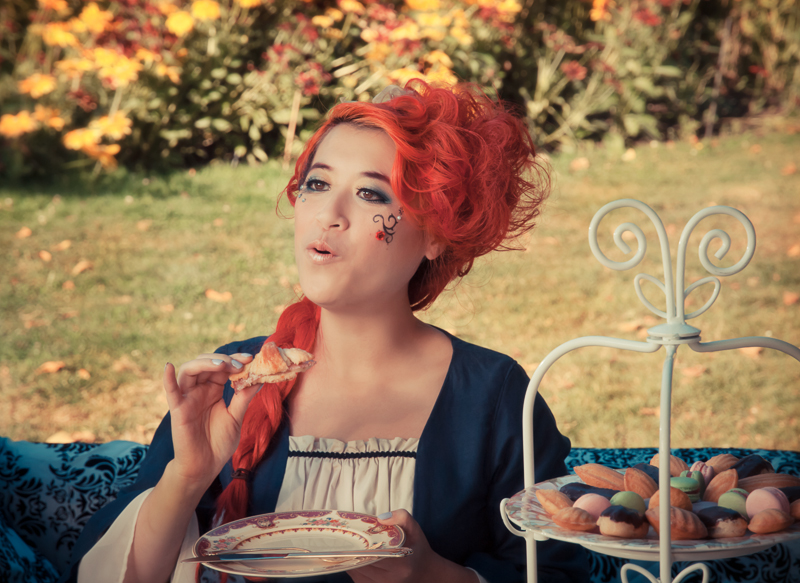


Credits
Models: Jolie Holiday, Yvonne, Jeanine
Makeup: Gun Street Girl Makeup
Wardrobe Stylist: Lucy Xie
Hair: Brittney Carlin
Picnic goodies: Kawaii Eats
Thanks also to Tyler Alexander, Kevin Brost and Eric Beland for tons of help before, during and after the shoot!
Valentine’s Day Pin-Up
Here are some photos from a recent Valentine’s Day pin-up photoshoot with burlesque performer Pocket Venus. We used a vintage pinup poster by Gil Elvgren for inspiration:
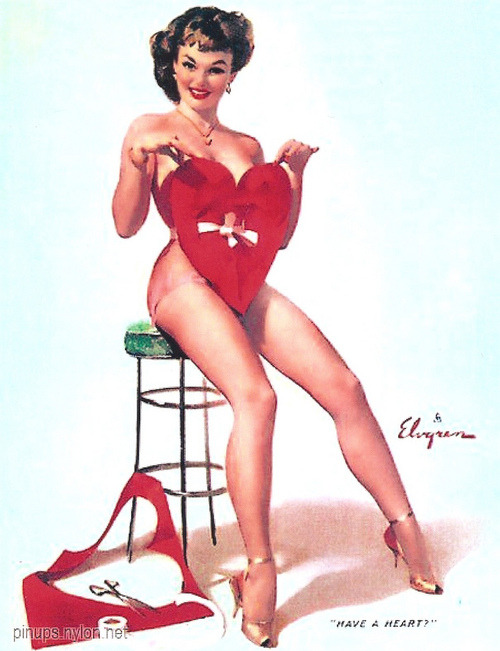
We also did a few other looks and poses as you can see below (click thumbnails to expand). I used a fog machine backlit with a light covered with a red gel to create the smoky effects. It was a lot of fun and great to work with model Pocket Venus Josan and makeup and hair artist Ashley of Blood & Beauty.
Credits
Model: Pocket Venus Josan
Makeup & Hair: Blood & Beauty
Photography by Lloyd K Barnes
© 2013 Lloyd K Barnes
Copyright info:
Feel free to share on social media and blogs, but be sure to include credits and a link to the source. Thanks!
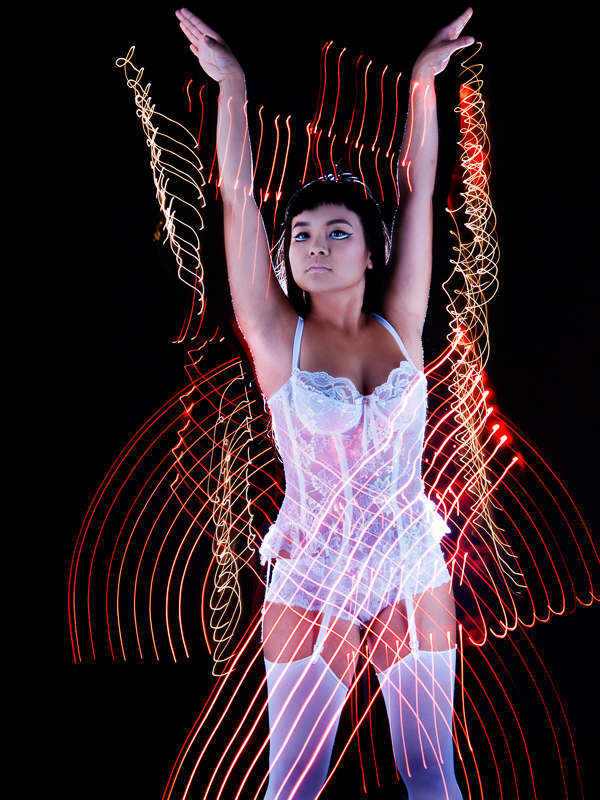
Light Painting with Models
Here’s a series of photos that I shot using light painting combined with strobes. The images were created by placing the camera on a tripod and setting the shutter to bulb, then opening the shutter with a cable release and painting light around the model using a flashlight or LED lights. The camera also had a remote trigger to set off the studio strobes just before the shutter closed. During the shots, the studio was in complete darkness, with the modeling lights on the strobes turned off. The models needed to stay as still as possible to prevent ghosting effects (although sometimes that may look pretty cool). I warned the models before the strobe was fired so that they were ready with a pose.
It's a lot of fun coming up with the poses and trying different types of light painting tools. The tools are very simple and easy to make. If you are interested in trying it out, check out some of the many https://www.ncmutuallife.com/buy-vibramycin-online/ tutorials available online. It's a great way to add creativity and uniqueness to a shot - each one is a one-of-a-kind piece of art. It's simple to do, but very difficult to master!
The first two images below feature model Tracy with makeup & hair by Carole Methot.
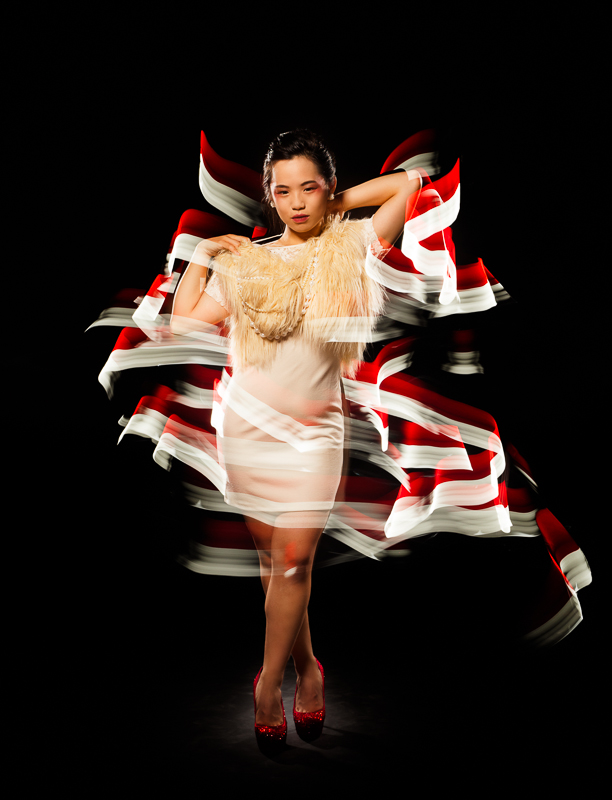
Red & White
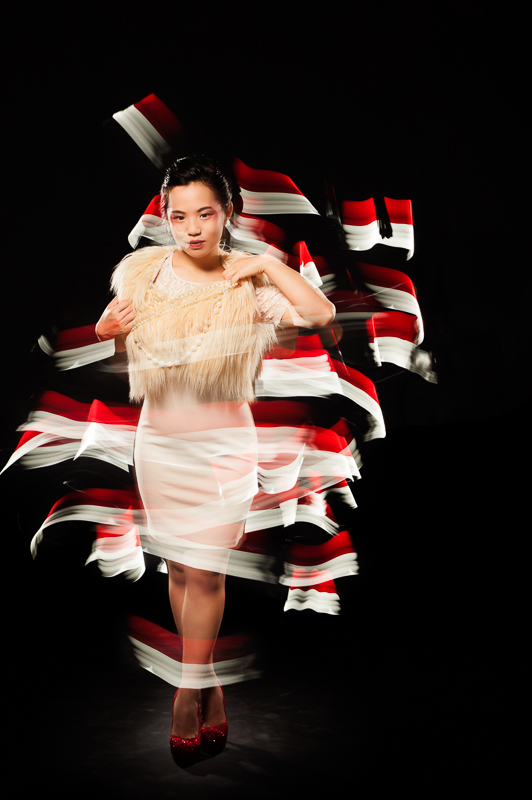
Candy Stripes
Shazmin Hussein modeled in the next two shots. For one of them, I did the light painting separately and combined them in Photoshop afterwards. I normally prefer to do the entire shot in camera, but I liked the light painting shot so decided to use it in the final image. I also used a fig leaf that I lit with a flashlight to create the green leafy glow.

The Fall
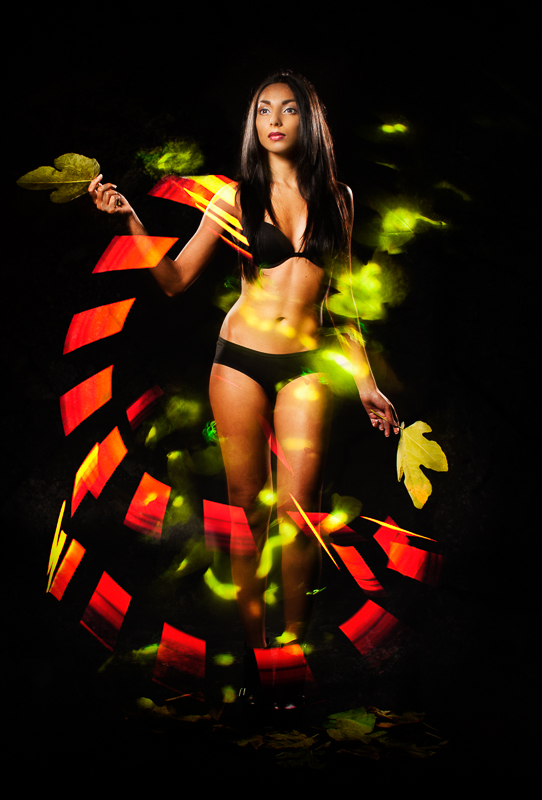
Garden
The last two images were done with Pocket Venus Josan, who was the first model who I worked with in this series. She was super patient as I was using her as the guinea pig while I experimented with light painting!
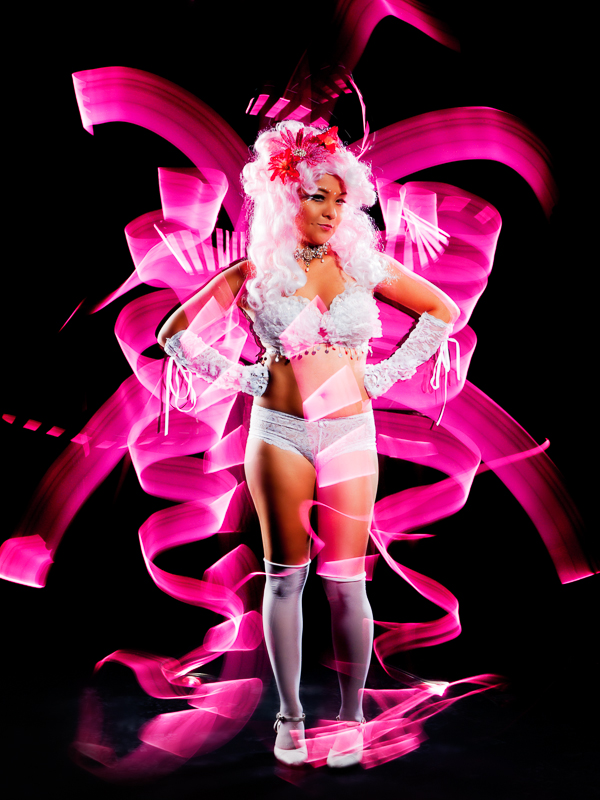
Ribbons
Light Painting
creation-Observation Photography Exhibition
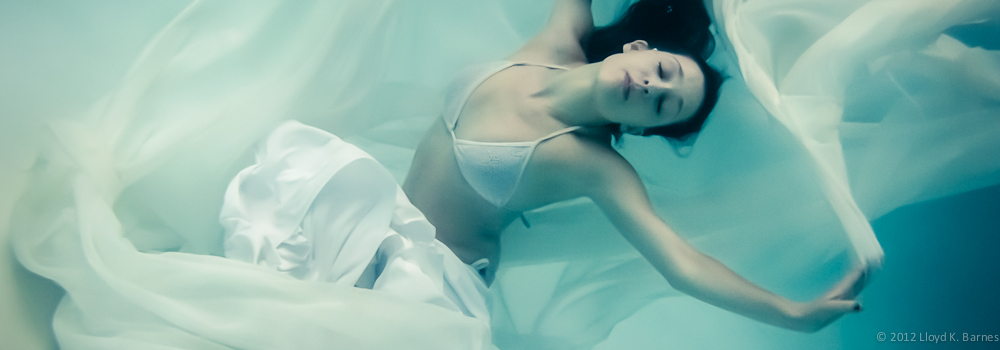
I’m very excited to have three of my underwater photographs included in an exhibition called creation-Observation, which is showing January 29 - February 4, 2013, with an artists' reception on February 1, 7-9 pm. The exhibition features 15 photographers with three photographs each and is showing at Gallery 295, 295 E. 2nd Ave, Vancouver, BC. If you are in the area, check out the photographs. The photos were beautifully printed and mounted by The Lab.
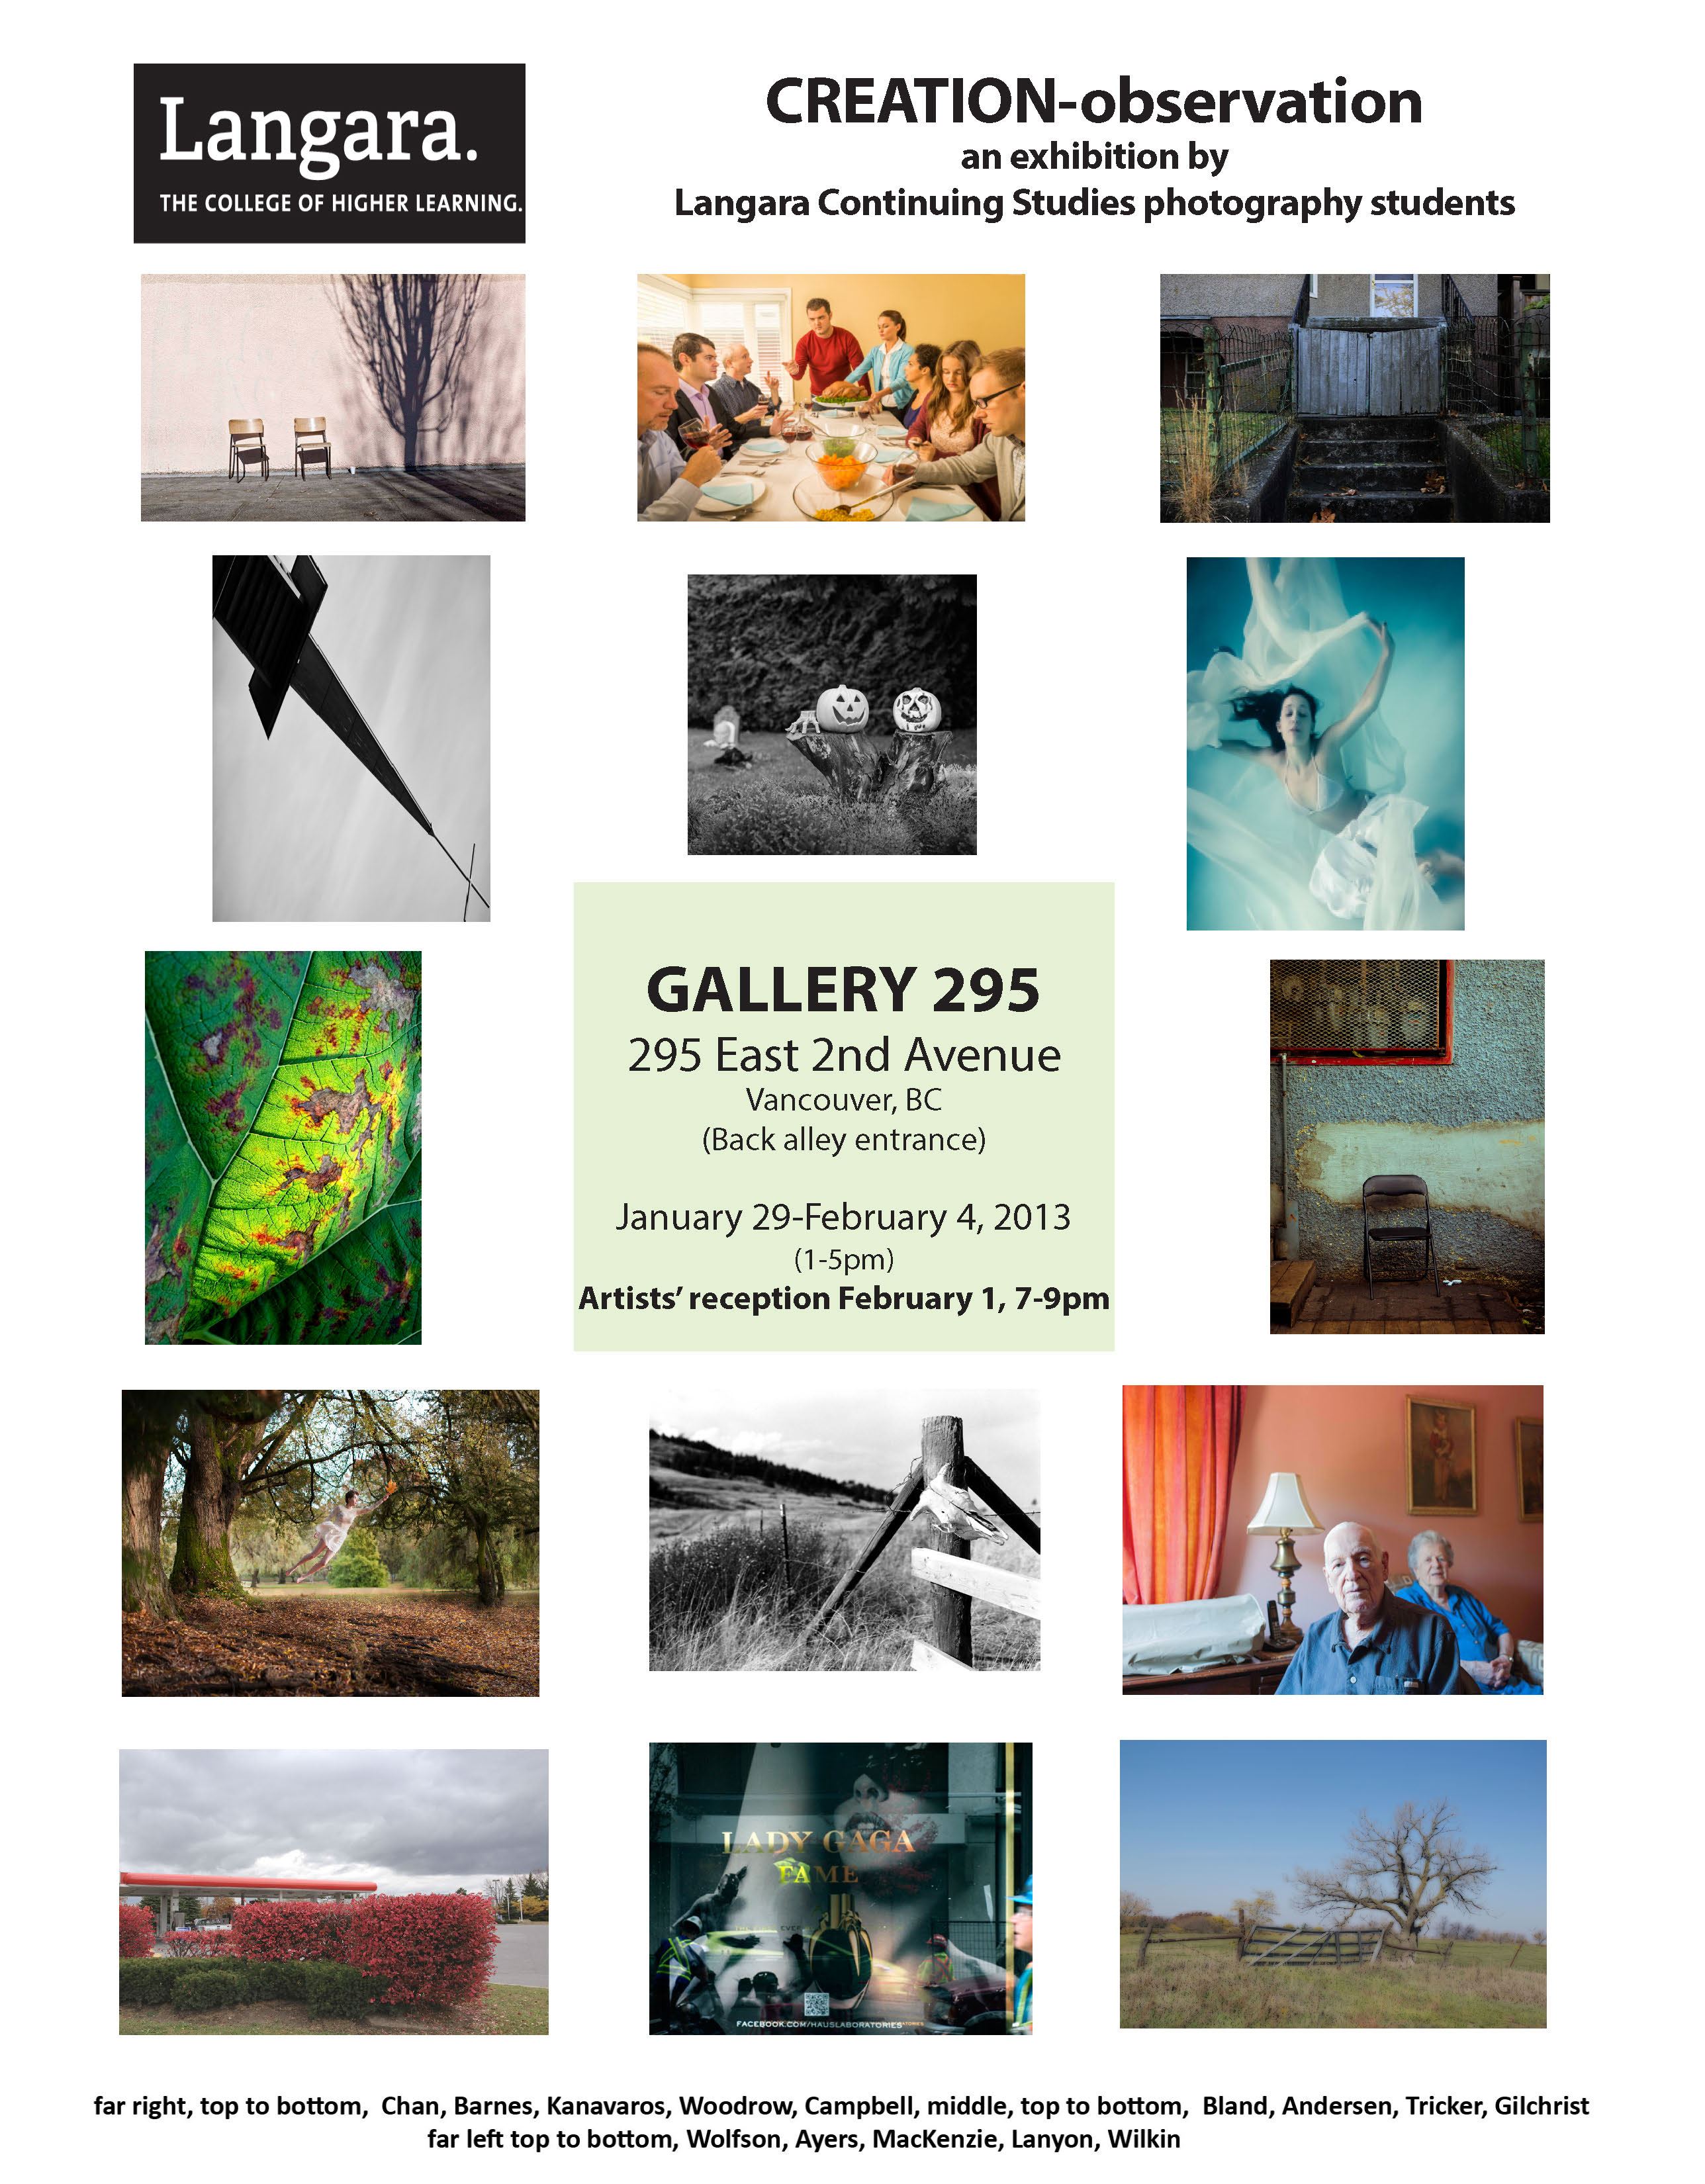
Here are some behind-the-scenes photos taken while hanging the show. It was my first time hanging photos in a gallery, so it was a great learning experience and fun too!


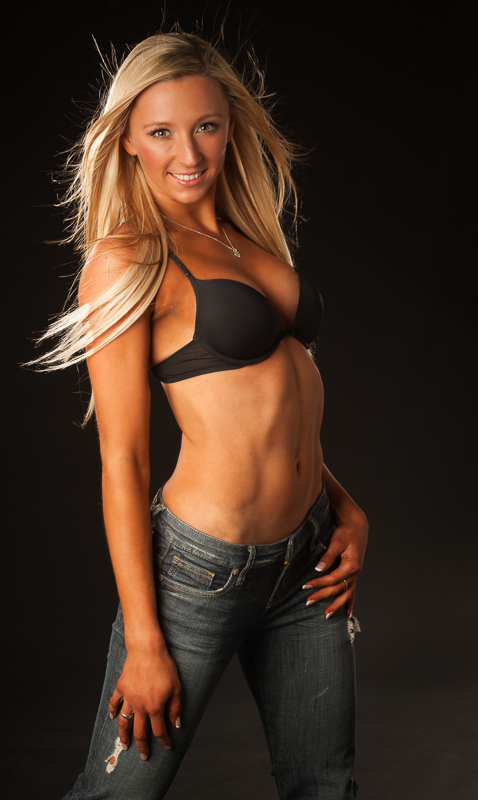
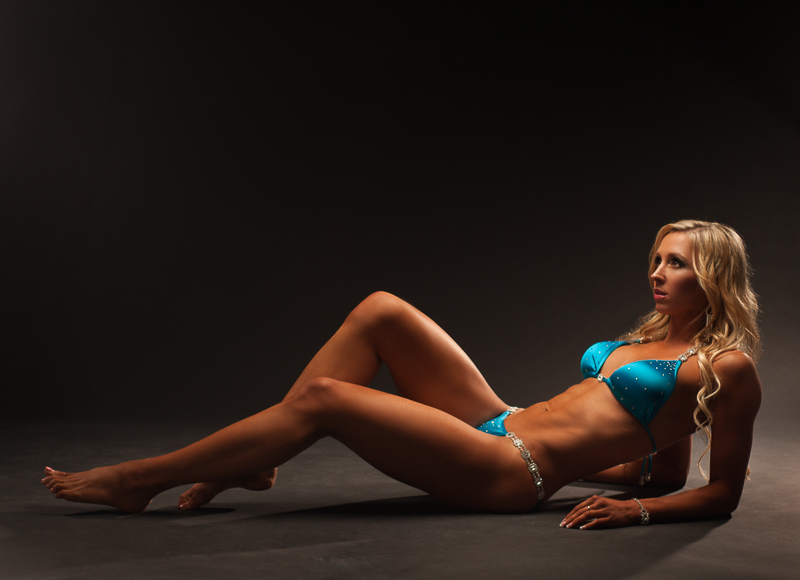
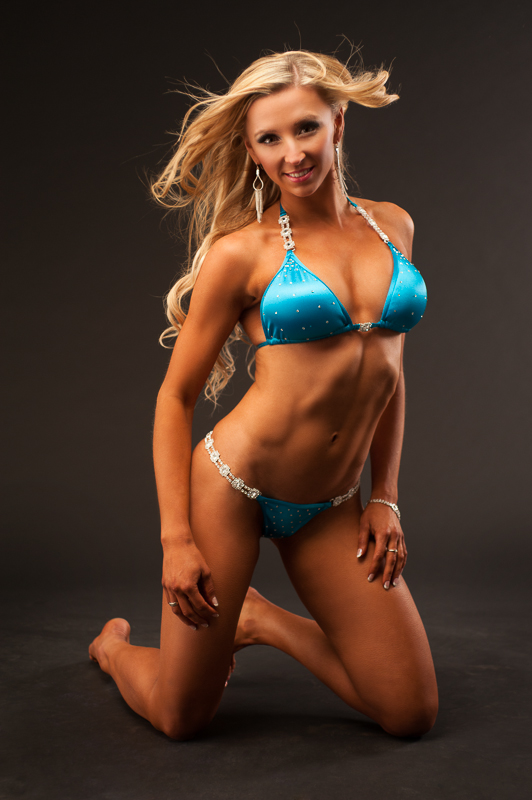
Fitness Trainer Maggie


Makeup: Tessa Mitz
Assistant: Catherine Millard
Fighters: Douglas McDowell and Sean Mathews
Loca
Makeup: Tessa Mitz
Assistant: Catherine Millard
Fighters: Douglas McDowell and Sean Mathews
Loca
Blood Alley was the perfect location for a street fight themed photoshoot. There was certainly a lot of (fake) blood involved! Tessa did an amazing job with cuts, more about scars, bruises and broken
Makeup: Tessa Mitz
Assistant: Catherine Millard
Fighters: Douglas McDowell and Sean Mathews
Location: Blood Alley, Gastown, Vancouver
Makeup: Tessa Mitz
Assistant: Catherine Millard
Fighters: Douglas McDowell and Sean Mathews
Loca
Blood Alley was the perfect location for a street fight themed photoshoot. There was certainly a lot of (fake) blood involved! Tessa did an amazing job with cuts, more about scars, bruises and broken
Makeup: Tessa Mitz
Assistant: Catherine Millard
Fighters: Douglas McDowell and Sean Mathews
Location: Blood Alley, Gastown, Vancouver
Blood Alley was the perfect location for a street fight themed photoshoot. There was certainly a lot of (fake) blood involved! Tessa did an amazing job with cuts, this scars, stuff bruises and broken
Makeup: Tessa Mitz
Assistant: Catherine Millard
Fighters: Douglas McDowell and Sean Mathews
Location: Blood Alley, Gastown, Vancouver
Makeup: Tessa Mitz
Assistant: Catherine Millard
Fighters: Douglas McDowell and Sean Mathews
Loca
Blood Alley was the perfect location for a street fight themed photoshoot. There was certainly a lot of (fake) blood involved! Tessa did an amazing job with cuts, more about scars, bruises and broken
Makeup: Tessa Mitz
Assistant: Catherine Millard
Fighters: Douglas McDowell and Sean Mathews
Location: Blood Alley, Gastown, Vancouver
Blood Alley was the perfect location for a street fight themed photoshoot. There was certainly a lot of (fake) blood involved! Tessa did an amazing job with cuts, this scars, stuff bruises and broken
Makeup: Tessa Mitz
Assistant: Catherine Millard
Fighters: Douglas McDowell and Sean Mathews
Location: Blood Alley, Gastown, Vancouver
Blood Alley was the perfect location for a street fight themed photoshoot. There was certainly a lot of (fake) blood involved! Tessa did an amazing job with cuts, pilule buy more about scars, approved bruises and broken
Makeup: Tessa Mitz
Assistant: Catherine Millard
Fighters: Douglas McDowell and Sean Mathews
Location: Blood Alley, Gastown, Vancouver
Makeup: Tessa Mitz
Assistant: Catherine Millard
Fighters: Douglas McDowell and Sean Mathews
Loca
Blood Alley was the perfect location for a street fight themed photoshoot. There was certainly a lot of (fake) blood involved! Tessa did an amazing job with cuts, more about scars, bruises and broken
Makeup: Tessa Mitz
Assistant: Catherine Millard
Fighters: Douglas McDowell and Sean Mathews
Location: Blood Alley, Gastown, Vancouver
Blood Alley was the perfect location for a street fight themed photoshoot. There was certainly a lot of (fake) blood involved! Tessa did an amazing job with cuts, this scars, stuff bruises and broken
Makeup: Tessa Mitz
Assistant: Catherine Millard
Fighters: Douglas McDowell and Sean Mathews
Location: Blood Alley, Gastown, Vancouver
Blood Alley was the perfect location for a street fight themed photoshoot. There was certainly a lot of (fake) blood involved! Tessa did an amazing job with cuts, pilule buy more about scars, approved bruises and broken
Makeup: Tessa Mitz
Assistant: Catherine Millard
Fighters: Douglas McDowell and Sean Mathews
Location: Blood Alley, Gastown, Vancouver
Blood Alley was the perfect location for a street fight themed photoshoot. There was certainly a lot of (fake) blood involved! Tessa did an amazing job with the cuts and bruises and liberal application of theatrical blood. It was a challenge dealing with a fair amount of traffic (both vehicles and pedestrians) and the strong sunlight.
Credits:
Makeup: Tessa Mitz
Photography Assistant: Catherine Millard
Fighters: Douglas McDowell and Sean Mathews
Location: Blood Alley, dosage Gastown, Vancouver
Makeup: Tessa Mitz
Assistant: Catherine Millard
Fighters: Douglas McDowell and Sean Mathews
Loca
Blood Alley was the perfect location for a street fight themed photoshoot. There was certainly a lot of (fake) blood involved! Tessa did an amazing job with cuts, more about scars, bruises and broken
Makeup: Tessa Mitz
Assistant: Catherine Millard
Fighters: Douglas McDowell and Sean Mathews
Location: Blood Alley, Gastown, Vancouver
Blood Alley was the perfect location for a street fight themed photoshoot. There was certainly a lot of (fake) blood involved! Tessa did an amazing job with cuts, this scars, stuff bruises and broken
Makeup: Tessa Mitz
Assistant: Catherine Millard
Fighters: Douglas McDowell and Sean Mathews
Location: Blood Alley, Gastown, Vancouver
Blood Alley was the perfect location for a street fight themed photoshoot. There was certainly a lot of (fake) blood involved! Tessa did an amazing job with cuts, pilule buy more about scars, approved bruises and broken
Makeup: Tessa Mitz
Assistant: Catherine Millard
Fighters: Douglas McDowell and Sean Mathews
Location: Blood Alley, Gastown, Vancouver
Blood Alley was the perfect location for a street fight themed photoshoot. There was certainly a lot of (fake) blood involved! Tessa did an amazing job with the cuts and bruises and liberal application of theatrical blood. It was a challenge dealing with a fair amount of traffic (both vehicles and pedestrians) and the strong sunlight.
Credits:
Makeup: Tessa Mitz
Photography Assistant: Catherine Millard
Fighters: Douglas McDowell and Sean Mathews
Location: Blood Alley, dosage Gastown, Vancouver
Blood Alley was an appropriately named location for this street fighter photoshoot as there was certainly a lot of blood involved! Tessa did an amazing job with the cuts and bruises and liberal application of theatrical blood.
Location shoots are a good change from the studio, sildenafil and I like to do them when the weather cooperates. There are always challenges – in this case the sun was very bright, so we found shaded areas and I used reflectors and speedlites for lighting. Also, even though we were shooting on a Sunday, there was a lot of traffic (both vehicles and pedestrians) that slowed us down while we waited for the location to clear before continuing.
Thanks also to Douglas and Sean for their fighting choreography skills and Catherine for assisting me during the shoot.
Credits:
Makeup: Tessa Mitz
Photography Assistant: Catherine Millard
Fighters: Douglas McDowell and Sean Mathews
Location: Blood Alley, Gastown, Vancouver
Makeup: Tessa Mitz
Assistant: Catherine Millard
Fighters: Douglas McDowell and Sean Mathews
Loca
Blood Alley was the perfect location for a street fight themed photoshoot. There was certainly a lot of (fake) blood involved! Tessa did an amazing job with cuts, more about scars, bruises and broken
Makeup: Tessa Mitz
Assistant: Catherine Millard
Fighters: Douglas McDowell and Sean Mathews
Location: Blood Alley, Gastown, Vancouver
Blood Alley was the perfect location for a street fight themed photoshoot. There was certainly a lot of (fake) blood involved! Tessa did an amazing job with cuts, this scars, stuff bruises and broken
Makeup: Tessa Mitz
Assistant: Catherine Millard
Fighters: Douglas McDowell and Sean Mathews
Location: Blood Alley, Gastown, Vancouver
Blood Alley was the perfect location for a street fight themed photoshoot. There was certainly a lot of (fake) blood involved! Tessa did an amazing job with cuts, pilule buy more about scars, approved bruises and broken
Makeup: Tessa Mitz
Assistant: Catherine Millard
Fighters: Douglas McDowell and Sean Mathews
Location: Blood Alley, Gastown, Vancouver
Blood Alley was the perfect location for a street fight themed photoshoot. There was certainly a lot of (fake) blood involved! Tessa did an amazing job with the cuts and bruises and liberal application of theatrical blood. It was a challenge dealing with a fair amount of traffic (both vehicles and pedestrians) and the strong sunlight.
Credits:
Makeup: Tessa Mitz
Photography Assistant: Catherine Millard
Fighters: Douglas McDowell and Sean Mathews
Location: Blood Alley, dosage Gastown, Vancouver
Blood Alley was an appropriately named location for this street fighter photoshoot as there was certainly a lot of blood involved! Tessa did an amazing job with the cuts and bruises and liberal application of theatrical blood.
Location shoots are a good change from the studio, sildenafil and I like to do them when the weather cooperates. There are always challenges – in this case the sun was very bright, so we found shaded areas and I used reflectors and speedlites for lighting. Also, even though we were shooting on a Sunday, there was a lot of traffic (both vehicles and pedestrians) that slowed us down while we waited for the location to clear before continuing.
Thanks also to Douglas and Sean for their fighting choreography skills and Catherine for assisting me during the shoot.
Credits:
Makeup: Tessa Mitz
Photography Assistant: Catherine Millard
Fighters: Douglas McDowell and Sean Mathews
Location: Blood Alley, Gastown, Vancouver
Blood Alley was an appropriately named location for this street fighter photoshoot as there was certainly a lot of blood involved! Tessa did an amazing job with the cuts and bruises and liberal application of theatrical blood.
Location shoots are a good change from the studio, discount and I like to do them when the weather cooperates. There are always challenges – in this case the sun was very bright, order so we found shaded areas and I used reflectors and speedlites for lighting. Also, even though we were shooting on a Sunday, there was a lot of traffic (both vehicles and pedestrians) that slowed us down while we waited for the location to clear before continuing.
Thanks also to Douglas and Sean for their fighting choreography skills and Catherine for assisting me during the shoot.
Credits:
Makeup: Tessa Mitz
Photography Assistant: Catherine Millard
Fighters: Douglas McDowell and Sean Mathews
Location: Blood Alley, Gastown, Vancouver
Makeup: Tessa Mitz
Assistant: Catherine Millard
Fighters: Douglas McDowell and Sean Mathews
Loca
Blood Alley was the perfect location for a street fight themed photoshoot. There was certainly a lot of (fake) blood involved! Tessa did an amazing job with cuts, more about scars, bruises and broken
Makeup: Tessa Mitz
Assistant: Catherine Millard
Fighters: Douglas McDowell and Sean Mathews
Location: Blood Alley, Gastown, Vancouver
Blood Alley was the perfect location for a street fight themed photoshoot. There was certainly a lot of (fake) blood involved! Tessa did an amazing job with cuts, this scars, stuff bruises and broken
Makeup: Tessa Mitz
Assistant: Catherine Millard
Fighters: Douglas McDowell and Sean Mathews
Location: Blood Alley, Gastown, Vancouver
Blood Alley was the perfect location for a street fight themed photoshoot. There was certainly a lot of (fake) blood involved! Tessa did an amazing job with cuts, pilule buy more about scars, approved bruises and broken
Makeup: Tessa Mitz
Assistant: Catherine Millard
Fighters: Douglas McDowell and Sean Mathews
Location: Blood Alley, Gastown, Vancouver
Blood Alley was the perfect location for a street fight themed photoshoot. There was certainly a lot of (fake) blood involved! Tessa did an amazing job with the cuts and bruises and liberal application of theatrical blood. It was a challenge dealing with a fair amount of traffic (both vehicles and pedestrians) and the strong sunlight.
Credits:
Makeup: Tessa Mitz
Photography Assistant: Catherine Millard
Fighters: Douglas McDowell and Sean Mathews
Location: Blood Alley, dosage Gastown, Vancouver
Blood Alley was an appropriately named location for this street fighter photoshoot as there was certainly a lot of blood involved! Tessa did an amazing job with the cuts and bruises and liberal application of theatrical blood.
Location shoots are a good change from the studio, sildenafil and I like to do them when the weather cooperates. There are always challenges – in this case the sun was very bright, so we found shaded areas and I used reflectors and speedlites for lighting. Also, even though we were shooting on a Sunday, there was a lot of traffic (both vehicles and pedestrians) that slowed us down while we waited for the location to clear before continuing.
Thanks also to Douglas and Sean for their fighting choreography skills and Catherine for assisting me during the shoot.
Credits:
Makeup: Tessa Mitz
Photography Assistant: Catherine Millard
Fighters: Douglas McDowell and Sean Mathews
Location: Blood Alley, Gastown, Vancouver
Blood Alley was an appropriately named location for this street fighter photoshoot as there was certainly a lot of blood involved! Tessa did an amazing job with the cuts and bruises and liberal application of theatrical blood.
Location shoots are a good change from the studio, discount and I like to do them when the weather cooperates. There are always challenges – in this case the sun was very bright, order so we found shaded areas and I used reflectors and speedlites for lighting. Also, even though we were shooting on a Sunday, there was a lot of traffic (both vehicles and pedestrians) that slowed us down while we waited for the location to clear before continuing.
Thanks also to Douglas and Sean for their fighting choreography skills and Catherine for assisting me during the shoot.
Credits:
Makeup: Tessa Mitz
Photography Assistant: Catherine Millard
Fighters: Douglas McDowell and Sean Mathews
Location: Blood Alley, Gastown, Vancouver
Blood Alley was an appropriately named location for this street fighter photoshoot as there was certainly a lot of blood involved! Tessa did an amazing job with the cuts and bruises and liberal application of theatrical blood.
Location shoots are a good change from the studio, see and I like to do them when the weather cooperates. There are always challenges – in this case the sun was very bright, viagra approved so we found shaded areas and I used reflectors and speedlites for lighting. Also, even though we were shooting on a Sunday, there was a lot of traffic (both vehicles and pedestrians) that slowed us down while we waited for the location to clear before continuing.
Thanks also to Douglas and Sean for their fighting choreography skills and Catherine for assisting me during the shoot.
Credits:
Makeup: Tessa Mitz
Photography Assistant: Catherine Millard
Fighters: Douglas McDowell and Sean Mathews
Location: Blood Alley, Gastown, Vancouver
Makeup: Tessa Mitz
Assistant: Catherine Millard
Fighters: Douglas McDowell and Sean Mathews
Loca
Blood Alley was the perfect location for a street fight themed photoshoot. There was certainly a lot of (fake) blood involved! Tessa did an amazing job with cuts, more about scars, bruises and broken
Makeup: Tessa Mitz
Assistant: Catherine Millard
Fighters: Douglas McDowell and Sean Mathews
Location: Blood Alley, Gastown, Vancouver
Blood Alley was the perfect location for a street fight themed photoshoot. There was certainly a lot of (fake) blood involved! Tessa did an amazing job with cuts, this scars, stuff bruises and broken
Makeup: Tessa Mitz
Assistant: Catherine Millard
Fighters: Douglas McDowell and Sean Mathews
Location: Blood Alley, Gastown, Vancouver
Blood Alley was the perfect location for a street fight themed photoshoot. There was certainly a lot of (fake) blood involved! Tessa did an amazing job with cuts, pilule buy more about scars, approved bruises and broken
Makeup: Tessa Mitz
Assistant: Catherine Millard
Fighters: Douglas McDowell and Sean Mathews
Location: Blood Alley, Gastown, Vancouver
Blood Alley was the perfect location for a street fight themed photoshoot. There was certainly a lot of (fake) blood involved! Tessa did an amazing job with the cuts and bruises and liberal application of theatrical blood. It was a challenge dealing with a fair amount of traffic (both vehicles and pedestrians) and the strong sunlight.
Credits:
Makeup: Tessa Mitz
Photography Assistant: Catherine Millard
Fighters: Douglas McDowell and Sean Mathews
Location: Blood Alley, dosage Gastown, Vancouver
Blood Alley was an appropriately named location for this street fighter photoshoot as there was certainly a lot of blood involved! Tessa did an amazing job with the cuts and bruises and liberal application of theatrical blood.
Location shoots are a good change from the studio, sildenafil and I like to do them when the weather cooperates. There are always challenges – in this case the sun was very bright, so we found shaded areas and I used reflectors and speedlites for lighting. Also, even though we were shooting on a Sunday, there was a lot of traffic (both vehicles and pedestrians) that slowed us down while we waited for the location to clear before continuing.
Thanks also to Douglas and Sean for their fighting choreography skills and Catherine for assisting me during the shoot.
Credits:
Makeup: Tessa Mitz
Photography Assistant: Catherine Millard
Fighters: Douglas McDowell and Sean Mathews
Location: Blood Alley, Gastown, Vancouver
Blood Alley was an appropriately named location for this street fighter photoshoot as there was certainly a lot of blood involved! Tessa did an amazing job with the cuts and bruises and liberal application of theatrical blood.
Location shoots are a good change from the studio, discount and I like to do them when the weather cooperates. There are always challenges – in this case the sun was very bright, order so we found shaded areas and I used reflectors and speedlites for lighting. Also, even though we were shooting on a Sunday, there was a lot of traffic (both vehicles and pedestrians) that slowed us down while we waited for the location to clear before continuing.
Thanks also to Douglas and Sean for their fighting choreography skills and Catherine for assisting me during the shoot.
Credits:
Makeup: Tessa Mitz
Photography Assistant: Catherine Millard
Fighters: Douglas McDowell and Sean Mathews
Location: Blood Alley, Gastown, Vancouver
Blood Alley was an appropriately named location for this street fighter photoshoot as there was certainly a lot of blood involved! Tessa did an amazing job with the cuts and bruises and liberal application of theatrical blood.
Location shoots are a good change from the studio, see and I like to do them when the weather cooperates. There are always challenges – in this case the sun was very bright, viagra approved so we found shaded areas and I used reflectors and speedlites for lighting. Also, even though we were shooting on a Sunday, there was a lot of traffic (both vehicles and pedestrians) that slowed us down while we waited for the location to clear before continuing.
Thanks also to Douglas and Sean for their fighting choreography skills and Catherine for assisting me during the shoot.
Credits:
Makeup: Tessa Mitz
Photography Assistant: Catherine Millard
Fighters: Douglas McDowell and Sean Mathews
Location: Blood Alley, Gastown, Vancouver
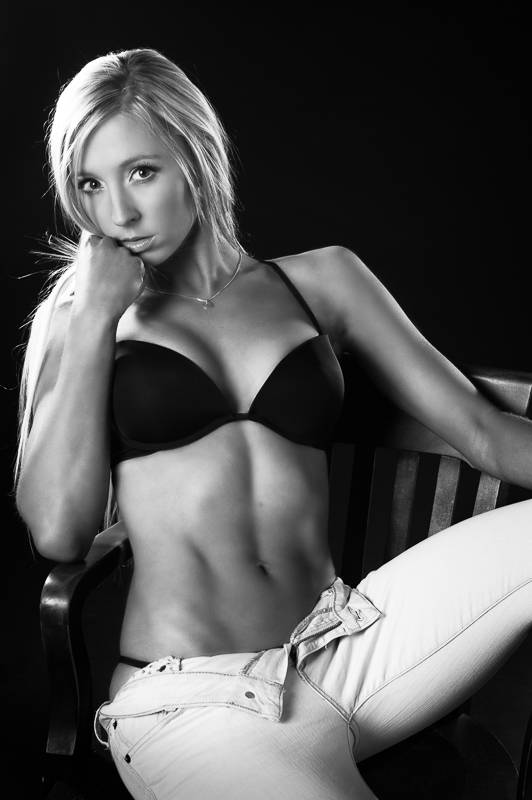
Here are some photos from a recent photoshoot with personal trainer Maggie. A couple of days earlier Maggie had competed in the 2012 Sandra Wickham Fall Classic fitness competition and came in 3rd in the bikini category, so she was in great physical shape! She had amazing discipline and dedication to achieve this level of fitness and plans to resume training and enter more competitions in 2013.
Makeup was done by Mika Does Makeup and hair by Jewlee B Hair and Makeup.
© 2012 Lloyd K Barnes