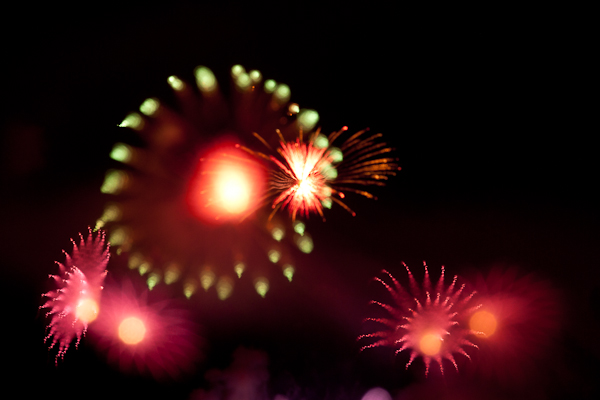
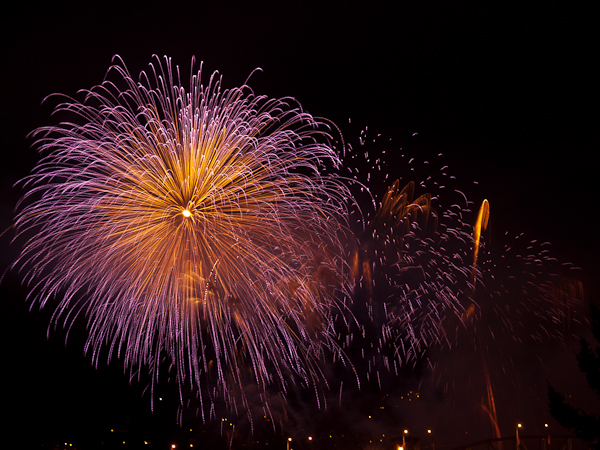
Day 2 of the Celebration of Light fireworks competition in Vancouver featured Spain on August 3, 2011. I love photographing fireworks and tried out the focus blur technique for some of the shots and got some cool effects! I put the camera on a tripod and set the shutter speed to bulb, the aperture to f/9.0 and used a remote control to trigger the camera.
I first focused the lens and noted the position of the focus ring, then unfocused the lens https://www.sihspune.org/propecia.php drastically. I waited until I saw some promising looking fireworks being launched, and triggered the shutter. I then focused the lens to the original position as the fireworks exploded. The technique creates wide lines of light that gradually narrow giving a flower-petal effect. Here are some examples from the Flickr focus blur group. The trickiest part is to avoid excessive movement when focusing the camera to prevent shaky lines. Timing is crucial and many of my shots didn't quite work out, but I did get a few nice shots!
I was inspired by the ballet dancer photograph (see below) by Chase Jarvis and decided to try a similar lighting style for a photoshoot that I did last week. I was shooting body painting work by makeup artist Meghan Thomas for actor, model and dancer Genevieve Clements. The theme was Medusa, the gorgon of Greek mythology with venomous snakes for hair and the power to turn to stone anyone who looked at her face.
Ballet Dancer by Chase Jarvis
I wanted a dark, shadowy look for the Medusa theme, but also wanted to make sure that the body painting was visible. To achieve this, I used a black https://www.bullens.com/buy-antibiotics-online/ seamless paper background and positioned two softboxes behind the model, one on each side. This is similar to the set up for the Chase Jarvis ballet dancer shot. I then added two gridded strobes in front to use as spotlights for highlighting the makeup and body painting. I also used two large black foamcore panels to block the light from the softboxes to prevent lens flare (see the lighting diagram below).
Post-processing was done with Lightroom 3.4 and Photoshop CS5. I increased the contrast and did some light retouching, but kept the colours to highlight the body painting.
Let me know what you think. Do you have some lighting techniques that you use to give a shadowy look?
I'm looking forward to the total lunar eclipse that will be visible from North America on the night of December 20-21, 2010. The moon will travel through the earth's shadow, and during the total eclipse it will become very dim, taking on a beautiful coppery red to orange colour depending on the atmospheric conditions. It's pretty easy to get some great photos of the lunar eclipse as long as the weather cooperates and it's not too cloudy. I'm hoping for a clear winter night!
Here are some tips and advice for photographing the lunar eclipse. The advice applies mainly to DSLR cameras, but the more advanced digital compact cameras should work well too.
Exposure settings
The brightness of the moon during the total eclipse can vary quite a lot, so it's best to let the camera's built-in light meter determine the exposure for you. Use the point metering mode (instead of an average reading), pointing the camera at the moon.
Use manual mode to set the aperture and shutter speed to give the correct exposure for the moon, which typically, will be 2 to 4 seconds at f/2.8 and ISO 100.
If you prefer to use aperture priority mode instead of manual mode, choose the maximum aperture for your lens to give you the fastest shutter speed at ISO 100. I don't recommend a longer shutter speed than 2-4 seconds because the moon will become blurry due to the movement caused by the earth's rotation. I was surprised how much movement takes place in a few seconds! Another way to further reduce the blurring caused by the long exposure is to increase the ISO. For most modern DSLR's you should be able to go to ISO 400 with no problem, and some will be fine at ISO 800 and higher, depending on the camera.
Tripod
Use a tripod because the exposures will be a few seconds, make it impossible to hand-hold the camera without blurring the image. If you do not have a tripod, you can find a stable place to set the camera, although it will be trickier to frame the moon in the viewfinder. For maximum flexibility, you could use a telescope mount that slowly moves the camera to compensate for the earth's rotation, allowing you to have much longer exposure times.
Cable release
To prevent camera shake, use a cable release instead of pressing the shutter release by hand. If you do not have a cable release, you can use the self-timer so that the shutter will activate a few seconds after you press the button.
Turn off image stabilization
Image stabilization is not necessary https://www.rossitchpediatricdentistry.com/buy-ativan-online/ when using a tripod. I use an Olympus E-510, which has image stabilization in the camera body, but for long exposures, the gyro mechanism actually increases the motion blur.
Turn off noise reduction
I usually turn it off and use Adobe Lightroom's noise reduction feature. Noise reduction increases the time for the camera to process and save images to the memory card, so I prefer to turn it off.
Lenses
One of the amazing things about the total lunar eclipse is the beautiful three dimensional spherical appearance of the moon. It is much more apparent than during the full moon, when it looks more like a two dimensional disk. I prefer to use the longest lens that I have in order to get as much detail at the highest resolution I can. Even with my 200 mm lens and 1.4x teleconverter, there's still a lot of empty space in the frame! If you have a longer lens, congratulations, and I hope you get some great shots!
If you are in a location with some interesting foreground or landscape features, then you might want to use a wide angle lens to capture everything in one shot. In this case, you will have the additional complication of setting the exposure for the moon as well as the other parts of the photograph. For the foreground, you could use the on-camera flash (or an external flash if you have one). For the background landscape, it may not be feasible to use the same exposure for both the eclipse and the background. Also, the moon will look disappointingly small when you use a wide angle lens. For the Vancouver lunar eclipse shown above, I used Photoshop to combine the lunar eclipse photo with the cityscape shot the same night. You could also do a double exposure if your camera has the capability. One of the nice things about the double exposure method (or Photoshop) is that you can use the large moon image (shot with the the longer lens) to create a more dramatic looking photo.
Time lapse
Some of the most beautiful lunar eclipse images that I have seen show the moon going through the entire eclipse by using time lapse photography. The images can then be combined in Photoshop, or they can be made into a video. I have not tried doing a time lapse, and I'm planning do this for the Dec 20-21 lunar eclipse!
Bring a flashlight and gloves
It will be dark and probably very cold!
Good luck with you photos and feel free to share your results by posting a link in the comments section.
Lunar Eclipse Through the Clouds, Vancouver, February 20, 2008
Bokeh is normally created in-camera by using a shallow depth-of-field and focusing on the subject and allowing the other parts of the image to become blurry. For this shot I wanted to create a glam look by adding some bokeh in Photoshop.
I added a blank layer above the top layer, and selected a hard-edged round brush and set the foreground colour to white. I wanted the brush to paint a bunch of random circles so I went to the brush window and selected "shape dynamics" and moved the slider for "size jitter" to around 30%, selected "scattering" and checked "both axes" and moved the slider to around 480%, "count" to 2, and "count jitter" to around 30%. FInally, I selected "other dynamics" and changed the "opacity jitter" to 10%. You might need to play around with the settings to get something that looks good for you. I then painted the layer with a few strokes. I added a layer effect - "gradient overlay" and used white for the foreground colour and some gold from the lips for the background. It was a linear gradient with an angle of 118 degrees, and normal blend mode. Finally, I adjusted the layer opacity to 67%.
I then added another blank layer above this, and painted some more circles, then I used the Gaussian blur filter to make these blurry. You will need to play around with the radius that best works for you. I added some layer effects - "outer glow" and used the eye dropper to grab some gold colour from the lips, and changed the blend mode to screen. I also used "inner glow" with a light yellow colour (ffffbe). I used a levels adjustment layer, clipped to this layer and lightened up the bokeh circles until they glowed a little. I then changed the layer opacity to about 50%.
Finally, I used a curves adjustment layer above all the other layers to tweak the contrast of the overall image.