Studio Lighting Setup for Beauty Photography
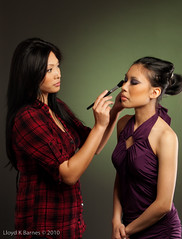
Here's a video slideshow with images from a glamour portrait photography session with Jennifer Ruth and Kaitlin Sullivan. (Click here to see the video if you are using an iPhone, iPod Touch or iPad). I met Jennifer at the Twisted Fairytale fashion show in March 2010 and loved her makeup work. Since we were both building our portfolios, we collaborated on a project with the beautiful and talented Vancouver model Kaitlin Sullivan. Jennifer did amazing work with the makeup, hair and styling for six different looks during the session. I did the shoot in the studio using basic portrait lighting setups to showcase the makeup and hairstyling.

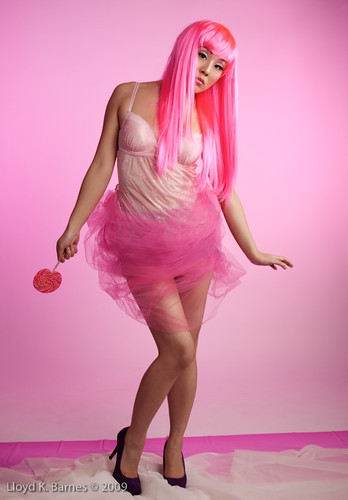
"Pink Feathers" 50-200mm Olympus f/2.8-3.5 lens, 1/160 sec f/14
For the first set Jennifer gave Kaitlin big pink feathered lashes, wet glittery pink lips and curly hair, with a pink feather boa and a chunky jeweled bracelet. Quite a glamourous look!
I used White Lightning strobes - the main light was an X800 equipped with a beauty dish. I love the light from the beauty dish - it is largish white reflector so the light is pretty soft, but it has some shadow definition that helps give more shape to the face. I used a white foam core reflector panel, as well as a reflector disk to fill in the shadows.
I normally use a lower power main light for portraits so that it does not interfere with the background lighting. I meter everything using a Sekonic Flash Master L-358, starting with the main light. The White Lightnings are great to use because I can easily fine tune the output. I used an X3200 with softbox for the hair light, located camera right, behind Kaitlin. I use a more powerful strobe mainly because the distance is further, but also it gives me the opportunity to increase the brightness of the side light or hair light to give more intense highlights. For a natural look, the hair light was adjusted to about a stop or so brighter than the beauty dish. The background was storm grey seamless paper (medium grey), with a gridded X1600 for a back burst. To meter the background, I used the reflected light attachment for the Sekonic and adjusted the light to give a gradient with the brightest part about a stop to a stop-and-half brighter than the main light. I used barndoors on the X1600 to control the light spill away from Kaitlin. I also used a hair fan for some of the shots, which you can see in the video.
One of the difficulties with large feathered lashes is the shadows that they cast over the eyes. Usually I like to get sparkling highlights on the eyes to give the portrait more life. With large lashes, I watch the highlights very carefully to make sure the eyes are not too dark. Another option is to have the model look down to show off the lashes.
The strobes were triggered using CyberSyncs. My camera is an Olympus E-510, and I used Olympus Studio 2 to tether the camera to my MacBook, I used Lightroom 3 and Photoshop CS4 for the post-processing. I will be posting more information on post-processing in future blog posts.
Here's a diagram of the basic set-up. Thanks to Kevin Kertz Photography for creating the template. It's awesome and free!

Glamour portrait studio lighting
In the second set, Jennifer used silver feathered lashes, silver lipstick and a hot pink bob wig for Kaitlin. For accessories, we had a black feather boa, diamond costume jewelry and huge ring with black beads. Kaitlin was lying down on a white faux fur for these shots. Other than lowering the lights, the setup was the same as the first buy viagra buy seroquel baikal-pharmacy.com cheaper set. I also took some of the shots from above using a ladder.

"Diamonds Are a Girl's Best Friend" Olympus 14-45mm f/3.5-5.6 lens, 1/160 sec at f/11
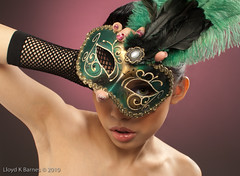
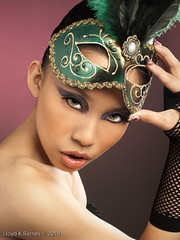
Jennifer totally switched up the look this time, with a long black wig, metallic blue lips, and copper eye shadow. We had a blue ostrich feather, a rhinestone owl ring with blue and amber gems to match the makeup. This set was shot using natural light against the grey seamless background paper, which was lit with a gridded X800 and blue gel to complement the lips. The studio has loading bay door, so we opened it up and shot using the daylight. The light was not super bright, so I used ISO 200 and a fast prime lens - Sigma 30 mm f/1.4. I love the shallow depth of field of the wide aperture, but was careful to make sure that Kaitlin's eyes were in focus. The large light source coming from the open garage door was beautiful and soft. We did have quite an audience gathered at the loading bay watching with great interest!

Sigma 30mm f/1.4 lens, 1/125 sec, f/2.2 ISO 200
For the next set, Jennifer created a beautiful look with gold lips with blue eyes gradually shaded to gold, perfectly matching the colourful gems in Kaitlin's earrings. I used a large softbox for the main light, and another large softbox behind Kaitlin, camera right. The background was lit with a gridded strobe to give soft gradient effect. I often use my 50-200mm zoom lens for portraits because it doesn't distort the face as much as a wider angle lens does. The Olympus Zuiko 50-200mm zoom is awesome - tack sharp with a wonderful depth of field at wider apertures. The only drawback for using it in the studio is I have to go quite far away from the model. On the other hand, not being right in her face gives an opportunity for different expressions, depending on the model. I like to mix it up and I'm always switching the lenses during the shoot!

"Dreaming in Colour" Olympus 50-200mm f/2.8-3.5 lens zoomed to 108mm, 1/160 sec at f/10
For the next set, Kaitlin's makeup featured pink and purple with a hint of gold. I used the same lighting setup as the previous set, except with two gels on the background light - blue and red - to get a purple to match the makeup and necklace. I used o have a purple gel but it melted down a few months ago in an unfortunate accident! Kaitlin was sitting in a large circular chair with a black cushion for these photos. I like to have the model stand, sit, lie down, or move around, even when just doing headshots, to get a variety of looks.

"She's Got the Look" Olympus 50-200mm f/2.8-3.5 at 50mm, 1/160 sec at f/9.0
The final set was done with the Kaitlin's hair in an updo and I used the same lighting setup.

"Beautiful Eyes" Olympus Zuiko 50-200mm f/3.5-2.8 lens at 54mm, 1/160 sec at f/9.0
The photography session was very successful - we all got some great images for our portfolios, and it was a pleasure to work with both Jennifer and Kaitlin. Jennifer is amazingly creative and super-organized, which allowed us to get six different awesome beauty looks. Kaitlin was also amazing and I expect to see more of her in the future! She is perfect in front of the camera - easy to direct with lots of creative posing ideas. I hope to have the opportunity to work with them both again in the future.