Each year the Vancouver Zombie Walk gets bigger and more popular. According to the Facebook event page, there were over 6,000 confirmed attendees. I don't know how many zombies actually showed up, but I suspect more than that!
Many of the zombies also had cameras and smartphones, but with all the amazing costumes and special effect makeup, the event also attracted a lot of photographers and videographers. I was very interested in the gear that they were using! I saw a few people with HD-DSLR rigs and several with off-camera flash set-ups. Others had speedlites with various attachments to help diffuse the light. The flash set-ups were a good way to reduce the contrast by filling in the shadows. I saw one photographer with a vintage twin lens reflex camera (a Rolleiflex I think). There was some very impressive gear!
For those who may be interested, here's some information about the photos that I took:
I used an Olympus E-30 with the Olympus 12-60 mm lens for wide angle and the 50-200 mm for zoom.
It was a bright sunny day, so I tried to find shady areas and expose for the shade. I also used backlighting and exposed for the shadow international viagra online side of the zombies using centre-weighted mode. I had the in-body image stabilization and face detection on. I haven't used face detection very often. I found that it sometimes focused on the wrong place, so I probably will avoid it in the future. I set the camera to continuous (burst) shooting mode and continuous autofocus. That way I could fire off a bunch of action shots when a zombie started running towards me!
For lighting, I wanted to keep it simple so went with available light only. I used ISO 200 and a wide aperture (around f/2.8 to f/3.5) and a fast shutter speed to minimize the motion blur but also isolate the zombies from the background due to the shallow depth of field. I used the fastest shutter speeds that I could to minimize any blur caused by camera shake.
Here's my gallery of Vancouver Zombie walk photos on Facebook. If you were at the zombie walk, you might be in the gallery - so feel free to tag yourself and your friends!
Also, feel free to share any links to your zombie walk photos as well as any tips about how you photographed the event. I'm looking forward to Zombiewalk 2012!
I love these animated gifs and wanted to try something like that myself. I did a photoshoot a couple of months ago and used a fog machine to create a misty background. It would be cool to show the mist swirling around in a short animated gif. The original photo had some mist, but I wanted to add some more in Photoshop and then animate it.
Original:
Original Photo
Animated:
Fog Animation Effect
Photoshop CS5
Level of difficulty: Intermediate. You should be familiar with working with layers, resizing images and using the warp tool.
Create the mist layers:
(Click on the screen shots to zoom)
Create a blank layer above the edited/retouched photo
Paint some mist on the blank layer & name the layer Mist 1. I used these mist brushes by SpiritSighs.
Mist Brushes
Copy the layer, name it Mist 2 and warp it using Edit => Transform => Warp. You can warp the mist to make it look like it has drifted around.
Copy the warped layer and repeat with another warp (Mist 3).
Copy the above layer and warp it again (Mist 4). You will now have the original image plus four mist layers above it. Click on Fig. 1 to expand.
Fig. 1 Layer palette with mist layers
Create the Animation Frames:
Select the 5 layers and open the animation window (Window => animation - Fig. 2). Make sure you are in frame view (Fig. 3).
Fig. 2 Opening the Animation Window
Fig. 3 Animation window in frame view
Click on the frame and duplicate it by dragging it to the new frame icon. Repeat this four times to give a total of 5 frames (Fig. 4 & 5).
Fig. 4 Duplicating the frame
Fig. 5 Duplicating the frame
Click on the first frame. Go to the layers panel and make only the base layer (retouch) visible (Fig. 6).
Fig. 6 Click on the eye to hide, click again to reveal layer
Click on the second frame and make the retouch layer on the Mist 1 layer visible using the layers panel
Click on the third frame and make the base layer & the Mist 2 layer visible.
Click on the fourth frame and make the base layer & the Mist 3 layer visible
Click on the fifth frame & make the base layer & the Mist 4 layer visible
Select all 5 frames by clicking on the first and Shift-Clicking on the last one.
Change the frame delay time to 0.1 (Fig. 7) You can try different timings depending on what works best for your project.
Fig. 7 Change frame delay
Tween the animation to make it run more smoothly
Click on the first frame and Shift-click on the second frame
Go to the animation menu and choose Tween... (Fig. 8)
Fig. 8 Animation Menu
Enter 10 in the "frames to add box" and select all layers, and position & opacity (Fig. 9)
Fig. 9 Tween Dialog Box
Select frames 12 & 13 and repeat the Tween for these two frames. Repeat this for frames 23 & 24 and 34 & 35 (See Fig. 10)
Fig. 10 Tweening Frames
Duplicate the last frame (45) and move it to the front
Tween the first and second frames as before. This makes the animation smoothly cycle back to the beginning.
Make sure the repeat mode is "Forever"
Save everything!
Check it out - when you press the play button you will have a pretty smooth animation!
Save the animated gif
Resize the image to the size that you want (I used a height of 375 pixels because it gave me a file size under 2 MB). Go to Image => Image Size and select the size that you want, making sure to lock the aspect ratio.
Go to File => Save for Web & Devices.
Set to "forever"
Select Gif and Save (Fig. 11)
Fig. 11 Saving the GIF
To view the animated gif, open it with your browser.
I'm looking forward to doing some more of these animations and have lots of ideas for future shoots! If you have tried it, please share by posting a link in the comments section.
Here are the resuts of some quick test shots using black lights, smoke and light painting.
The subject was a vintage glass bottle with a ground glass stopper. I noticed a lot of these in the shop of Yusuf the chemist in Mombasa in the movie Inception! As a chemist, I'm always interested in vintage laboratory and apothecary items.
I made the pink fluorescent liquid by soaking the felt insert from a pink highlighter pen in some water. It worked really well! Here's more information about how to make liquids that glow under black light.
For the black light source, I used a UV Cannon and a 12" UV fluorescent tube.
I generated the smoke using a stick of incense. To light up the smoke, I used a Paul C. Buff X800 White Lightning strobe with a pink gel, and a 10º honeycomb grid and barndoors to prevent light spill on the bottle. The background was a black nylon fabric. The bottle was placed on a piece of white foam core.
I've used smoke quite often as an interesting background - it works best with a dark background and backlighting. In this case, I had the light to the right of the camera and behind the bottle, out of frame. For people, I have a fog machine that gives great smoke effects on a larger scale.
To get the above shot, 1. Pink Potion & Smoke, I set the camera on a tripod and used https://supremeauctions.com/buy-coreg-online/ second curtain sync (slow sync) and a 2.5 sec exposure and CyberSyncs to trigger the flash. I was below the table with the smoking incense, using a remote control to trigger the camera.
For the next shot, 2. Pink Potion & Nebula, I used painting with light to create a nebula-like effect. For the the background, I used white seamless paper with a black nylon fabric covering it. With the black fabric in place, and the camera set to bulb, I started with a couple seconds of blacklight, then shut them off. While the shutter was still open and the studio in darkness, I removed the fabric to reveal the white seamless paper, I painted it with a Maglite flash light, with a blue gel over it some cool the light a bit, then closed the shutter with the remote. It took a few tries to get a background that I liked!
The third shot was done in a similar way as the second, except that I also used an LED flashlight and did not use the blue gel on the Maglite. The LED flashlight actually has three separate beams so it created trails in groups of 3, making an interesting abstract design.
If you are in need of a unique background in your still life or product photography, you might want to give these a try. If you have some similar examples, please share links to them in the comment section!
I'm looking forward to the total lunar eclipse that will be visible from North America on the night of December 20-21, 2010. The moon will travel through the earth's shadow, and during the total eclipse it will become very dim, taking on a beautiful coppery red to orange colour depending on the atmospheric conditions. It's pretty easy to get some great photos of the lunar eclipse as long as the weather cooperates and it's not too cloudy. I'm hoping for a clear winter night!
Here are some tips and advice for photographing the lunar eclipse. The advice applies mainly to DSLR cameras, but the more advanced digital compact cameras should work well too.
Exposure settings
The brightness of the moon during the total eclipse can vary quite a lot, so it's best to let the camera's built-in light meter determine the exposure for you. Use the point metering mode (instead of an average reading), pointing the camera at the moon.
Use manual mode to set the aperture and shutter speed to give the correct exposure for the moon, which typically, will be 2 to 4 seconds at f/2.8 and ISO 100.
If you prefer to use aperture priority mode instead of manual mode, choose the maximum aperture for your lens to give you the fastest shutter speed at ISO 100. I don't recommend a longer shutter speed than 2-4 seconds because the moon will become blurry due to the movement caused by the earth's rotation. I was surprised how much movement takes place in a few seconds! Another way to further reduce the blurring caused by the long exposure is to increase the ISO. For most modern DSLR's you should be able to go to ISO 400 with no problem, and some will be fine at ISO 800 and higher, depending on the camera.
Tripod
Use a tripod because the exposures will be a few seconds, make it impossible to hand-hold the camera without blurring the image. If you do not have a tripod, you can find a stable place to set the camera, although it will be trickier to frame the moon in the viewfinder. For maximum flexibility, you could use a telescope mount that slowly moves the camera to compensate for the earth's rotation, allowing you to have much longer exposure times.
Cable release
To prevent camera shake, use a cable release instead of pressing the shutter release by hand. If you do not have a cable release, you can use the self-timer so that the shutter will activate a few seconds after you press the button.
Turn off image stabilization
Image stabilization is not necessary https://www.rossitchpediatricdentistry.com/buy-ativan-online/ when using a tripod. I use an Olympus E-510, which has image stabilization in the camera body, but for long exposures, the gyro mechanism actually increases the motion blur.
Turn off noise reduction
I usually turn it off and use Adobe Lightroom's noise reduction feature. Noise reduction increases the time for the camera to process and save images to the memory card, so I prefer to turn it off.
Lenses
One of the amazing things about the total lunar eclipse is the beautiful three dimensional spherical appearance of the moon. It is much more apparent than during the full moon, when it looks more like a two dimensional disk. I prefer to use the longest lens that I have in order to get as much detail at the highest resolution I can. Even with my 200 mm lens and 1.4x teleconverter, there's still a lot of empty space in the frame! If you have a longer lens, congratulations, and I hope you get some great shots!
If you are in a location with some interesting foreground or landscape features, then you might want to use a wide angle lens to capture everything in one shot. In this case, you will have the additional complication of setting the exposure for the moon as well as the other parts of the photograph. For the foreground, you could use the on-camera flash (or an external flash if you have one). For the background landscape, it may not be feasible to use the same exposure for both the eclipse and the background. Also, the moon will look disappointingly small when you use a wide angle lens. For the Vancouver lunar eclipse shown above, I used Photoshop to combine the lunar eclipse photo with the cityscape shot the same night. You could also do a double exposure if your camera has the capability. One of the nice things about the double exposure method (or Photoshop) is that you can use the large moon image (shot with the the longer lens) to create a more dramatic looking photo.
Time lapse
Some of the most beautiful lunar eclipse images that I have seen show the moon going through the entire eclipse by using time lapse photography. The images can then be combined in Photoshop, or they can be made into a video. I have not tried doing a time lapse, and I'm planning do this for the Dec 20-21 lunar eclipse!
Bring a flashlight and gloves
It will be dark and probably very cold!
Good luck with you photos and feel free to share your results by posting a link in the comments section.
Lunar Eclipse Through the Clouds, Vancouver, February 20, 2008
Eco Fashion Week (EFW) is taking place in Vancouver on Sept 27-30, 2010. It is being held at the Creekside Community Centre, which was part of the Olympic Village during the 2010 Winter Games.
Vancouver has a goal to become the greenest city by 2020 and EFW will help to educate the fashion industry and fashion-buying public about environmentally friendly best-practices and to promote those business that have good green https://gigglesgobblesandgulps.com/buy-valtrex-500mg/ practices.
A Green Advisory Board helped to evaluate the fashion designers, retailers and manufacturers using the following criteria:
Fair/ethical trade
Local
Custom/tailor made
Organic/Natural textiles and materials
Recycled/reborn
Vintage/second hand
Vegan/animal free/cruelty free
Eco printing
Fabric waste reduction
Green marketing
Socially responsible
Resource efficiency
Eco-certification
These practices can also apply to other industries and I will be looking carefully at my photography business to see what I can do to make sure it is green too!
On Sept 28, I attended runway shows featuring the spring/summer 2011 collections by designers emesha, Lara Miller, Eden, Nixxi, Lav and Kush, and Kim Cathers. Here is a quick look at the the collections by emesha and Lara Miller. The rest of the designers have been posted here.
emesha - Eco Fashion Week, Vancouver
Lara Miller - Eco Fashion Week, Vancouver
Here's a slideshow with more photos from the show:
Eco Fashion Week (EFW) is taking place in Vancouver on Sept 27-30, 2010. It is being held at the Creekside Community Centre, which was part of the Olympic Village during the 2010 Winter Games.
Vancouver has a goal to become the greenest city by 2020 and EFW will help to educate the fashion industry and fashion-buying public about environmentally friendly best-practices and to promote those business that have good green practices.
A Green Advisory Board helped to evaluate the fashion designers, retailers and manufacturers using the following criteria:
Fair/ethical trade
Local
Custom/tailor made
Organic/Natural textiles and materials
Recycled/reborn
Vintage/second hand
Vegan/animal free/cruelty free
Eco printing
Fabric waste reduction
Green marketing
Socially responsible
Resource efficiency
Eco-certification
These practices can also apply to other industries and I will be looking carefully at my photography business to see what I can do to make sure it is green too!
On Sept 28, I attended runway shows featuring the spring/summer 2011 collections by designers emesha, Lara Miller, Eden, Nixxi, Lav and Kush, and Kim Cathers. Here is a quick look at the the collections by emesha and Lara Miller. The rest of the designers have been posted here.
emesha - Eco Fashion Week, Vancouver
Lara Miller - Eco Fashion Week, Vancouver
Here's a slideshow with more photos from the show:
Eco Fashion Week, unhealthythis site Vancouver, BC, Spring/Summer 2011, www.kimcathers.com
approvedvisit this site on Flickr" href="http://www.flickr.com/photos/kalamakia/5205649561/">
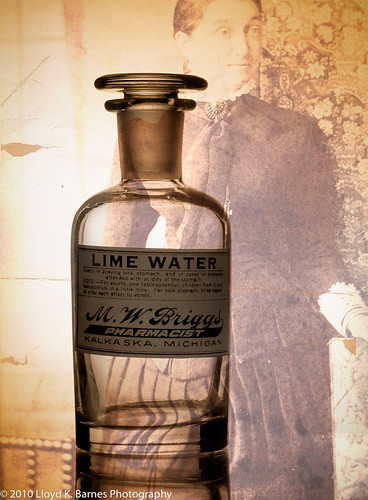
Glass Apothecary Jar
I recently took some photos of antique glass apothecary jars using a technique called "bright field lighting". Glass is tricky to shoot because it is both transparent and reflective. If you are not careful, here you will lose the definition of the edge of the glass and get unwanted reflections and highlights.
In this shot, I used a white background and lit it with a single strobe facing the background and placed it behind and below the glass jar. The jar was on a table covered with white paper and placed on top of a clear piece of glass. I put black cards on each side of the jar to give more defined edges. I also used a reflector in front of the jar to increase the light on the label. The basic setup is shown in the lighting diagram.
I did some post-processing - changed the image to a sepia tone, using Lightroom and added a vintage photo to the background with Photoshop. I used a levels adjustment layer to increase the brightness of the label.
Lighting setup for glass
The next photo shows a basic image of a glass of water with a couple of drops of food coloring, shot using the same technique without the Photoshop work. In this image I adjusted the contrast and removed a few stray water drops using the dust removal tool in Lightroom.
Lighting Glass with Bright Field Method
Another way to photograph glass is by using a dark background with highlighted edges such as in the photo of the glass vase below. The strobe was placed behind a black background, which was placed in front of a larger white background. The strobe was facing towards the white background, so the edges of the vase were lit by the reflected light.
Glass on Black
It is very helpful to use a tripod to aid in composing the shots and to help tweak the setup. Although I used strobes for these shots, continuous lighting will work too, and a tripod will allow you to use longer shutter speeds with no problem.
A great reference for lighting, including glass is Light - Science & Magic by Hunter, Biver and Fuqua.