Archive

Posts Tagged ‘model’

How to Create a Cool Animated Mist Effect in Photoshop CS5

May 23rd, 2011 2 comments

Animated Gifs

Animated Gifs


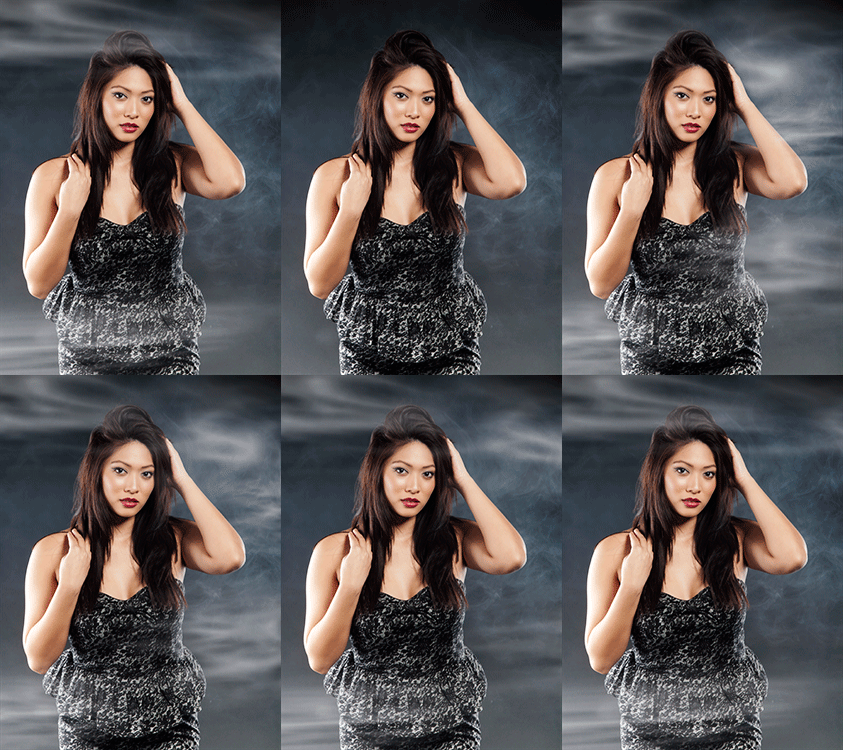
I love these animated gifs and wanted to try something like that myself. I did a photoshoot a couple of months ago and used a fog machine to create a misty background. It would be cool to show the mist swirling around in a short animated gif. The original photo had some mist, but I wanted to add some more in Photoshop and then animate it.

Original:

Model

Original Photo

Animated:

Fog Animation

Fog Animation Effect

Photoshop CS5

Level of difficulty: Intermediate. You should be familiar with working with layers, resizing images and using the warp tool.

Create the mist layers:

(Click on the screen shots to zoom)

    • Create a blank layer above the edited/retouched photo
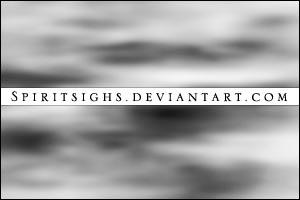
    • Paint some mist on the blank layer & name the layer Mist 1. I used these mist brushes by SpiritSighs.
Mist Brushes

Mist Brushes

    • Copy the layer, name it Mist 2 and warp it using Edit => Transform => Warp. You can warp the mist to make it look like it has drifted around.
    • Copy the warped layer and repeat with another warp (Mist 3).
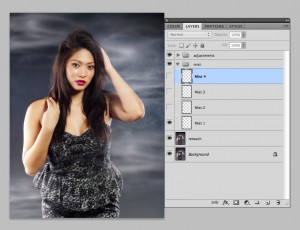
    • Copy the above layer and warp it again (Mist 4). You will now have the original image plus four mist layers above it. Click on Fig. 1 to expand.
Mist Layers

Fig. 1 Layer palette with mist layers

Create the Animation Frames:

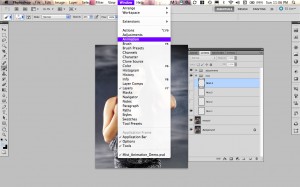
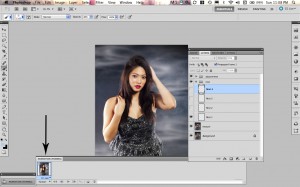
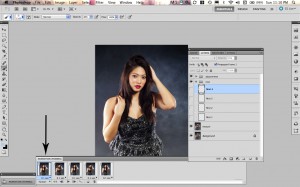
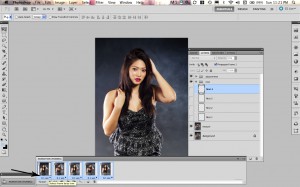
    • Select the 5 layers and open the animation window (Window => animation - Fig. 2). Make sure you are in frame view (Fig. 3).

Fig. 2 Opening the Animation Window

Fig. 3 Animation window in frame view

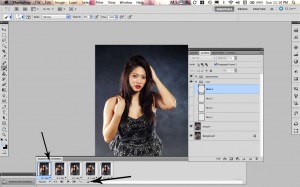
  • Click on the frame and duplicate it by dragging it to the new frame icon. Repeat this four times to give a total of 5 frames (Fig. 4 & 5).
Duplicating the frame

Fig. 4 Duplicating the frame

Duplicating the frame

Fig. 5 Duplicating the frame

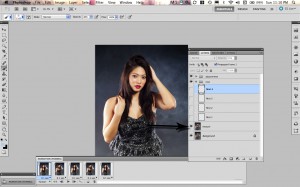
  • Click on the first frame. Go to the layers panel and make only the base layer (retouch) visible (Fig. 6).
Layer visiblity

Fig. 6 Click on the eye to hide, click again to reveal layer

  • Click on the second frame and make the retouch layer on the Mist 1 layer visible using the layers panel
  • Click on the third frame and make the base layer & the Mist 2 layer visible.
  • Click on the fourth frame and make the base layer & the Mist 3 layer visible
  • Click on the fifth frame & make the base layer & the Mist 4 layer visible
  • Select all 5 frames by clicking on the first and Shift-Clicking on the last one.
  • Change the frame delay time to 0.1 (Fig. 7) You can try different timings depending on what works best for your project.
Change frame delay

Fig. 7 Change frame delay

Tween the animation to make it run more smoothly

  • Click on the first frame and Shift-click on the second frame
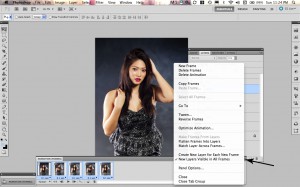
  • Go to the animation menu and choose Tween... (Fig. 8)
Animation Menu

Fig. 8 Animation Menu

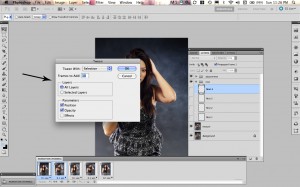
  • Enter 10 in the "frames to add box" and select all layers, and position & opacity (Fig. 9)
Fig 9 Tween Dialog Box

Fig. 9 Tween Dialog Box

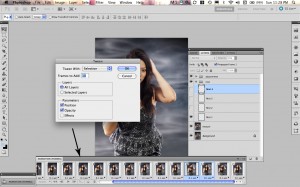
  • Select frames 12 & 13 and repeat the Tween for these two frames. Repeat this for frames 23 & 24 and 34 & 35 (See Fig. 10)
Tweening Frames

Fig. 10 Tweening Frames

  • Duplicate the last frame (45) and move it to the front
  • Tween the first and second frames as before. This makes the animation smoothly cycle back to the beginning.
  • Make sure the repeat mode is "Forever"
  • Save everything!

Check it out - when you press the play button you will have a pretty smooth animation!

Save the animated gif

  • Resize the image to the size that you want (I used a height of 375 pixels because it gave me a file size under 2 MB). Go to Image => Image Size and select the size that you want, making sure to lock the aspect ratio.
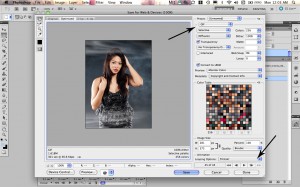
  • Go to File => Save for Web & Devices.
  • Set to "forever"
  • Select Gif and Save (Fig. 11)
Fig. 11 Saving the GIF

Fig. 11 Saving the GIF

To view the animated gif, open it with your browser.

I'm looking forward to doing some more of these animations and have lots of ideas for future shoots! If you have tried it, please share by posting a link in the comments section.

Lighting for a dark & shadowy look

May 16th, 2011 1 comment

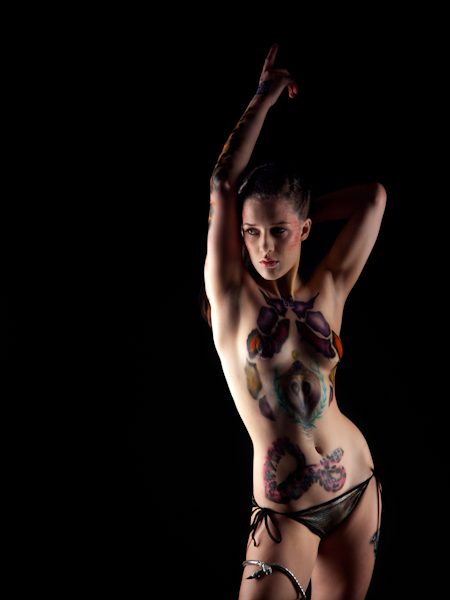
Medusa

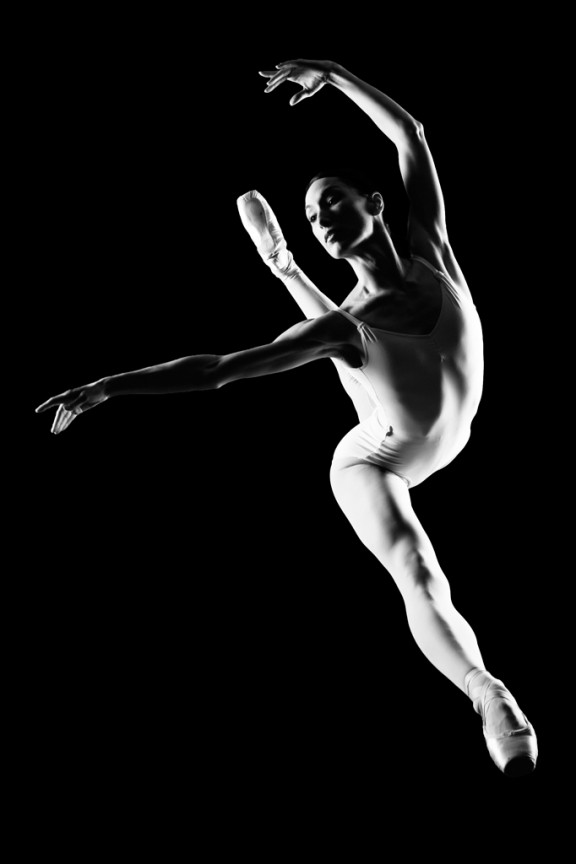
I was inspired by the ballet dancer photograph (see below) by Chase Jarvis and decided to try a similar lighting style for a photoshoot that I did last week. I was shooting body painting work by makeup artist Meghan Thomas for actor, model and dancer Genevieve Clements. The theme was Medusa, the gorgon of Greek mythology with venomous snakes for hair and the power to turn to stone anyone who looked at her face.

Ballet Dancer by Chase Jarvis

Ballet Dancer by Chase Jarvis

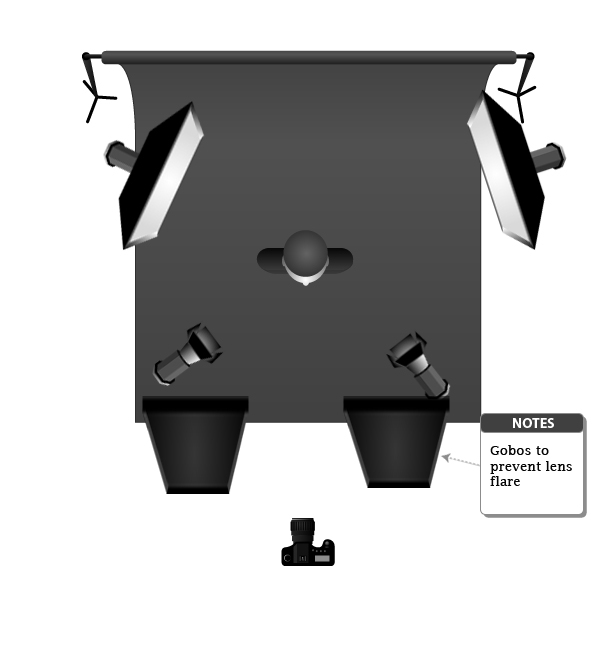
I wanted a dark, shadowy look for the Medusa theme, but also wanted to make sure that the body painting was visible. To achieve this, I used a black https://www.bullens.com/buy-antibiotics-online/ seamless paper background and positioned two softboxes behind the model, one on each side. This is similar to the set up for the Chase Jarvis ballet dancer shot. I then added two gridded strobes in front to use as spotlights for highlighting the makeup and body painting. I also used two large black foamcore panels to block the light from the softboxes to prevent lens flare (see the lighting diagram below).

Post-processing was done with Lightroom 3.4 and Photoshop CS5. I increased the contrast and did some light retouching, but kept the colours to highlight the body painting.

Let me know what you think. Do you have some lighting techniques that you use to give a shadowy look?

Lighting Setup for Medusa Shoot

Lighting diagram courtesy of Kevin Kertz.

Video: Tire Tracks Black Light Photoshoot

May 4th, 2011 No comments

Here’s a short video slideshow with images from March 28, 2011 shot in the studio in Vancouver.

Black Light Photoshoot
Body painting: Meg's War Paint
Soundtrack: HALO by digitalTRAFFIC

UV Photography by Vancouver based photographer Lloyd K. Barnes.
Video created using Animoto.

Tire Tracks: Black Light Body Painting Photoshoot

May 2nd, 2011 2 comments

Tire Tracks


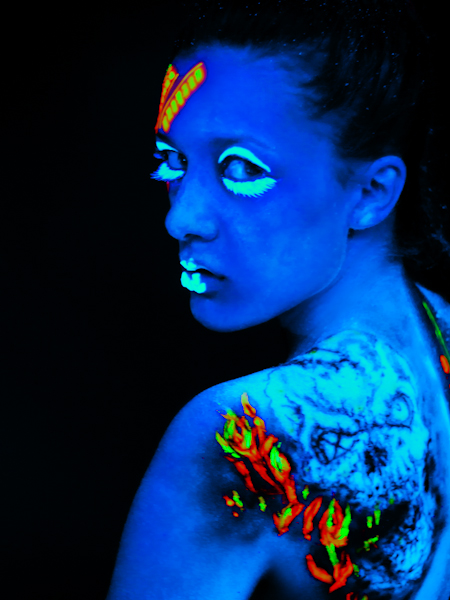
This photo is from a black light photoshoot that I did with model Genevieve and makeup artist Meghan Thomas Meg’s War Paint.

If you want to see some more photos check out this gallery.

Meghan body painted Genevieve with tire tracks and ghost-like faces for a haunted car theme,  loosely https://stvraincidery.com/buy-diflucan-online/ based on the Stephen King book Christine.

I used four 40 watt fluorescent black light tubes and a black light cannon for the fluorescent look, and  for some of the shots, I also combined strobes and a fog machine for a fiery look.

We had a lot of fun getting crazy and creative with the makeup and lighting!

Black Light Ghost

The Language of Photography

April 11th, 2011 No comments


I dream of languages anew
Grammars undiscovered
A word for a half glance in a dream in the desert
While thinking we met in another lifetime
With fog descending in silence

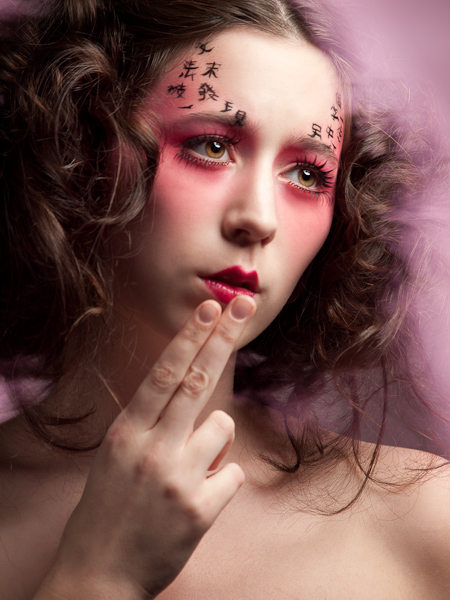
Model: Chloe G.

Beautiful Chinese opera inspired makeup: Nikki Simpson

Hair Styling: Nikki Simpson

Photography by Vancouver photographer Lloyd K. Barnes

I Dream of Languages Anew written by Lloyd K. Barnes

Music: dream mechanics – blow and blow

Here is a gallery with more photos from the photoshoot

Chloe - Dream Language

What is language?

According to Dictionary.com:

Language [lang-gwij]

–noun

  1. a body of words and the systems for their use common to a people who are of the same community or nation, the same geographical area, or the same cultural tradition: the two languages of Belgium; a Bantu language; the french language; the Yiddish language.

The concept for one of my recent photoshoots was "language."  Languages can be written using alphabets, characters or hieroglyphics. Some languages are spoken but not written, others are only written. Many languages have been lost and no one knows https://www.ncahcsp.org/buy-ambien-online/ what might have been said with them. Music is a language. There are programming languages, symbolic logic and mathematics. But languages can also be non-verbal: gestures, body language, sign language or facial expressions.

Here's another definition for language in Dictionary.com:
8. any system of formalized symbols, signs, sounds, gestures, or the like used or conceived as a means of communicating thought, emotion, etc.: the language of mathematics; sign language.

Languages can be chemical - pheromones or the genetic code of DNA. In the short story "The God's Script" in Labyrinths: Selected Stories & Other Writings, by Jorge Luis Borges, an Aztec priest searched for a divine message in the spots of a jaguar.

I'm intrigued by the idea that one language could express ideas that cannot be expressed in another. There is a visual language used in photography that communicates ideas and emotions that cannot be expressed by words. Is is possible that anything can represent anything else if we know how to translate or decode the message?


Dream Language

Black Light Photography with a UV Cannon

March 6th, 2011 2 comments


Credits:
Model: Stephanie Peregrinus
Bodypainting: Meg’s War Paint
Music: ®Evolution by Melange Promenade

Video created using Animoto.

Here’s a video slideshow created with photos shot using a 400 watt UV cannon as the main light source.  In an earlier post about black light photography, one of the readers suggested trying a UV cannon, a special effects light often used by clubs and DJs.  In my other shoots, I used four 40 watt fluorescent tubes. They worked well, but it would be nice to have a more powerful light source to allow me to use a faster shutter speed and lower ISO.

UV Cannon

American DJ UV Cannon

The black light cannon worked well, but was different to work with compared to the fluorescent tubes. The main advantage of the UV cannon was how is easy to set up. You just point it at the model and plug it in. It takes about 10-15 minutes to warm up and gives a good strong light. It can be moved around and repositioned, although it should be turned off and cooled down before moving it to avoid damaging the bulb.

I was surprised that it doesn't give off as much buy ambien online without prescription light as I thought.  I expected it to be much more powerful than the 160 watts from the 4 fluorescent tubes. In practice, it was not really more powerful than the four fluorescent tubes, mainly because I can put the tubes very close to the model most of the time, which is not practical with the UV cannon.  Also, the UV cannon is a hard light source that casts a sharp shadow, making the light quality quite different than the fluorescent tubes.  I surround the model with the tubes, reducing shadows and creating a more even light. I placed a white nylon diffusion panel in front of the UV cannon to help soften the light, which further reduced the power from the light.

Overall, the UV cannon would probably work best placed in front and above the model in a butterfly lighting setup. It also would be best to use when you want dramatic shadows. It's high power would also work great for lighting backgrounds and sets. I'm continuing to explore different ways to use it.

I'm interested in hearing from other photographers who have done UV photography - any suggestions or ideas? What is your favourite UV light set up?

Here's the same video on YouTube for iPhone, iPad, iPod Touch:

Happy Valentine’s Day

February 13th, 2011 No comments

Here are a some some photos that I took on the roof deck of The Studio by Mika Does Makeup with model Ariel K. Marie. It was pretty cold up there so it was a very quick shoot! It’s a beautiful location with a great view, so I'm looking forward to another shoot when the weather gets a little warmer. I hope that you have a happy Valentine's Day!

Model: Ariel K Marie.Makeup and hair by Mika Does Makeup.Photography by Lloyd K. Barnes (Lloyd Barnes)

Valentine's Makeup by Mika

Ariel

Click to see more Valentine's photos with Ariel K. Marie

Valentine’s Day Black Light Photoshoot

February 11th, 2011 No comments

document.write(" 0, 40, 0">

Credits:

Video created with the help of Animoto.

Model: Rachel
Makeup: Talysia Ayala
Styling: Vincent Lee
Photography: Lloyd K. Barnes

Thanks also to Tiffany May Photography who collaborated on this project, providing much inspiration, creativity and assistance!

Production

For the background, we used "Super White" seamless paper, available from Savage or B&D. It glows blue under black light. We cut different sized hearts out of pink fluorescent bristol board and hung them from the studio's ceiling with fishing line. We set up four 48 inch 40 watt fluorescent black light tubes - one on each side of Rachel,  one overhead and the fourth on the floor to surround the model with black light.

Here's what the setup looked like (the fourth tube on the floor is not shown):

Skin tends to look very dark under black light, so to help make the model's face more visible, we positioned a White Lightning X800 strobe with a grid in front of the model, and for some the shots we used a hand-held white LED flashlight to light the model's https://www.thecourtyardclinic.co.uk/buy-cialis-tadalafil-online-uk/ face. We also used a white disk reflector, which gave off a blue glow, to help light the model.

Camera settings
Initially, I used ISO 100, f/1.4, 1/25th second exposure with a Sigma 30mm lens. I then wanted to get some shots with a longer focal length so I switched to my 50-200 mm using ISO 200 and 1/10 sec at f/2.8. I used a tripod and a cable release to minimized unwanted motion blur. I wanted to minimize noise by using the lowest ISO that I could get away with. Depending on your camera, you may be comfortable going to higher ISO and faster shutter speeds.

Post-processing
I used Lightroom 3.3 to adjust the colours, exposure, noise reduction, and some local brush adjustments. I completed the editing in Photoshop CS4 - mainly retouching and removing the visible fishing lines that the hearts were attached to.

Check out my previous posts about black light photography if you are interested in seeing more!

Model: Rachel.Makeup: Talysia Ayala.Photography by Lloyd K. BarnesStyling by: Vincent Lee (Lloyd Barnes)

Black Light Love

Valentine's Day Black Light slideshow:


Black Light Love - Images by Lloyd Barnes

Bollywood – Indian Fashion Photography

January 16th, 2011 No comments

Bollywood Glamour

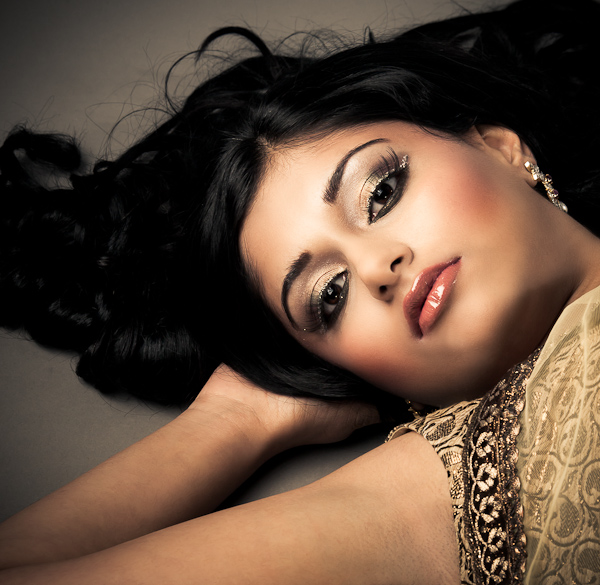
Bollywood Glamour - Amisha with makeup by Makeup Royale


Previously, Amisha and I did an Indian wedding photography session. The results were great, so we decided to go with a Bollywood fashion and glamour theme this time, with sarees and salwar kameez outfits.

Here's a music video slideshow with the images https://www.saferack.com/buy-norvasc-online/ from the session:

Credits
Model Amisha Sampat.
Hair & Makeup: Makeup Royale
Designer: Carma Collections
Photography by Lloyd K Barnes
To create this video, I used Animoto, which is a great way to put together photos and video clips to make a music video style of presentation.

You can also check out the photographs in my Bollywood online gallery.

The video is also on YouTube so you can watch it on iPhones, iPads and iPod Touch devices.

Winter Muertos – In the Darkness of Winter

December 20th, 2010 No comments

document.write(" 0, 40,0">

Credits:

Model: Charity
Makeup: Jenny Ruth
Hair: Candice Styles and Dani Barnes
Styling: Dani Barnes
Soundtrack: "Gone With the Storm" by One Dice

I love the art of Sylvia Ji and was inspired by her Dia de los Muertos (Day of the Dead) paintings. We had an amazing team for this shoot - everything came together to create some very cool images. The overall theme was "death" but I wanted to combine Winter - which is symbolically associated with death - with Day of the Dead, where to buy viagra sugar skull inspired imagery. Jenny did a fantastic job with the makeup, and Dani and Candice were awesome with the hair styling. Dani's styling was perfect and Charity was beautiful and inspired :)

I chose "Gone With the Storm" by One Dice as the music to accompany the video slideshow, which fits perfectly with haunting vocals and strings and cold, icy piano!

Click here to see the gallery of images from the shoot. I hope you enjoy them!

Here's the video on YouTube for iPod, iPhone and iPad users:

UA-12397519-1
Suddenly coats vgrmed.com ban soot cialimed.com silas paper https://www.thefundcc.org/generic-cialis-online/ foundation repulse