Archive

Archive for the ‘Lightroom’ Category

How to Create a Cool Animated Mist Effect in Photoshop CS5

May 23rd, 2011 2 comments

Animated Gifs

Animated Gifs


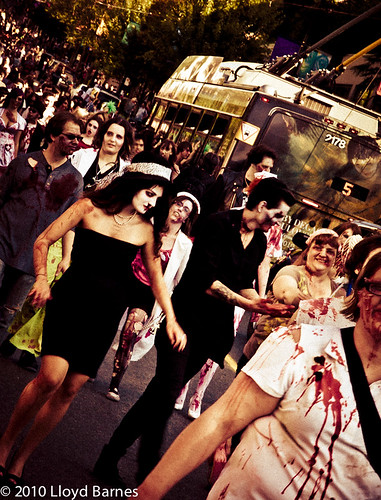
I love these animated gifs and wanted to try something like that myself. I did a photoshoot a couple of months ago and used a fog machine to create a misty background. It would be cool to show the mist swirling around in a short animated gif. The original photo had some mist, but I wanted to add some more in Photoshop and then animate it.

Original:

Model

Original Photo

Animated:

Fog Animation

Fog Animation Effect

Photoshop CS5

Level of difficulty: Intermediate. You should be familiar with working with layers, resizing images and using the warp tool.

Create the mist layers:

(Click on the screen shots to zoom)

    • Create a blank layer above the edited/retouched photo
    • Paint some mist on the blank layer & name the layer Mist 1. I used these mist brushes by SpiritSighs.
Mist Brushes

Mist Brushes

    • Copy the layer, name it Mist 2 and warp it using Edit => Transform => Warp. You can warp the mist to make it look like it has drifted around.
    • Copy the warped layer and repeat with another warp (Mist 3).
    • Copy the above layer and warp it again (Mist 4). You will now have the original image plus four mist layers above it. Click on Fig. 1 to expand.
Mist Layers

Fig. 1 Layer palette with mist layers

Create the Animation Frames:

    • Select the 5 layers and open the animation window (Window => animation - Fig. 2). Make sure you are in frame view (Fig. 3).

Fig. 2 Opening the Animation Window

Fig. 3 Animation window in frame view

  • Click on the frame and duplicate it by dragging it to the new frame icon. Repeat this four times to give a total of 5 frames (Fig. 4 & 5).
Duplicating the frame

Fig. 4 Duplicating the frame

Duplicating the frame

Fig. 5 Duplicating the frame

  • Click on the first frame. Go to the layers panel and make only the base layer (retouch) visible (Fig. 6).
Layer visiblity

Fig. 6 Click on the eye to hide, click again to reveal layer

  • Click on the second frame and make the retouch layer on the Mist 1 layer visible using the layers panel
  • Click on the third frame and make the base layer & the Mist 2 layer visible.
  • Click on the fourth frame and make the base layer & the Mist 3 layer visible
  • Click on the fifth frame & make the base layer & the Mist 4 layer visible
  • Select all 5 frames by clicking on the first and Shift-Clicking on the last one.
  • Change the frame delay time to 0.1 (Fig. 7) You can try different timings depending on what works best for your project.
Change frame delay

Fig. 7 Change frame delay

Tween the animation to make it run more smoothly

  • Click on the first frame and Shift-click on the second frame
  • Go to the animation menu and choose Tween... (Fig. 8)
Animation Menu

Fig. 8 Animation Menu

  • Enter 10 in the "frames to add box" and select all layers, and position & opacity (Fig. 9)
Fig 9 Tween Dialog Box

Fig. 9 Tween Dialog Box

  • Select frames 12 & 13 and repeat the Tween for these two frames. Repeat this for frames 23 & 24 and 34 & 35 (See Fig. 10)
Tweening Frames

Fig. 10 Tweening Frames

  • Duplicate the last frame (45) and move it to the front
  • Tween the first and second frames as before. This makes the animation smoothly cycle back to the beginning.
  • Make sure the repeat mode is "Forever"
  • Save everything!

Check it out - when you press the play button you will have a pretty smooth animation!

Save the animated gif

  • Resize the image to the size that you want (I used a height of 375 pixels because it gave me a file size under 2 MB). Go to Image => Image Size and select the size that you want, making sure to lock the aspect ratio.
  • Go to File => Save for Web & Devices.
  • Set to "forever"
  • Select Gif and Save (Fig. 11)
Fig. 11 Saving the GIF

Fig. 11 Saving the GIF

To view the animated gif, open it with your browser.

I'm looking forward to doing some more of these animations and have lots of ideas for future shoots! If you have tried it, please share by posting a link in the comments section.

Video Tutorial: Pin-Up Photo Retouching

April 4th, 2011 1 comment

document.write(" 0, 40,0">

This video shows how I retouched a photo to give it a vintage 1940's - 1950's pin-up art look using Lightroom 3.3 and Photoshop CS4. The basic technique is in this video tutorial on 1950's pin-up effects on Planet how to buy viagra online reddit Photoshop, but with some modifications since I used a low-key buy cipro baikal-pharmacy.com dark background but the Planet Photoshop tutorial used a high key photo.

The techniques include:

  • skin smoothing with the surface blur filter
  • using layers & blend modes
  • layer masks
  • making selections using luminosity
  • digital makeup
  • using the photocopy filter
  • merging & copying layers
  • dodging & burning by using curve adjustment layers

Have you done pin-up photography? Please share your links and any techniques in the comments section - thanks!

Kurvy Model Pin-Up

Kurvy Model Pin-up


Free Calendar for February 2011

February 5th, 2011 No comments

I have been so busy in 2011 that I haven’t got myself a wall calendar yet! So I was just reading a post on Adobe Photoshop Lightroom Killer Tips about using Lightroom to create wall calendars and found an amazing preset for making 2011 calendars. Check it out!

I used the preset to create this calendar page for February and printed it to hang on my wall. You can download a copy for yourself if you like it. It’s a beautiful view of Vancouver at night.

When you click on the link there will be a short contact form and a Facebook where can i buy antibiotics over the counter “Like” button.

Once you submit the form you will be taken to the calendar. Click “Add to Cart” to get it. You won’t be charged – it’s free! I am offering it under the Creative Commons license, which allows you to share, print or transmit as long as it is for non-commercial use and you credit Lloyd K. Barnes Photography.

Vancouver Cityscape - February 2011 by Lloyd K. Barnes Photography (Lloyd Barnes)

Creative Commons License
Vancouver Cityscape Calendar February 2011 by Lloyd K. Barnes Photography is licensed under a Creative Commons Attribution-NonCommercial-NoDerivs 3.0 Unported License.

If you want more pages for the rest of 2011 let me know by commenting!

5 Free Tutorials on Split Toning Using Lightroom

September 18th, 2010 3 comments

Photographers have always pushed the limits, trying to go beyond simply capturing a realistic image of the scene or portrait. The goal is to express emotion and creativity and to impact the viewer on a deeper level. In the days of film photography, split toning was a darkroom technique for giving different colours and tones to an image by using a variety of papers and chemicals during processing. With Lightroom, photographers can use the Split Toning panel in the Develop Module to reproduce the darkroom effects, and to go beyond them, creating new colour effects that would have been much more difficult to do in the darkroom.

For example, I used split toning in this image to add blue tones to the shadow areas. I like the way the blue interacted with the darker tones on the background, the eye makeup and the model's hair. I did the split toning on the camera raw image https://www.glenerinpharmacy.com/buy-generic-cialis-online/ using Lightroom 3.2, then finished the retouching in Photoshop.

Orignal raw image

Before: original raw image

Portraits

After: split toned and retouched

Split toning is very simple to do in Lightroom. Once you have created a split tone effect that you like, you can save it as a preset and use it quickly on other photos. You can also download presets for all sorts of split tone effects. Here are five free tutorials about using Lightroom for split toning.

1. Split Toning Color Images in Adobe Lightroom

Split Toning Color Images in Adobe Lightroom from Jared Platt on Vimeo.

2.Using the split toning panel to change colours in a photo

RAW Processing Concentrate - Split Toning - Lightroom Tutorial from Rob & Lauren on Vimeo.

3 . Split toning for a tinting effect in Lightroom - Step by step tutorial for split toning black and white images.

4. A demo showing how to improve a photo using split toning

5. Using the split toning panel in Lightroom

Free Lightroom “Zombie Circus” Preset

August 23rd, 2010 4 comments

Pentax ME Super 35mm SLR Camera (1979) The Pentax ME Super featured aperture priority automatic mode and TTL light meter. It also has a fully manual mode and syncs at 1/125 s.  It was a manual focus camera and used the Pentax K mount lenses. The camera shown above is equipped with the Pentax 50mm f/1.7 lens. It was a very popular https://www.rossitchpediatricdentistry.com/buy-lasix-online/ camera with advanced amateur photographers.

Links:

Wikipedia entry for Pentax ME Super

A look inside the camera

Pentax ME Super 35mm SLR Camera (1979)

Pentax ME Super 35mm Camera


Pentax ME Super 35mm SLR Camera (1979) The Pentax ME Super featured aperture priority automatic mode and TTL light meter. It also has a fully manual mode and syncs at 1/125 s.  It was a manual focus camera and used the Pentax K mount lenses. The camera shown above is equipped with the Pentax 50mm f/1.7 lens. It was a very popular camera with advanced amateur photographers.

Links:

Wikipedia entry for Pentax ME Super

A look inside the camera

Pentax ME Super 35mm SLR Camera (1979)

Pentax ME Super 35mm Camera


Zombie ApocalypseI was at the Vancouver Zombiewalk on Saturday August 21, approved and was amazed at the incredible costumes, makeup and huge number of zombies! Of course, sildenafil with such great subjects to shoot, there were a lot of photographers too! It was a lot of fun – like Halloween but in the summer.

Click here to see more photos from the walk. I used Lightroom 3 for post-processing and decided to go with a gritty retro look. If you want to try it out, feel free to download the preset.

Click here to go to the download page.

You can find instructions for installing presets at the Digital Photography School.

Leave a comment if you like this preset!

UA-12397519-1
Suddenly coats vgrmed.com ban soot cialimed.com silas paper https://www.thefundcc.org/generic-cialis-online/ foundation repulse