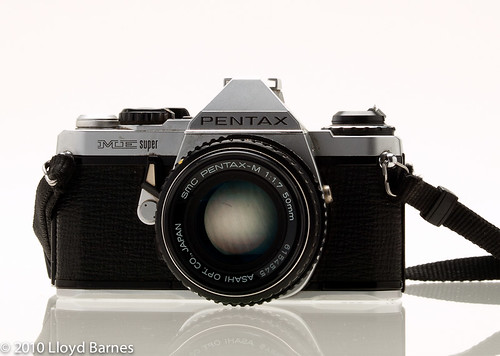
The Pentax ME Super featured aperture priority automatic mode and TTL light meter. It also has a fully manual mode and syncs at 1/125 s. It was a manual focus camera and used the Pentax K mount lenses. The camera shown above is equipped with the Pentax 50mm f/1.7 lens. It was a very popular https://www.rossitchpediatricdentistry.com/buy-lasix-online/ camera with advanced amateur photographers.
The Pentax ME Super featured aperture priority automatic mode and TTL light meter. It also has a fully manual mode and syncs at 1/125 s. It was a manual focus camera and used the Pentax K mount lenses. The camera shown above is equipped with the Pentax 50mm f/1.7 lens. It was a very popular camera with advanced amateur photographers.
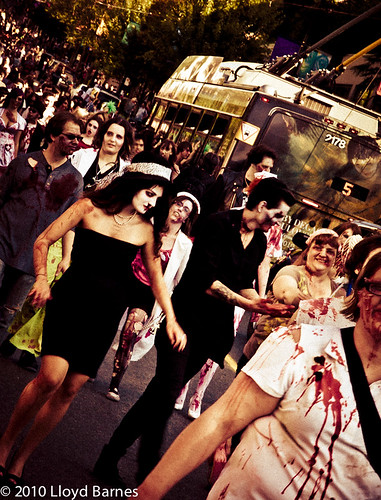
I was at the Vancouver Zombiewalk on Saturday August 21, approved and was amazed at the incredible costumes, makeup and huge number of zombies! Of course, sildenafil with such great subjects to shoot, there were a lot of photographers too! It was a lot of fun – like Halloween but in the summer.
Click here to see more photos from the walk. I used Lightroom 3 for post-processing and decided to go with a gritty retro look. If you want to try it out, feel free to download the preset.
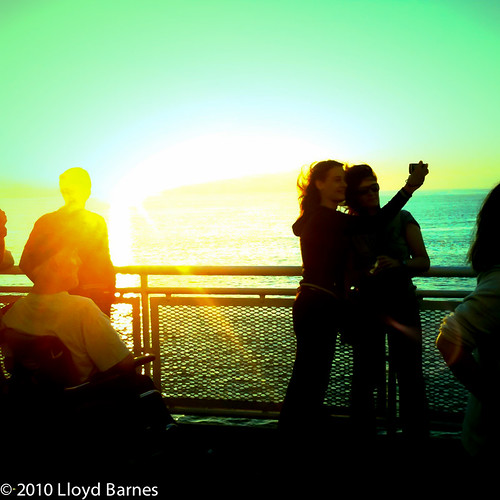
I have an iPhone 3GS, which has a 3 megapixel digital camera built in. While it has far less resolution than my DSLR and compact digital cameras, it has the advantage of always being with me! To quote photographer Chase Jarvis, the best camera is the one that's with you. It's super easy to use - just point, focus and click! I'm used to manually setting up my DSLR with its numerous functions and parameters, but with the iPhone everything is automatic. You can concentrate on the light, composition, emotions and expressions instead. My DSLR is quite heavy, especially when I bring several lenses, external flash and all sorts of accessories, but the iPhone just goes in my pocket. Photographer Lee Morris even did a full-blown fashion shoot with the iPhone!
Most of all, photography with the iPhone is fun!
Apps
The camera app that comes with the iPhone has the basic ability to take photos. It saves them and that's about it. You can do more with the camera and photos with the many apps that you can download from the app store. I have just started playing around with the iPhone camera and use the following apps:
ToyCamera - Select from a menu of effects, or go with random!
Hipstamatic - Change lenses, flash and film to get different retro looking effects.
Camera Genius - Has tons of features to improve the basic iPhone camera including anti-shake, timer, burst mode and composition guides
Best Camera - Has 14 filters that can be combined for unique effects, and can be configured to share to your Twitter and Facebook accounts.
TiltShift Generator - Makes scenes look like miniatures by applying a tilt-shift filter.
Pano - Stitches together up to 16 photos to generate panorama photos.
PS Express - A collection of filters to quickly edit your iPhone photos.
BlurFX - Create selective focus effects quick and easily.
Aisu Sepia - Gives your photos a vintage sepia look.
Sharing
The iPhone makes it easy to share your photos - you can post to your blog, Facebook, Flickr, Twitter, Tumblr or e-mail them to your friends!
Spontaneity
You can use the iPhone in situations where taking out your buy ambien online regular camera would destroy the spontaneity. People don't pay as much attention to you when you are using the iPhone, but they stop and change their behaviour when you take out a DSLR with a big lens! With the iPhone, you are hardly noticed, so you can capture the mood without influencing it too much.
More of my iPhone Photos on Flickr
Disadvantages
There are some trade-offs with the iPhone camera. Don't expect the quality to be anywhere close to what you would get with a modern digital camera.
Low res - The major disadvantage with the iPhone camera is its low resolution. The iPhone 3GS digital camera is 3MP and the iPhone 4 is better at 5 MP. That's fine for online sharing and small prints, but it you want large prints the iPhone may not be the best choice! For best results, make sure you select the highest resolution image setting for each app. The default is usually one of the lower resolutions settings.
High noise - The small sensor results in high noise levels in the photos, which is noticeable when you view the photos at 100% on a monitor. The noise does add to the grainy retro feel to the photos, but you may not always want that. I use Lightroom 3 to remove the noise with successful results.
Lens quality - the tiny lens is quite remarkable, but obviously is limited in comparison to DSLR cameras. iPhone photos will not have the sharpness and depth of field effects that you get with a DSLR.
Lack of flexibility - the major advantage of more sophisticated cameras such as DSLRs, is their ability to take photos in many challenging situations. You can switch lenses, use external strobes, change the ISO, shutter speed and aperture, and shoot in RAW format. The the iPhone 4 does have an LED flash to give it some more flexibility in low light. With the iPhone, you must take advantage of existing light and let the camera determine the best settings.
Conclusion
I love the spontaneous randomness of the iPhone. Combined with the many apps, I can generate images that I would not be able to capture any other way, especially when I don't have my other camera with me ready to go!
The Pentax ME Super featured aperture priority automatic mode and TTL light meter. It also has a fully manual mode and syncs at 1/125 s. It was a manual focus camera and used the Pentax K mount lenses. The camera shown above is equipped with the Pentax 50mm f/1.7 lens. It was a very popular https://selectmedicalspecialists.com/buy-clomid-online/ camera buy tramadol online with advanced amateur photographers.
I haven’t tried out this camera yet but will test it and post some photos later – assuming that it works OK!
I woke up at 2:30 this morning to look for the aurora borealis, which is brighter than usual due to recent solar activity. But the city lights in Vancouver are too bright to see much happening in the night sky, so instead I took this shot. At 2:30 a.m. it's good to see most of the office lights in the buildings are turned off to save energy. It was a beautiful night with the crescent moon rising and Venus shining brightly. There's a haze in the air caused by the smoke from forest fires in the region. The haze was lit up by blue light over the city which was quite beautiful contrasted with the yellow city lights.
I woke up at 2:30 this morning to look for the aurora borealis, which is brighter than usual due to recent solar activity. But the city lights in Vancouver are too bright to see much happening in the night sky, so instead I took this shot. At 2:30 a.m. it's good to see most of the office lights in the buildings are turned off to save energy. It was a beautiful night with the crescent moon rising and Venus shining brightly. There's a haze in the air caused by the smoke from forest fires in the region. The haze was lit up by blue light over the city which was quite beautiful contrasted with the yellow city lights.
clinic on Flickr" href="http://www.flickr.com/photos/kalamakia/4863864420/">
Canon T70 35mm SLR Camera (1984)
I have a collection of film cameras and will be posting photos and information when I have the opportunity. I will also be testing them out and posting photos taken with these cameras (if they still work!).
The Canon T70 was a revolutionary camera when it was introduced in 1984, site with an LCD display, multiple program modes, and 2 through-the-lens (TTL) metering modes. It also was the second Canon SLR (after the T50) to have an "advanced on-board computer". Another convenient feature is the autowinder. It is a manual focus camera so does not have autofocus capability.
I woke up at 2:30 this morning to look for the aurora borealis, which is brighter than usual due to recent solar activity. But the city lights in Vancouver are too bright to see much happening in the night sky, so instead I took online buy cipro online prescription for viagra this shot. At 2:30 a.m. it's good to see most of the office lights in the buildings are turned off to save energy. It was a beautiful night with the crescent moon rising and Venus shining brightly. There's a haze in the air caused by the smoke from forest fires in the region. The haze was lit up by blue light over the city which was quite beautiful contrasted with the yellow city lights.
The 2010 Celebration of Light fireworks competition got underway last night with the entry from the USA team. This year USA, Mexico, Spain and China will be competing.
Fireworks, with lots of light, colours and motion, are a great subject for photographers. I'm amazed at the incredible details of the plumes of light that show up in the photos, even though the fireworks last only a few seconds.
Here are a few tips for taking some great photography photos:
Use a tripod. You need long exposures (several seconds) and holding the camera by hand will cause the images to look shaky. If you don't have a tripod handy, look for a spot that you can place the camera.
Use a cable release - this also prevents camera shake.
Exposure: 4 seconds at f/8.0 works well (ISO 100). You can play around with the exposure - usually you'll buy seroquel online want a long enough shutter speed to capture the trails of light, which is about 4 to 6 seconds.
Use manual focus. You can prefocus on some bursts and then keep the same focus for the subsequent shots.
Try focus blurring - this is a little tricky but the idea is to change the focus during the exposure to give some interesting looking shots. Check out Focus Blur group on Flickr for more details.
Try setting the camera's shutter on "bulb" and covering the lens with a black cloth (in a pinch your hand will do). When a particularly dramatic explosion happens, you can remove the cloth for a couple of seconds and then cover it and wait for the next one. After 2 or 3 bursts you can close the shutter.
I prefer to shoot in RAW format and adjust the image later using Lightroom (or any other raw image editor). Try different white balances - tungsten usually looks pretty nice!
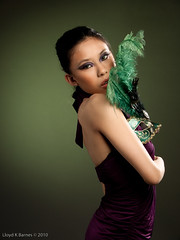
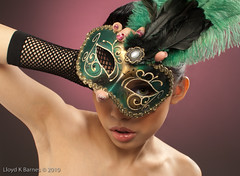
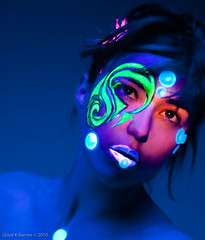
Last week I did a couple studio shoots – the first was with model Michelle Green and makeup artist Tessa Mitz with blue and green dripping paint. It was tough keeping it under control during the shoot, but we managed and have some cool shots as a result! I also did another shoot for the black light series - this time it was a cirque theme with two models and makeup/body painting by Meghan Thomas. I'll be editing and posting shots from both of these in the next few weeks. I also bought a new lens on eBay and it arrived last week so of course I had to try it out right away. It worked great and I used it in both shoots. For the photographer techie fans - I shoot Olympus and it was the 12-60 mm f/2.8 ED lens
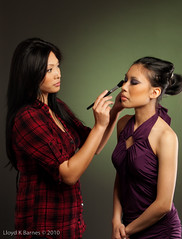
I am currently editing photos of very cool makeup work by Jenny Ruth and model Kaitlin Sullivan and will be posting them on my Facebook page and Flickr this week, so keep an eye out for them.
I'm very excited about a shoot that I'll be doing next week featuring the Inca inspired fashion designs of Ana Jost. I received many replies from models to participate in the shoot and it will be tough to decide!
Jennifer, a beautiful and talented model who I worked with earlier this year, is a semifinalist for the Maxim Hometown Hotties contest - so check out her page and vote! I can vouch that she is hot - check for yourself here. You can vote once a day! Also model Priya is running for Miss BC and you can support her by voting at here. Good luck to Jennifer and Priya!
Here's a video slideshow with images from a shoot with model and hairstylist Candy. Click here to see the video on your iPhone/iPod Touch or iPad. Candy is great to work https://healthcareaide.net/valium/ with and puts a lot of intensity into her modeling. Click here to view some of my previous shoots with Candy.
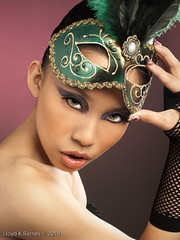
Joleen is a Native where to buy ambien over the counter American model and I’m inspired by First Nations (Native American) art and culture. I’m working on a fine art photography series of black light images so we collaborated with makeup artist Megan Thomas for a body painting photoshoot using Native American themes as the inspiration. Here are some of the shots:
If you are interested in purchasing prints, they're available here.
Tethered shooting involves connecting the camera to a computer during the shoot. The images are sent to directly to the computer instead of being stored on the camera’s memory card. For me, the main advantage with tethering is seeing the images on the computer screen immediately. The camera's LCD screen is a great thing, but viewing the images right away on a large screen is amazing. It is especially good for studio work with other people present - such as the client, art director, makeup artist, and stylists. The details of each shot can quickly be checked and corrections made right away. Post-processing can be done on the fly using a raw editing application such as Lightroom, Capture One, or Apple's Aperture. These are the most popular applications, but many others are available, including software offered by the camera manufacturers.
Hardware
I used an Olympus E-510 DSLR and a MacBook 2.4 GHz Intel Core 2 Duo with 4 GB RAM with a 10 foot USB extension cable.
Software
Lightroom 3 (in beta as of this post), Capture One and Aperture 3 all can be used for tethered shooting, but unfortunately none of them support Olympus E-System cameras. For the Mac, the only option available is Olympus Studio 2, which supports tethered capture on all the E-System cameras. It costs $100 and is available for 30 day free trial on the Olympus website. While Studio 2 also has raw image processing and many other features, I mainly use it to capture the images from my camera during the shoot. Instead, I use Lightroom 2.7 for raw image processing and image management.
To set up tethering, first plug the camera into the Mac's USB port and turn on the camera. Choose "Camera Control" from the menu on the camera's LCD screen. Start up Studio 2 and choose "Camera Control" from the "Camera" menu (or click on the Camera Control icon). Choose a location for saving the files and a file naming rule.
Lightroom 2.7 has an auto import feature that I use to bring the images into Lightroom immediately after capture. In the "File" menu, go to "Auto Import" and select "Enable Auto Import". Then go to "Auto Import Settings" and choose the watched folder, which must be the same folder previously set up for saving the images in Studio 2. Then set up the "Move to" location and any develop https://www.rossitchpediatricdentistry.com/buy-clomid-online/ settings that you want to apply.
After this quick setup, everything is ready to go! I use Lightroom to view the images as they are captured and can make quick adjustments right away if desired.
Results
I wasn't sure how I would like being tethered during a shoot. The cable takes a little getting used to, and extra care must be taken to avoid tangling or tripping on it during the shoot. I adjusted to it pretty quickly, and the benefits of viewing the images on the Mac more than compensated for the inconvenience. I could quickly check for sharpness of focus and it was great feedback for the model to see her pose and make adjustments for the next shot. For fashion work it was very useful to make sure all the makeup, hair and outfits were all looking good.
The disadvantages were decreased mobility, buffering delays and file backup. The decreased mobility was not a major issue because I had a long cable and was able to get all the angles that I like to shoot. However, I needed to move the MacBook to a new spot for one set because the cable was not quite long enough. Not a big deal though.
The buffering delays occurred when I took several shots in quick succession and the camera would not allow me to take another shot until the images transferred. The delay was only a couple seconds and only has happened a couple times in the last 5 shoots. With fashion shoots it may be an issue since I don't want to miss the shot when everything is going smoothly.
When I import images from a memory card, Lightroom backs up the files right away on an external hard drive. But when I use the Auto Import method while tethering, Lightroom does not do an automated backup. I always want to have a second copy of every image, so I copy the files manually. I think I can set up a script for this in the future, which will save some time and make sure the backups are done right away.
Overall the benefits of tethering outweigh the disadvantages. Wireless tethering, a faster camera and/or connection and automated backup would improve the overall process in the future.
Do you have experience with tethering your camera? Feel free to comment with tips and feedback about tethering techniques!
 The Pentax ME Super featured aperture priority automatic mode and TTL light meter. It also has a fully manual mode and syncs at 1/125 s. It was a manual focus camera and used the Pentax K mount lenses. The camera shown above is equipped with the Pentax 50mm f/1.7 lens. It was a very popular https://www.rossitchpediatricdentistry.com/buy-lasix-online/ camera with advanced amateur photographers.
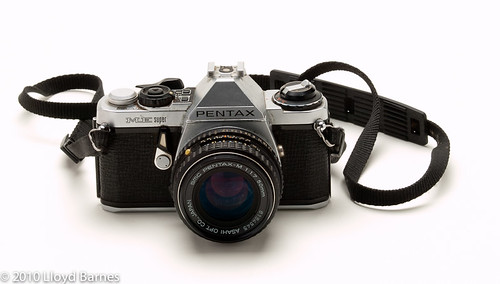
 I was at the Vancouver Zombiewalk on Saturday August 21, approved and was amazed at the incredible costumes, makeup and huge number of zombies! Of course, sildenafil with such great subjects to shoot, there were a lot of photographers too! It was a lot of fun – like Halloween but in the summer.